Thursday, October 28, 2004

Chicken Fajita

Okay...Ting-aling also had a series of turkey recipes recently. It's now my turn...with chicken...haha!


One thing that was not quite common in the Philippines is dealing with leftovers for days...because it is seldom to have any (what else can you expect in an extended family?), and if there is, it is usually eaten up for merienda.


Another way that I thought of using up the leftover chicken was to make a fajita. Especially good when I have only myself to feed, usually during lunchtime when the kids are at school and hubby is working.


I got a taste of chicken fajita first at a KFC outlet in SM City Annex. It fell short of my expectation. I just considered having it because it looked so much like shawarma (the best one I tasted had roasted tomatoes and sour cream to which I added hot sauce). I did not like the fajita they had at KFC. But now I considered making my own.


I roasted a whole ripe tomato (broil on high) for 5 minutes, then heated the flour tortilla and the meat. I mashed the tomato,


with a big bite!added a slice of white cheese, a tablespoon of tomato salsa (which I canned), a dollop of sour cream, then added shredded veggies (leftover from taco dinner).

Then I rolled it and wrapped in wax paper (for less messy handling)...hmmmm, simple yet filling! And healthy too!


Chicken Quesadilla

I was looking for more ideas to use up leftover chicken (from roasted chicken) since it seems like we will be having this at least every other weekend (that's how much my hubby loves it). Then I came across Ting-aling's post on turkey and shrimp quesadilla, then stumbled upon thess' . So now I got ideas on how to make it. Then considering my husband's favorite order at Friendly's is chicken quesadilla, I asked him what the ingredients he detected in that. Knowing his taste buds, I expected nothing more than a mixture of chicken breast and different cheeses sandwiched between the flour tortilla. So I gathered all the cheeses. I cubed Monterey Jack cheese,


Then I layered mozarella, blended chicken, cheddar and MJ cheeses then another layer of mozarella. I added a dash of paprika, salt and pepper. This one is for my hubby.


The next pair of flour tortilla had added chopped bell peppers and onions. That was for me and my kids.


I then baked at 250 for 10 minutes. My kids loved it. My husband could not finish the whole thing so he brought half of it to work the next day. He used the microwave and heated it up til the cheeses were all bubbly and he said it was delicious! (Ah, so that meant that my conventional oven-prepared quesadilla was not heated enough for him????) Lesson: Next time I do this, I will use the microwave and let the cheeses melt until they bubble. Posted by Hello


Monday, October 25, 2004

Canning PASTA SAUCE

I canned a total of 4 bushels of those big heavy deep-red tomatoes (not counting the smaller tomatoes which are better canned whole or used raw in salsa). Quite expectedly I experimented with different recipes for pasta or spaghetti sauces. After several experimentations, I came to the conclusion that the easiest thing is to make them all into standard tomato sauce, then just add the other ingredients to convert them into pasta sauce according to my taste. You see, this recipe here does not give the taste that I really want, because most of the concern of the developer of these recipes is to come up with a mixture that will ensure the pH that will least encourage the growth of Clostridium botulinum. I mixed together 1 pint of standard tomato sauce with a pint of Italian Seasoned Tomato Sauce and came up with the most delicious yummy pasta sauce I have ever had. The procedure is actually quite standard, with variations only in the style of cooking (stewed tomatoes prepared differently from pasta sauces). So for purposes of demonstration, I am featuring this here. My personal preference at the end of my canning season is just to make standard tomato sauce then add ingredients as I cook the meal. The standard tomato sauce is easier to prepare, requires no other veggies so it maintains its acidity and therefore is not subject to dangers of botulism. For more information on preserving tomatoes, click here.

Ingredients

3/4 cup chopped onion
3/4 cup chopped celery
4 cloves garlic, minced
2 tablespoons olive oil
20 pounds tomatoes
3 bay leaves
2 tablespoons brown sugar
2 tablespoons oregano
2 tablespoons parsley
1/4 teaspoon crushed red pepper (I lessened the original amount asked for, for my children's sake)1/2 teaspoon black pepper
Bottled lemon juice

Instructions

Prepare Ball® or Kerr®jars and closures according to instructions found in Canning Basics. Since this is a combination of tomatoes plus other vegetables, it is considered low-acid food, and therefore, caution against development of botulism is warranted.

Core and quarter tomatoes.


Cook onion, celery and garlic in olive oil, in a large saucepot, until transparent.

Add some of the tomatoes, then transfer this


and the remaining ingredients to saucepot.

Simmer mixture about 2 hours, stirring occasionally.


Remove bay leaves. Put tomato mixture through a food mill or sieve to remove seeds and peel.

Return puree to saucepot and cook, uncovered, over medium-high heat until sauce thickens (usually down to half of the original volume of pureed mixture). Stir frequently to prevent sticking.


Add 1 tablespoon bottled lemon juice to each pint jar. Carefully ladle hot sauce into hot jars, leaving 1/4-inch headspace.

Wipe jar rim clean with a damp paper towel or cloth to ensure smooth sealing.


Place lid on jar with sealing compound next to glass.

Screw band down evenly and firmly just until a point of resistance is met-fingertip tight.


Place in the canning rack and lower into the boiling water. Add more water as needed, making sure that water level is about 2 inches above the lids.

Process at least 40 minutes in a boiling-water canner. Make sure that the water is boiling fully and refrain from opening the canner while processing.


Making sure that there is no draft inside the house, remove the jars one by one from the canner and place on a towel on the countertop, with at least 1 inch space between each jar. Cover with another towel and leave alone for at least 12 hours.

Check for failure to indent, a sign of non-sealing. This photo is a combination of canned pasta sauce and spaghetti sauce that I made. Notice the jars that are less than the required volume, and the jar with a different cover. I don't bother processing that jar with half the content. I use it up right away. A batch of tomatoes that I process that results only in 1 or 2 quart jars I also do not process anymore. Instead, I place it inside the fridge and consume within 2 weeks. Or I may transfer to a freezer bag and use within 1 year.

Here's how I stack them in the freezer. When I transfer into freezer bags, I squeeze out as much air as I can to create vacuum and lessen the chances of freezer burn. Then, once frozen, I lay them flat on a baking sheet for organized stacking. By then I can stand them upright like books or just pile them up higher.

I confronted my hubby about whether the quality of the pasta and tomato sauces rivaled those in the grocery store, because if not, I would rather not spend this much time processing these tomatoes. It can be quite tiring and power-consuming. I wanted to see if it was worth the effort. I might be biased, but I love my home-made sauces. Hubby said they were yummy indeed, but if I tire so much canning them, it might still be more cost-effective to buy from the store. (Quite hard to assess whether it was bola or truth. It might be that he did not want to hurt my feelings.) Then recently we watched on History Channel a documentary on how tomatoes are harvested and processed immediately. Oh well...most of my canning this year was out of curiosity on how it was done, on what would be the result (I have no doubt that home-made jams and jellies are better than store-bought, but I doubt that canning veggies are worth the trouble), and having the produce on hand from my garden. I might plan my garden otherwise next year, probably less tomatoes, more berries, same cucumbers, etc. I will probably plant several other veggies good enough for freezer storage for the whole year.Posted by Hello

Wednesday, October 20, 2004

What's in the Meat You Eat?

I saw an ad in Time Magazine about the Union of Concerned Scientists that is why I visited the place. They have several sections of interest, but I focused on the food for interesting reads which I can post here.
One of the articles focused on the use of antibiotics on livestock and poultry that may contribute to development of antibiotic-resistance among patients/people.
Did you know that approximately 70 percent of all antibiotics and related drugs

produced in the United States are given to livestock and poultry? These

drugs

are used for nontherapeutic purposes such as accelerating growth and

preventing

the diseases caused by overcrowded and unsanitary conditions on

"factory farms."

Unfortunately, this practice results in

antibiotic-resistant bacteria that can

cause difficult-to-treat diseases in

humans.


Read the whole article by clicking on the title.


The food section also features a Gallery of Foodborne-Illnesses.


There is also a discussion that addresses the risks of genetically engineered foods.


And I am more intent to learn more about Sustainable Agriculture. I may just continue my gardening in the future years, and I may try to learn how to raise my own pig/chickens/beef. I am glad I have something to start with - a family that grew up farming.


Other non-food related topics can be found on the said website - vehicles, environment, energy and security. I signed the Consumer Pledge to Reduce Antibiotic Use. I hope you will too.

Tuesday, October 19, 2004

Making Pie Crust - My first attempt

Last year I wanted to try making an apple pie. But I did not know how to make the crust. I searched the website which I trusted to give the best tips on how to make one: King Arthur Flour. And I found their Favorite Pie Crust Recipe, which explained their method first before they gave their ingredients list. At first I found it too complex. So, I shook off my dream to bake a pie that year and tried another apple recipe, which I liked but my hubby found so-so (anything new to him is not that welcome. I was surprised he liked my adobo, kaldereta, and chicken curry at all!).


Now, with the recent trial in making empanada which met success at least with the group we had during a friend's birthday celebration, I gathered enough courage to give the recipe a second look and to finally try. The empanada pie crust was very similar anyway. But the method given by KAF resulted to a more pliable, yet tender and flaky crust that my hubby dubbed as "perfect" and "better than store-bought" ("Don't show that to Mom. She'd have a fit!" What a compliment.) My apple pie tasted good to my husband, but not to me nor to my kids, as we are not that used to super-tart/sweet combination in pies. So, in this post, I would share only my pie crust making, as I am still in search of pie filling recipes that will reach a compromise between my taste and my husband's (the kids like it sweeter, just as I do). Maybe the long-time Pinay expats can give me some.


Why do I want to make my own pie crust when we can buy it from the store? One thing is that I believe that making from scratch is more economical, given that I have plenty of time to experiment. Second, I like the challenge. Third, if I can come up with something better than store-bought (like my whoopie pie), then why not? Fourth, it might be a source of additional occasional income in the future if I find a market for my goods. (A note to drstel: My friend who celebrated her birthday was asking for a session in empanada, because her co-worker's family had been bugging her to teach them the recipe!) And fifth, if I can teach my kids the how-to's of such favorites, then it will be a tradition to be passed on (a good way to share quality time with the family).


Okay on to Pie Crust Making:


(I compared recipes of two-crusted pies with that of KAF, and I chose one that used both vegetable shortening and butter (like in KAF), but I incorporated 1 tbsp vinegar (as in KAF, but not in the recipe I used) and eliminated KAF's use of their special flour (I used regular all-purpose flour, which I had in my pantry) as well as the buttermilk powder (I did not have it; it was optional anyway.) I got the recipe from All-Recipe's website. It also had sugar (not in KAF, but I liked it so after having tried the empanada crust of drstel). Then I added a touch of eggwash (1 egg slightly beaten + 1 tbsp sugar + (optional) 1 tbsp cream or milk) like I did with the empanada.


Ingredients:

2 1/2 cups white flour

2 tbsp sugar

1/4 tsp salt

1/2 cup cold butter

5 tbsp cold vegetable shortening

1 tbsp cold cider vinegar

7 tbsp (or so) ice water
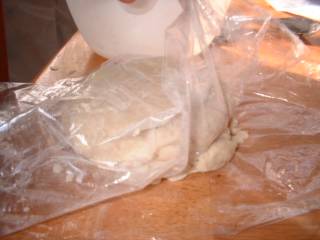
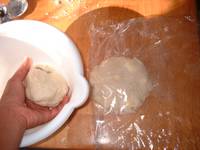


Instructions:


Whisk together all of the dry ingredients, reserving a few tablespoons of the flour. Cut in the vegetable shortening, working the mixture until it’s mealy and crumbly. (I did not include photos here of the initial steps. That would be redundant. Just look at the chicken empanada recipe.)


Place the reserved flour on your work surface, and coat the butter with the flour. Use a rolling pin or the heel of your hand to flatten the butter till it’s about 1/2-inch thick. Break this flour-coated butter into 1-inch pieces, and mix it into the dough, just till it’s evenly distributed; some of the pieces of flour-coated butter should break into smaller pieces.


Sprinkle the vinegar first then the ice water (may use more than 7 tbsp) over the dough while tossing with a fork. Just as soon as the dough becomes cohesive (i.e., you can squeeze it into a ball easily), stop mixing; there should still be visible pieces of fat in the dough. Make two balls and flatten the dough balls into disks and wrap them in plastic wrap or waxed paper.


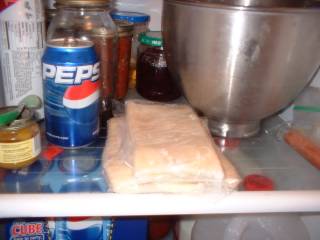
Refrigerate for 30 minutes or longer; this resting period allows the flour to absorb the water, making the dough easier to roll out.


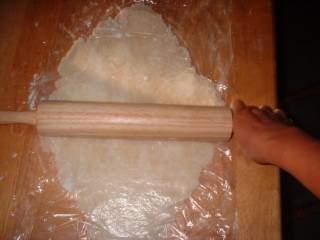
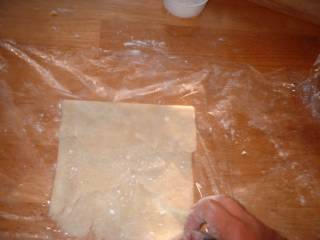
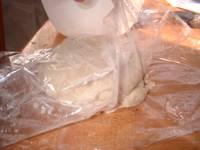
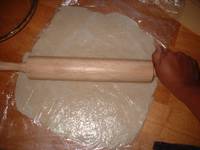
Flour your work surface and roll the dough into a 12 x 9-inch (approximately) rectangle. If it isn’t holding together well, sprinkle it lightly with a couple of teaspoons of water. (I intermittently sprinkled lightly with flour while rolling, so it will spread out easier despite the clinginess to the plastic.)


Fold the dough into thirds (like a letter),


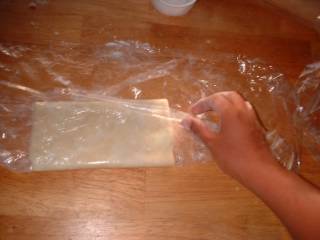
then fold it into thirds the opposite way, to form a rough square.


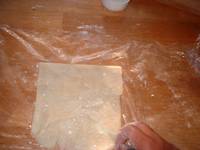
Do the same with the other disk.


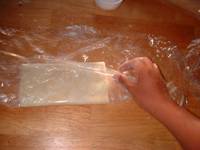
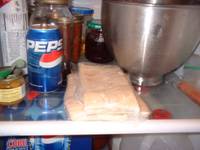
Wrap them well and refrigerate again.


When you’re "ready to roll," remove the dough from the fridge. Dough made with a combination of butter and shortening should rest for about 5 minutes at room temperature before rolling.


Roll the dough between sheets of plastic wrap or waxed paper to the size needed (about 13 inches for a 9-inch pie). Chill in its plastic wrap or waxed paper until ready to fill.


Pre-heat the oven to 425 deg F. Prepare your filling. (I chose not to post the apple pie recipe that I tried here since I did not like it. It was too sour for me, but my hubby liked the tartness that was in contrast to the sweetness of the sugar, though he admitted it was a bit too sour, and suggested that it was probably the McIntosh variety that made it so, then added that probably next time I should use the Cortland variety or use more sugar. I intend to do both next time.)


Place one dough onto the pie plate; peel off the plastic wrap (or wax paper).


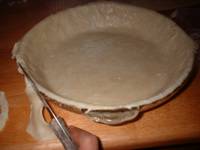
Cut the edge with a knife or the handle of a spoon.


Pour the filling into the middle; shake to distribute around.


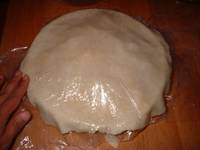
Cover with the other disk; peel off the plastic (See how easy it is to maneuver with plastic?)


Decorate the edges by pressing with fork (or use your thumb; whatever suits you). Pressing also seals the two disk doughs together. Trim away the excess dough.


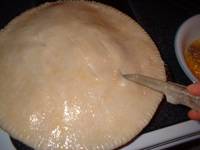
Brush the top with eggwash (I make mine the same way I do with my empanada: 1 egg slightly beaten with 1 tbsp sugar; may add a tbsp of milk or cream)


Cut several slits (you may want to decoratively slit, as in orient the slits as to create an asterisk effect. Don't copy what I did here). These will be vents for steam to escape through.


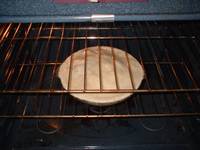
Bake in the middle shelf of the oven as instructed in the recipe you are following (mine said 40-50 minutes or until crust is brown and juice begins to bubble through slits in crust).


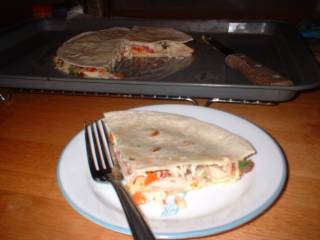
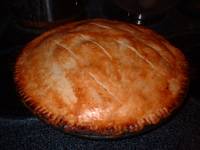
This is how it appears after baking. Bulge in the middle will disappear upon cooling down. Set on the cooling wire rack for several minutes until comfortably warm to eat.


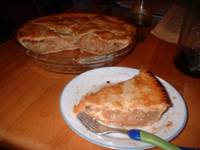
I am not saying this is the perfect way to do it. I just followed the instructions by the authority in baking at King Arthur's website and it turned out "perfect" for my hubby, and I was satisfied with it so I am sharing this here. If you have better ways, maybe you can share yours, too.


The cut pie reminded me of longed-for BUKO (coconut) PIE. Now I wanted to ask my fellow pinay expats if there's any chance I can make coconut pie a la Laguna style even if I am here, probably with the use of dried coconut meat (if there's any) or fresh buko (where can I find one?) and if you have a recipe to share (because I really don't know how to make buko pie)? Also if you have tried and tested recipes for fillings which uses other fruits, can you share or provide links to them? I would appreciate it if I would be spared the trouble of trying, like I did with this one. Posted by Hello


UPDATE as of January 15, 2005.


This update is a result of correspondence with isabelo.


What I do now with my pie crust recipe is I use pork lard (I have a post on that, too) while I have it, in place of the vegetable shortening. Malapit na maubos ngayon, haha!


Then while you are rolling, once in a while you peel off the plastic and sprinkle some more flour on top of the dough, then place the plastic and roll again. This way, while you flatten the bits of butter/shortening/lard, you also have a thin layer of flour above them, so that when you finally bake them, they are formed as flaky sheets. I realized that this pie crust recipe can also be used for empanadas. So when I make a pie and have extra crust that I cut off from the overhang, I form it into balls for empanada making. I place in airtight bag until I am ready to make the empanadas, either making another batch of pie crust recipe, or using leftover doughs from making pies. Don't let them openly exposed in the fridge or they will dry up and will be brittle -- hard to roll.


When I make empanadas, I have a sheet of baking pan inside the fridge, ready to receive the empanadas as I make them, this way the butter does not melt, so that when I am ready to bake them and brush the eggwash on top, it will be "dry" (the butter won't get incorporated/dissolved in the eggwash).


I have also been freezing some of the extra empanadas, kept airtight in ziploc bags. When I want to bake only 3-4 pcs (one for me and my boys for merienda purposes), I use the oven toaster (I asked that from hubby last Christmas; I saw one big enough for just $12 at Sear's), set at 400 deg F for 15 minutes or until I see the crust's butter bubbling and crust gets golden brown. Then I lower the heat to 325 and bake to further heat the innermost filling for about 5 minutes more. Instant and saves energy!
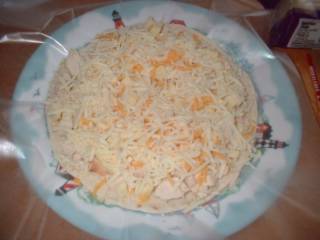
Friday, October 15, 2004

Lemongrass

Remember my Baked/Roasted Chicken recipe? I used lemongrass (tanglad) there.The I thought maybe some readers don't know what it is, so I am posting about it while I am thinking about it, especially that my hubby always buys roaster chicken now (he really loves my baked chicken!)


My friend Ana divided her plant and gave half to me. I place in in a potting plant and nurtured it. Then during winter, Ana and her spouse spent the season in a less colder place, and her indoor plants were taken care of by her sister-in-law, who watered them as needed. However, she forgot to lock the door, which was blown open by the wind, killing all Ana's indoor plants. Good thing that I have propagated mine (so that I have made two pots already). And in several weeks I can further divide the two pots. Now I wonder what I will do with my extra plants? I hope I will meet more Pinays in my area to whom I can give my excess plants/produce. Posted by Hello


So maybe some of you will decide to plant one inside the house, too. It's quite easy to maintain. Just have a handy small bag of Miracle-Gro and water it (with the fertilizer, prepared according to the instruction) weekly or so depending on the dryness of the soil. When handling it, be careful as the blades are quite sharp and can cut your skin easily.


Tuesday, October 12, 2004

Concord Grape Jelly

This is concord grape. I had about 2 pounds or more of these bunches about a week before the first frost hit us. Then I waited for the second batch, which I made the morning right after the first frost (a friend's mother-in-law told me they taste better after frost).

1 big colander is equivalent to more than a pound of them, but I had to wash, remove the green ones (choose only the most purple ones) to make into grape jelly.

Ingredients:
5 cups prepared juice (about 3-1/2 lb. fully ripe Concord or you may use other loose-skinned grapes)
1-1/2 cups water
1 box Fruit Pectin (Sure-Jell or Ball Brand)
1/2 tsp. butter or margarine (optional)
7 cups sugar, measured into separate bowl

Preparing the juice:

STEM and crush grapes thoroughly, one layer at a time. Place in large saucepan; add water.

Bring to boil. Reduce heat to low; cover and simmer 10 minutes, stirring occasionally.

Place 3 layers of damp cheesecloth or jelly bag in large bowl. (I had none at the time. I improvised using a clean old pillowcase with a small cheesecloth sandwiched inside.) Pour prepared fruit into cheesecloth.

Tie cheesecloth closed; hang and let drip into bowl until dripping stops. Press gently (If you squeeze hard, you might end up with turbid jelly). Measure exactly 5 cups prepared juice into 6- or 8-quart saucepot.

(I did this juice preparation at night and let it drip overnight. Then I proceeded with the next step the next morning)

Making the jelly:

BRING boiling-water canner, half full with water, to simmer. Wash jars and screw bands in hot soapy water; rinse with warm water. Pour boiling water over flat lids in saucepan off the heat. Let stand in hot water until ready to use. Drain well before filling.

STIR pectin into juice in saucepot. Add butter to reduce foaming, if desired. Bring mixture to full rolling boil (a boil that doesn't stop bubbling when stirred) on high heat, stirring constantly.

Stir in sugar all at once and keep on stirring until dissolved.


Return to full rolling boil and boil exactly 1 minute (set the timer!), stirring constantly. This is how a full rolling boil looks like, where any stirring won't keep the bubbles down (hence, if the pot is not big enough, it might overflow). After one minute, remove from heat.

Skim off any foam with spoon.

Ladle into the hot jars.

Wipe with damp paper towel the sealing surfaces.

Pick the lid and screw band submerged in boiling water using the magnetic picker, then cover the jars and close, fingertip-tight.

Turn upside down for 5 minutes then turn upright again (this is when you want to eliminate processing in boiling-water canner for 5 minutes).

Set them on a place without disturbing for at least 12 hours. Then watch out for covers that did not pop in (downward concavity). If there's one, or if a jar is not full like in the upper small jar in this phot, place in the fridge and consume immediately, preferably within 2 weeks.


Children like it on sandwiches, I like it on Ritz or saltine crackers, hubby likes it (and raspberry and strawberry jams) with peanut butter for sandwiches. It is quite a bit sour for my taste, but my hubby and in-laws like the contrast of sweetness and tartness (maybe because they are used to these sour berries and grapes). One thing for certain, these home-made jams and jellies are far superior than the commercial ones.


(To my Filipina readers/friends in the Philippines who might be interested in making home-made preserves, a web research lead me to this site which gives the telephone number for the pectin producer in the Philippines and globally.)
Custom Search