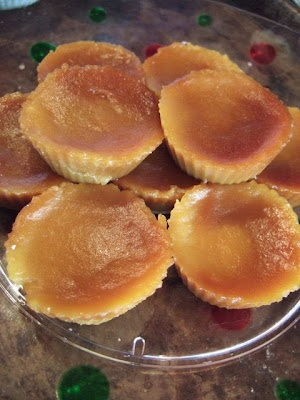
Friday, January 30, 2009

Ube Haleya/Halaya/Jaleya - the Basics

From ube haleya
UPDATE [2-3-09]
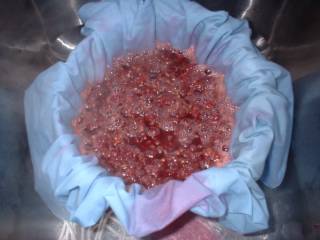
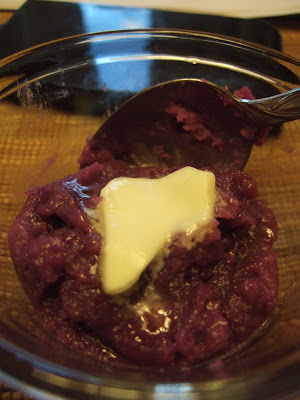
I cooked this again recently, and came up with my own recipe using the grated uncooked ube in the photos below.

Ingredients:
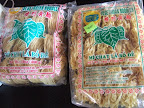
2 (14-oz grated ube, uncooked)
1-15 drops purple coloring
5 drops blue coloring
1/2 stick (1/4 cup) butter
1 can (14-oz) condensed milk
1 can (12-oz) evap milk
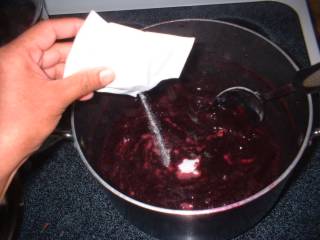
1-2 cups sugar (depends on your taste)

Method:
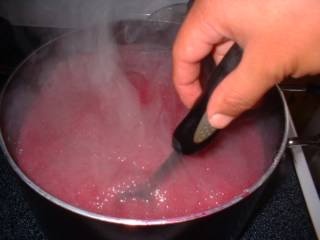
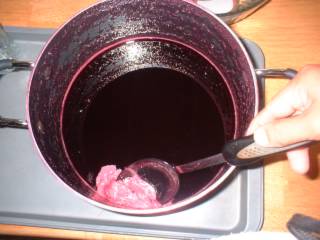
Puree the grated ube. On low heat, melt the butter, add ube, condensed, and evap milk. Stir constantly. Add sugar according to your taste. Cook until sticky/gooey to your desired consistency.

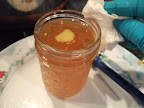
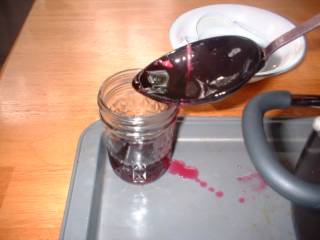
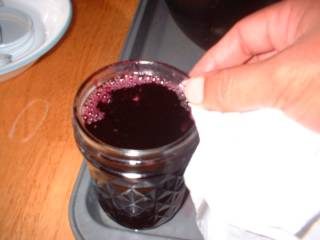
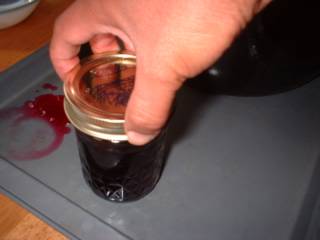
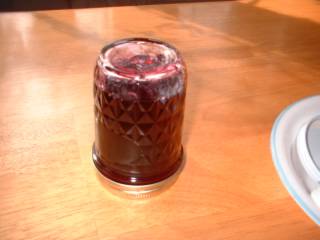
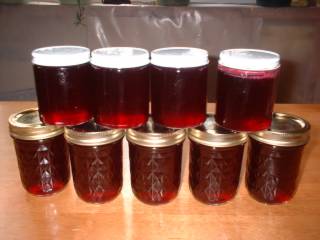
I placed these in sterilized jars and processed in boiling water canner for 30 minutes. I am now experimenting on shelf-life. I have one jar out in room temp and I check daily if it starts to grow mold. After two weeks, I will open it and see if it is not ruined (I hope it won't!). Meanwhile, I have the rest in jars also (I made a total of 5 8-oz jars with some excess to eat) placed in the fridge for future cooking/baking experiments.


This will be my basic ube haleya recipe, which I will use to make ube cream cheese filling, ube cake roll, ube buttercream frosting, ube ice cream, ube ensaymada, and ube hopia in the future.
~~~~~~~~~
I am actually not ready to post about this yet...If not for my promise earlier, I would not post this now. But I want to keep my promise.

I have made ube haleya out of what ingredient I had -- grated uncooked ube -- by trial and error. I have not come up with a good proportion of ingredients to make a final recipe here. (I have not tried making haleya using the powder form...or have I? Maybe I did and failed to achieve a satisfactory result.)

After I made the basic ube haleya, I experimented making ube cake, using both powdered and the haleya I made. It ended up in tragedy, mainly because I was not following a tried and tested recipe. I had my own theories I wanted to prove, and they were proven wrong...teehee! Ngek!

Anyway, out of the ube cake experiment, I made a filling which turned out yummy, enough to make up for the bad turn out of the cake itself. I had some leftover of that which I placed in the fridge.

Then just a while ago, when I had another craving for ube haleya, I took out of the fridge the little haleya that was remaining, and the other jar of the filling which I mistakenly thought of as another unfinished jar of haleya. When I realized it was the filling, I added it to the haleya (instead of the usual butter that I add), 1 part of filling to 2 parts of haleya. Then I reheated in the microwave for 30 seconds...an accidental mistake since I was not really planning on heating up the filling.

Oh well, I thought I would just mix the two together, maybe it would turn out okay anyway...

And what resulted was probably what I would label as the yummiest ube haleya I have ever tasted in my whole life...

Now I am on a quest to come up with a clear recipe to recreate that...And since right now I have no exact measurements, let me just describe to you how I made the basic ube haleya that I came up with...then I will follow with the post of the filling that I made for the cake (never mind the cake! I will experiment again on that later). During these times, I should be coming up with a well-defined recipe for the yummiest ube haleya I have ever had.

So what I will share here with you is the "how" of my ube haleya adventure.

The basics:

Researching the internet for recipes showed me to "boil the ube first then mash." My dilemma was not even knowing whether my grated ube was already boiled then mashed. I took two 14-oz packages of grated ube (pale in color) then cooked it with 1/2 stick of butter, 1 can of condensed milk and some (I added probably a cup) whole milk, all the while stirring the saucepan until the mixture was quite getting dried up...but I would try to taste and it would still be gritty...as if not yet fully cooked (that's the point that I realized the grated ube was uncooked, really). So, I was already considering of just throwing everything away...I just felt it was a disaster...but I thought better of it. My stubborn self just had to seek ways to resolve the dilemma.

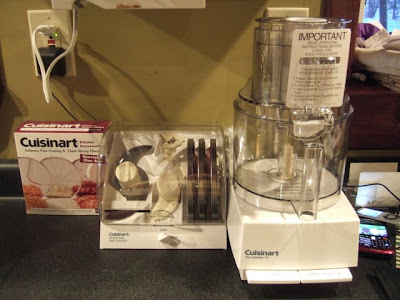
I added 1/2 cup plain water to further cook without scorching...then I thought of pureeing the mixture to make the ube more homogenous...I added some more (1/2 cup) cold water, stirred, then dumped into my food processor. I pureed for about 2 minutes each batch (filled to max line). Then I proceeded to cook on the stovetop. When it felt like it was cooked, I adjusted the taste by added more granulated sugar, with 1/2 cup increments, until I was satisfied with the taste. At the same time, I adjusted the purple coloring by adding drops of food coloring. I did not want it to be too intense (it just felt too unnatural for me). Good thing it did not affect the taste. I also added 1 tbsp of butter every now and then until I was satisfied. I stopped when I achieved the consistency that I wanted (I did not want it too pasty. I wanted it to have more body, unlike those in the jar, which to me are too runny/soft, not to mention to artificially tasting.

There...I had ube haleya to enjoy and experiment with to make ube cake for the days that followed...I liked eating it with slathered with butter. My younger son liked it plain. My older son was freaked out with the purple color...(hindi ata nakatikim nung nasa Pinas pa). This will be the same filling I will use for hopiang ube.

Next: How I made that nice ube filling...

For now, let me experiment with my next batch of haleya to come up with a good recipe for it.


A Kusina Ni Manang establishment in the Philippines?

It was PurpleGirl who, in 2005, posted photos of stalls in Dampa sa Libis that bore our blog names "Kusina Ni Manang" and Lola's Kitchen." Gosh, I can't believe how long we have been blogging about food...Thanks for the link, PG!!Sometime ago in the spirit of LP tradition, I believe, a Pinoy foodblogger (Sorry, I can't remember now who he was) posted photos of establishment/stalls in Metro Manila that bore the names "Lola's Kitchen" and "Kusina Ni Manang." Try as I might, I could not find those photos anymore, but I managed to find an article in Manila Bulletin about them. Apparently, they are located in Dampa sa Libis, which, if I remember it right, is in Paranaque.

It says:

When Fresh is Best


BY JEREMY C. MALCAMPO

Before one can even intellectualize and gauge what fine cuisine really is, one need not look beyond the importance of fresh ingredients. This is, perhaps, what sets Dampa Sa Libis as an upright gastronomic destination at par with all fine-dining establishments, one can think of.

Situated within a semi-open warehouse which exudes an RTW drop-zone, kiosks of house goods, and tiange, Dampa sa Libis offers forerunner dishes as the ones we're most familiar with that label good food with honest ingredients.
Here one can go pick the freshest meats and veggies sold at the wet market behind the main dining area, and ask a particular kitchenette to cook it the way one prefers it done. As a basic procedure, a customer must buy from the market all the ingredients, and register them at the counter for cooking preferences.

Not to put this spot alongside mediocre foodcourts, this market bids some of the most notable produce from different parts of the Philippines. To note, Seabass sells by the kilo, as Lapu-lapu by the piece.

Tiger prawns are indeed tiger prawns and finely crusting a fresh pack of shrimp meat well enough for a platter of Buttered Sugpo, lightly veiled by toasted garlic and limey aftertastes. For this dish, go to Emperor's Garden Kitchen.

For drinkers, a full serving of Ebi Tempuras will definitely suit even the most discriminating Japanese tastebuds. Noted for this dish are Kusina sa Libis Kitchen, Aling Cely's, and Emperor's Garden.

To include Lola's Kitchen, and Kusina Ni Manang for exquisite cookery, this establishment does not put Filipino cuisine in a secondary tableset. Sarangani Bay's fishes are available for all types of Visayan fares; Batangas beef for steaks; and fruits for all types of desserts and salads and the Pork Liempos from a Batangueno supplier are heaven to grill with two types of marinades. One can always choose between a garlic-vinegar-and-pepper, and Sweet and Sour.


If it was indeed the one in Paranaque, I once visited that place before I came to the USA. That blog post was made after the first wave of Pinoy foodbloggers came into the open (internet) and provided help to a lot of newbies, as well as seasoned foodies who have their own expertise to share with one another. Lola's Kitchen and my blog, as well as other Pinoy food blogs were among those first food blogs put up by Pinoys/Pinays who got into blogging as an answer to the pleas of one like me (when I was starting) for sharing/teaching cooking tips and survival in the Western (or other non-Philippines) kitchens. Since then, cooking and baking the most terribly missed Filipino foods have been easier for those of us expats.

Then there's also Kusina Ni Manang in Iloilo, and that my statcounter account always shows me a follower from Iloilo. I wonder if there's a connection? (If you are reading this post now, I would love to hear from you! Please email me.)

Now I know I have some readers/co-foodies in the Philippines. And I have met one who works in media. Maybe someone can feature Dampa and all the stalls there in a blog post? Anyone? It will be interesting to learn more about these stalls, if they have anything to do with our food blogs, if they even refer to our food blogs for some of the recipes they use....

I know I promised ube haleya/halaya/jaleya (whatever!)...later on, ok? I will try to cook it again today with some other methods that might make it easier to achieve what I want, with clearer instructions and proportions of ingredients...


Lemonade Award from Yummy As Can Be

I feel honored to be awarded (for the very first time in my life! Tagal ko na nagba-blog, ngayon lang ako nakatanggap ng award...maiiyak yata ako! Inde....joke lang...) with the Lemonade Award.

Thanks to Yummy-As-Can-Be for giving me this award in appreciation of my attitude/gratitude as I build my blog.

Sa lahat po ng mga sumusuporta sa akin, maraming salamat. Kung wala po kayo, matagal ko nang tinigilan ang pagsasayang ng oras sa blogging. (kuno...di ko lang maamin, isa akong certified blog addict, ke meron or walang nagbabasa...)--Sus! Drama!

Pasensya na at kanina pa ako nanood ng mga Charice ChaTubes. Si Inday kasi nagpasimuno, eto tuloy, na-glue na naman ako ke Charice. I have been an avid fan of Charice since Dec 2007 (opo, bago pa sya nag-guest sa Ellen DeGeneres at Oprah, pinanganga na nya ako. As in. Jaw drop. Simula mapanood ko sya sa Starking, where initially I thought she was Korean. Aba pagdating sa interview, nagulat ako. Pinay! Nakita ko lang yung YT vid nya embedded in one of the singsnap pinoy members. Kung tinitingnan nyo yung other blogs ko, Online karaoke, you know what singsnap is. Pero matagal na akong absent dun...)

Anyway, I digress...

I pass on this Lemonade award to the following people who have been making the lives of newbie cooks/bakers like I was once easier (great attitude!) and those who thank me or others (or provide a reference link) that they learned to cook/bake something from someone else (gratitude):

JMom of InOurKitchen
Stel of BabyRambutan
Iska of Iskandals
Julie of OneWallKitchen
Mely of PinoyAmericanRecipes
TN of TangledNoodles
Wena of Wena's Thought

From ube haleya
I will post again tomorrow...about haleyang ube...

Sunday, January 25, 2009

Cassava Suman

From Cassava suman
I have always loved cassava, be it suman, or bibingka style, or pichi-pichi, or nilupak. (My father once added some grated cassava to his muffins topped with grated cheese, which we referred to as "cheesecake," and I loved the effect!).
Recently with all the grated cassava overload, after having been requested to prepare the pichi-pichi, I thought I'd make some cassava suman as well to bring to another Pinay gathering hosted by my friend Cecilia. Who would have thought a child would teach me how to make them? Not the child in the photo (whose name is Jessica), though, but a child blogger, Veggie Kid. The recipe and method was very simple, as long as you have all the ingredients, which I got from the Asian store. The only thing I changed was the cooking time. Instead of the 1 hour, I thought I would check after 20 minutes, and they were done!

Ingredients:
1-16 oz. frozen grated cassava, thawed (about 2 cups)
1 cup shredded coconut
1/2- 3/4 cup sugar (I used the half cup then measured the sugar heaping)

Instructions:


I prepared my own grated yucca/cassava using my food processor. If you have pre-grated ones from the Asian store, you are lucky!

Prepare the steamer (I used boiling water canner with the rack, on which I placed a rounded cake cooling rack, then added about 2 inches of water and started boiling it).

Prepare the banana leaves (cut in appropriate sizes, dipped in boiling hot water, wiped).

Mix the ingredients, scoop out about 2 tbsp each and lay on the banana leaves for wrapping. Proceed as depicted in the slide show.

Place in bamboo steamer seam side and folds down. Cover and place in the steamer if ready (as in water is boiling)

Steam for 20 minutes or until done.

When I first tasted it, still piping hot, I thought the banana leaves' flavor was so overwhelming. But when it has cooled down some, and my friends (and the kids as well) had a taste of it, plain or with sugar, they all liked it! I did not have seconds, though, because there was not enough for seconds for anyone. Haha! Gone in a flash! Thanks a lot, Veggie Kid!

UPDATE - 02-12-09
A promisingly yummier variation was made by mrsRusty.


Ginisang Ampalaya (Sauteed Bittermelon) with Eggs

From ginisang ampalaya (sauteed bittermelon) with egg
Not a lot of people like eating ampalaya. I myself started not liking it, but I acquired the taste for it as I grew older. Now I love it, especially when I have finally discovered to get rid of most of the bitter taste, and come up with crunchy slices of ampalaya.

As a side note, it is a common knowledge among Filipinos that ampalaya is one of the natural remedies for lowering blood sugars (in other words, anti-diabetic).

I used to eat this every morning when I wanted to lose weight (or I would alternate it with adobong kangkong or ginataang puso ng saging or adobong labong). Cooked only with eggs as its protein source, I would enjoy it with freshly cooked plain rice. I can eat a whole ampalaya in two meals cooked this way. It's a great way to slim down.

Ingredients:
1 ampalaya, prepared as depicted in the slideshow
salt (for ampalaya)
3 tbsp oil for sauteeing
2 cloves garlic, sliced
1 medium onion, sliced
1-3 medium tomatoes (as you prefer)
2 eggs, beaten slightly with 1/4 cup water, let stand
1/2 cup chicken stock
salt and pepper to taste
ground basil

Instructions:

Prepare amapalaya as shown above. While sitting with the salt on, start slicing the other veggies. Beat eggs and add the water. Let sit.
After about 5 minutes, while heating up the pan, rinse and wring out excess fluid from ampalaya using a layer of cheesecloth.
Sautee garlic, onion, then tomatoes. Add the ampalaya and cook for 2 minutes. Add chicken stock. and let boil. Set veggies at one side of the pan and pour the beaten eggs onto the boiling stock, let cook untouched. Then stir together again for further 3 minutes or until ampalaya is cooked but still crunchy. Season with ground basil and salt and pepper.


Chicken Sotanghon Soup with Ampalaya (Bittermelon)

Another comfort food for me is the chicken sotanghon soup with thin slices of bittermelon. It is a "manang" thing. I don't know of anyone else who likes this, but I do remember this as being introduced to my by my Nanay (just like I love tinolang manok with ampalaya and sweet corn that she also introduced to us, I like this sotanghon soup with ampalaya).

As usual, I just need chicken stock and meat for this, basically. I soak the sotanghon noodles first in hot water for about 5 minutes while I reheat the stock with meat. I seldom have ampalaya, so this is something I make only when I have these ingredients. And I am the only one who likes it in this family. My sons have not developed the taste for ampalaya (they tried, but did not like it). I let the ampalaya slices sit with salt sprinkled on them for about 5 minutes then rinse with cold water and pressed to remove the bitter juices. Then when sotanghon is almost cooked I add the ampalaya and let cook for about a minute or two, sprinkle with ground basil, and enjoy my bowl of soup.

Chicken Mami Noodle Soup

From chicken mami noodle soup
One of my favorite comfort foods is the chicken mami noodle soup. When I was still in the Philippines working, I would usually stop by the nearest mami house (usually owned by a Chinese) and get myself a bowl of chicken mami noodles. My usual toppings would be spring onion and lots of ground pepper. Optional add-ons would be sliced hard-boiled eggs, or crummbled chicharon (like in lugaw). This type of mami I prefer over the instant mami (like Lucky Me).

My sons are in love with the instant ramen noodles. I have "trained" them to be self-sufficient when preparing their breakfast before going to school. And this is their favorite breakfast. However, they are not as imaginative as I used to be when I was a child. They do not have add-ons and toppings, making it mainly a carb-laden breakfast. I have taught them to do what I do to prepare the one in the photo above; that is, after I prepare the chicken stock and have separated the meat from the bones. I may add leftover fish/squid balls, if any.

I don't have an exact recipe for this. Amount depends on how much you want to add. Basically, the ingredients are chicken stock, chicken meat (refrigerated less than 2 weeks, from bony parts of chicken that I boiled to make chicken stock) and other add-ons as desired, noodles, salt and pepper, and spring onions.

I usually bring out from the freezer a 2-cup frozen chicken stock, microwave for 2 minutes, then add the noodles and chicken meat and microwave for another 2 minutes. I then top with spring onion and sprinkle as needed with salt and pepper....Ahhh...tastes like home. Indeed a comfort food for me. My kids love it, but only if I was the one who prepared it. They never make it if they have to prepare it.

As a side note, such soups as this (wonton, mami, etc.) are perceived by my husband as "washings of dirty socks." Sarap batukan...


Saturday, January 24, 2009

Honey Garlic Pork Roast

From Honey Garlic Pork Roast
I made this using the shoulder butt roast ("butt" cut as explained by hubby is any cut that they could make out of a poor area to cut due to many ligaments/fats. In Tagalog, "bara-bara"). Since this roast cut is the equivalent of a chuck roast in beef, I decided to slow cook it. Hubby loved the flavor of this sauce, and it reminded my sons and I of adobo. I got the recipe from allrecips.com but it was using pork ribs.

Ingredients:
shoulder butt roast
1/2 cup honey
1/2 cup packed brown sugar
2 tbsp + 2 tsp soy sauce (that's 40 mL)
1/4 tsp garlic powder
1/4 tsp ground ginger
1/2 tsp ground mustard.

Instructions:

Brown all sides of roast.
Prepare sauce. Pour some on the slow cooker.
Place roast underside up in the slow cooker and pour some sauce.
Flip roast over and pour the rest of the sauce, distributing well all over surface.
Cover and slow cook for 4 hrs on high (or 8 hrs on low)
Let rest on a platter for 10 mins before slicing.
Serve with your favorite sides (photo here shows rice, chop suey, and basic egg bread)


Wednesday, January 21, 2009

Food Processor

From food processor
My husband did not know what to give to me last Christmas (I already had every electronic gadget that I could possibly want, though not the latest ones. I tend to keep one as long as I could until it just breaks down.) Even if he would have wanted to surprise me, he did not want me disappointed with something I did not want. So, I asked for a food processor.

While a lot of homemakers with a food processor usually end up stacking theirs in the basement, I already had plans with what to do with it, especially that I love cooking and canning. The set that I got can also prepare dough, and every reader of this blog knows how I enjoy baking. With the plans that I had, I had to get a specialty disc set, because what I really would want to be able to do with this food processor is the fine grating -- of yucca, mainly, since I love pichi-pichi and cassava cake. Of course, aside from the fine grating, I also had in mind faster and easier chopping/pureeing, and slicing when I am canning produce from my garden during fall. I actually chose the fine grater first then the main gadget
to go with it (as recommended by amazon.com). The only brand that has this fine grating disc was Cuisinart. Nothing else. However, when I got the pair, they were not really a pair. I got the wrong model. I should have gotten another model that had a stem which would attach to different discs. Good thing there was no problem shipping back the item and getting the refund. (I love amazon!)

Recently, with a recent Filipina gathering, my trip to the Asian store and getting green papaya to turn into atsara, I went on to "break in" my new food processor, grating two big yuccas in 1/4 the time it usually took for me to grate them manually (minus the achy arm and wrist!); grating the green papayas, and slicing the other veggies. It took me seconds to grate what I would have grated in an hour. Wow! I was impressed! And the receptacle was large enough to hold a whole onion! Cool! I am so looking forward to making more jars of pickles, jams and jellies next year.

I also made ube haleya two nights ago, using pre-grated ube that I was not sure whether it was pre-cooked or not. And while I was cooking it, I realized it was uncooked, and it was drying up already without being fully cooked yet. I decided to add more liquid and puree it using the food processor (I was not sure whether I could have achieved the same result with the blender; I probably could), before putting back to the stovetop to cook further. I have been eating some haleya since then (my sons have been enjoying it as well), but saving some for an experiment with ube cake. Those two will be on future posts...

Verdict: Met my expectations and more. Easy to clean as well. Seems durable (time will tell, but I am hoping to make full use of it). Quite pricey, but it seems worth it for freeing up some of my time and wrist/arm aches. If you are into canning or even catering, this is a great help. If you are not going to make any slicing or grating in big volumes, this is not recommended.

Now if only there is an electric stirrer powerful enough to stir cooking ube haleya, and long enough to reach the bottom of a stock pot while preparing pasta sauce, I'd be a much happier cook! Not that I don't like burning the calories, but I hate having a sore arm and wrist and right shoulder after such a tedious task.

Monday, January 19, 2009

Atsarang Papaya (Pickled Green Papaya)

From atsarang papaya
Just a peek into what's coming next....
Ok, peeps...during this week I am in a marathon for orientation in another hospital where I am gonna work per diem. So, even though I have cooked and tried and eaten quite a lot in the past days, my posts will be slow...slower than my actual cooking and eating. haha!

Like I said before, my favorite pickled cucumbers, "bread and butter pickles," was to me reminiscent of atsarang papaya when I first had a taste of it from my mother-in-law. Since then, I have been making them yearly since fall of 2005 (I learned as I watched MIL in 2004). I have been giving them away to Filipina friends every Christmas or whenever we would gather together and I still had some to give away (I have to ensure my own supply of minimum 6 quarts per year).

I tried making atsarang papaya last year using the same method but trying a certain recipe I got online, but trying to stick to the proportions of sugar and vinegar, and the kinds of veggies included, so as not to deviate significantly from proven recipes that are effective in keeping the canned atsara safe even without refrigeration. However, in that first attempt, combining the salt from the first stage, and the salt in the recipe I followed made my atsara too salty that I ended up throwing them away (sayang!).

This year, I resolved to stick to the brine recipe I have for bread and butter pickles minus the turmeric, because I included slices of ginger with the papaya, along with the usual bell peppers, onions and carrots. I don't like the taste of garlic in atsara (I like it in dill pickles, though.) nor ampalaya (but I eat ampalaya prepared in other ways). Since I have had success in the shelf-life (and maintaining the quality and crunchiness) of BBP that can keep up to a year at least, I am most certain that with this recipe, and observing proper methods of clean (almost aseptic) techniques in preparation, I will end up with atsarang papaya that I can say "Proudly Pinoy." Can't wait to let my in-laws have a try at it. My kids loved it (we tried some that we strained off the excess brine).
I will post as soon as I have the time...Stay tuned!
In choosing green papayas, for those who have not done any pamamalengke in the past, choose ones that are very firm to the touch, so that when you poke gently and firmly with a finger, there are no dents formed at all. Most of the ones I got, they tend to be hidden underneath the mushy, obviously not fresh, green papayas (typical business practice of exposing the older ones to get rid of them first).

When peeling papaya, I made sure I removed a thick layer of the skin and scraped the inside lining (where seeds attached) good. I believe these are bitter, but I could be wrong!

Now, this process can be so tedious when you are doing them all manually. I asked my husband for a food processor when he could not think of what to give me for Christmas. After I received it, I was so excited to finally make another trip to the Asian stores to get some raw ingredients for such projects as this.

Please take note that the brine has NO WATER; only vinegar and sugar, two very powerful preservatives. If you want to dilute with water or use less sugar, I cannot vouch for the safety or shelf-life, and so I do not recommend that. Please understand that maintaining pH and minimizing contamination are the key to effective canning/food preservation, especially for recipes that you will not process in a water bath. I cannot overemphasize the importance of reading first about the basics of canning. I have several links on the right sidebar for your perusal before you embark into the wonderful world of canning.

Equipment:

knife/grater/food processor
chopping board (better if you have a mandolin or a slicer either in food processor or as attachment)
nonreactive stockpot (stainless steel)
Jars and closures
magnetic picker
wide stainless steel funnel (to make it easier to transfer into jars; I don't have any. I used spaghetti lifter and ladle instead.)
cheesecloth (for pressing out excess water)
bubbler (I dont' have any; I used the handle of spatula)

Ingredients:
3 green papayas (each weighed about 3 pounds), grated
1 each of red and green bell peppers, cut in small squares
1 big onion, sliced round
1 big carrot, sliced round (you may want to grate it, but I like the flowery look)
about 2 tbsp of peeled and sliced ginger
1 cup canning salt

For brine:
12 cups cider vinegar (this gives you light yellowish tint of the product; more so if turmeric is used instead of ginger)
12 cups of sugar
1/4 cup of mustard seeds (optional; I love these in BBP so I thought I'd include them. If you don't like eating these round spices, them don't include).

Day 1: Preparation -
Prepare the veggies as described above. Place in a stainless steel stock pot. Sprinkle 1 cup of canning salt (I use Morton - the green box) on top. This process draws juice/liquid from the veggies as the salt turns into solution by process of simple diffusion so somehow, the veggies get less watery, resulting to more crunchy veggies despite being cooked and kept in brine). Cover with the (hopefully flat) lid, and let sit in the fridge. If you don't have space in the fridge, what I did was to put it in a bed of ice cubes inside a medium-sized cooler, then added more ice cubes on top of the lid and the sides. Let sit at least overnight. (If made during fall, you can leave this in the garage overnight instead of using ice and cooler).

Day 2: Canning -
As usual, before proceeding, prepare jars and closures according to instructions in Canning Basics.

Next morning, rinse with cold water and drain. (I did this twice and tasted some to make sure it is the right saltiness I like). Place in two layers of cheesecloth by batches, and wring out excess water as much as you can). Place in a big nonreactive stock pot (aluminum is NOT advisable; it reacts with vinegar. Use stainless steel.)

Prepare brine and boil for 5 minutes. I usually start boiling hot water in another shallower stock pot, then pouring hot tap water into the jars as well, to prime them for sterilizing in boiling water. This prevents jars from being shocked with extreme temp changes. [During the actual canning, I remove the hot water in the jars then transfer the jar into the boiling water for sterilization, rotating as needed, and take out just before filling with the hot pickles. Alternatively, you can use a sterilizer by steaming (much like how you do with feeding bottles). I don't let the jars get cold before filling, or the pickles to get cold/contaminated before covering.)]

Pour the brine into the veggies. Cook on medium heat for about 2-3 minutes then lower to maintain heat while you do canning. In one fluid motion for each of the jars, proceed as follows:

Stir, then ladle into the jars. Make sure you have enough brine. Leave 1/2-inch headspace. Take bubbles out by using the bubbler (this minimizes air trapping; read about the effects of air trapping here.)Wipe the rim with clean damp paper towel to make sure nothing is there to prevent proper seal. Lift a lid out of hot water (or I swipe quickly in boiling water) then cover and close tight. Wipe sides of jar to minimize stickiness. Place hot jars on towel laid on countertop (minimize jarring), one inch apart, in a draft-free place (sudden rush of cold air might cause hot jars to crack). Additionally, you may cover with towel to minimize exposure of the jars to cold air. Leave untouched for minimum 12 hours. Observe for popping in of lids. If lids did not pop in, that signifies that it was not sealed properly. Place in the fridge and consume within two weeks.

Pickles start tasting like pickles after the 3rd day.

UPDATE: 1/30/09
From sweet chili sauce
If you are going to try making this and end up with lots of lefotver pickle juice, DO NOT THROW IT AWAY. While I was looking at it, debating against dumping it in the sink or saving it in the fridge, my older son suggested, "Maybe we can make sweet chili sauce out of it." Like a light bulb, I knew what to do with it. Will post about it sometime in the future. Thanks, Patrick!


Pork Sinigang (Sinigang na Baboy)

Although hubby is not too welcoming of any dish with thin soups (except New England Boiled Dinner, but he leaves the soup out), I and my boys still crave them, and this sinigang is one of the favorites. Of course, sinigang can make use of pork, shrimps, or fish. I have not tried sinigang na manok, although I love sinampalukang manok (I just don't have access to the tamarind leaves).

So, for my boys who love this dish, it is very simple and easy to make as long as you have sinigang mix, whether Mama Sita's or Knorr.

Ingredients:
1 lb pork cuts (some fat is desirable)
2 bay leaves
3 cloves garlic
10 peppercorns
3 big tomatoes, cut in half
1 big onion, cut in half
salt
water to cover meat and veggies
1 eggplant, cut in wedges
handful of okra (optional)
1 icicle radish, sliced across thinly (about 1/4 cm)
2-3 pcs taro or gabi (optional)
handful of green beans (sitao if you have)
sinigang mix
1/2 of cabbage

Procedure:
Boil pork with bay leaves, garlic, peppercorns, onions and tomatoes, with 1 tbsp salt for about 30 minutes. Add the veggies except cabbage and cook another 5 minutes. Add sinigang mix and some more salt to taste. Add cabbage and cook another 2 minutes or so. Eat with plain rice.

Posted by Picasa

My Trip to the Asian Stores

I went to the Asian stores (2 hours away from my house) last Tuesday. There were several of them but I was only able to go to two because of time constraints. I came home and realized I was not able to find any macapuno!!!

I probably spent about $300 because I was thinking this would be a once-a-year trip for me. But I will probably change my mind unless someone sends me jars of macapuno...maybe I can request from my Ate Cris in Canada. (nagpaparamdam ba daw!)


Some of the things I got were grated ube, various frozen fish, patis and toyo, chili sauce, chinese cooking wine, lucky me pancit canton, ube hopia (my favorite), fish/squid balls, green papaya, big cassava tubers, niyog, ube powder, banana leaves, rice flours (glutinous and regular), etc. I planned to make/experiment with making cassava suman(done!), ube cake, and atsarang papaya (which I actually already started by this time). Will make posts on those later...


How I Prepare Chicken Stock

Despite all the "waste not, want not" attitude of my MIL and SIL, apparently I am worse then them. During a familiy gathering, they mentioned how they wonder why some people gather the turkey or chicken carcasses after a holiday dinner to boil and make chicken stock.

First, for me, though chicken broth is readily available in the grocery stores, I want my signature taste in my chicken stock/broth. I don't want to have the same generic taste you get from those canned ones.

Second, I prepare chicken stock not only to make use of such bones that would otherwise end up in the trash, but because I like the flavor of "roasted" poultry it imparts to the resulting stock. Sometimes I do prepare stock using chicken necks or backs, though, which gives me the plain boiled chicken taste (the meat of which I remove from the bones after 45 minutes to 1 hr of boiling, then I continue to simmer for another 2 hrs, or I use the slowcooker to simmer overnight.

Third, chicken stock brings out the best taste in dishes such as pancit, chop suey, mami noodles, lugaw (if there's no meat; I usually like the meat taken off the necks here), chicken dumplings in stewed tomatoes, and some stir-fried veggies.

I prepare chicken stock with minimal basic spices: 2 bay leaves, 10 peppercorns, 3 cloves of garlic, and salt (approximate amounts to end up with about 2 quarts of stock). I usually pour water to cover the bones, then double that amount to make room for reduction while simmering. I don't put a lot of salt since that can be easily fixed once you do the cooking and final adjustment.

As depicted in the slide show above, I use empty cups of cottage cheese which measure about 16 ounces (2 cups) to freeze the strained broth. After freezing, I transfer to plastic bags and use as needed.


Sunday, January 18, 2009

Squash Kutsinta

From squash kutsinta
Last week I tried making kutsinta using the recipe posted by JMom. However, I used the regular white flour (not sticky sweet) that I got from Spice of Life, a health food store. As what she implied as she referred to her basis for the recipe, there really is no standard rice flour, that's why results can be expected to vary. She used mochi. Mine was not branded. Probably that was the reason why I ended up with rock hard solid bottomed-liquidy top kutsinta, which I first mistook as undercooked after 20 minutes of steaming, so I extended the time to reach 1 hour, and I gave up at the end of that. I tried one and threw them all away, not because of the taste but because of the consistency as I described above.

So I looked around again for another recipe I could try so I could bring kutsinta to our Filipina get-together (yesterday, actually). I would have tried to make the same recipe using the sticky sweet (glutinous) rice flour, but thought better of it..."What if it does not turn out the way I wanted it to be" So I looked again for another recipe not out of a homemaker's experimentations, but from a nationwide publication, the DOST's Tekno-Tulong website, using all purpose flour (can't go wrong with that!) and guess what? SQUASH! "This sounds insteresting!," I thought. Not only do I make use of my extra squash sitting in the freezer for more than a year now, but I also make my kutsinta more power-packed. Well, we know how nutritious squash and other yellowish-orange-ish veggies are.

The final verdict was made, of course, by my Filipina friends.
From lye solution
Although the recipe only gave me several kutsinta, we all decided it was good!

The only issue I encountered was that some of them was too liquidy at the top, that I resorted to microwave them one by one to further cook, but still ended up with soft solid bottom and a liquidy top. I guess that is because of sedimentation problems, with flour going more to the bottom and making that part more solid when cooked. But this won't stop me from making this again in the future. I might end up cooking it the same way I microwave-cooked pichi-pichi, but I will double or even triple the recipe. Or I might try using the double-boiler method, where I will boil water in a deep 10-in saucepan, place the cups there and pour the mixture; that way, the mixture will start cooking right away and not have time for sedimentation. Then as soon as I have poured into all the cups I will just cover then cook 20 minutes (I remember my ex-MIL using this technique for her lech flan and it worked good!)

Materials:
1 cup mashed boiled squash
3/4 cup brown sugar
3/4 cup all purpose flour, sifted
1 cup water
1 teaspoon lye solution (potassium carbonate and sodium bicarbonate solution)

Procedure:

1.Dissolve the sugar in water and boil, allow to cool.
2.Add the flour little by little.
3.Add the squash, keep on stirring until it becomes fine in texture.
4.Strain using two layers of cheesecloth (wring to extract the most out of the mixture).
5.Add the lye, stir.
6.Put the mixture in muffin cups, with allowance of a little space from the rim. (Photo in slides shows the second layer, I ended up probably with 12 cups, 3 of which had super liquid-y tops.)
7.Steam for 20 minutes.

Friday, January 16, 2009

Concord Grape Jelly

This is a re-posting from my Old Kusina. I am posting with today's date mainly for A Scientist in the Kitchen, who expressed interest in learning more about making jams and jellies. Maybe those in the Philippines can also experiment using our very own fruits. I have seen my ex-MIL make guava jelly even without pectin, so probably we can also find out how to make jams and jellies out of those fruits without using pectin.

Children like it on sandwiches, I like it on Ritz or saltine crackers, hubby likes it (and raspberry and strawberry jams) with peanut butter for sandwiches. It is quite a bit sour for my taste, but my hubby and in-laws like the contrast of sweetness and tartness (maybe because they are used to these sour berries and grapes). One thing for certain, these home-made jams and jellies are far superior than the commercial ones.

These are concord grapes, and they are very very tart! Not at all suitable for eating in its raw form. I had about 2 pounds or more of these bunches about a week before the first frost hit us. Then I waited for the second batch, which I made the morning right after the first frost (a friend's mother-in-law told me they taste better after frost).


1 big colander is equivalent to more than a pound of them, but I had to wash, remove the green ones (choose only the most purple ones) to make into grape jelly.

Ingredients:

5 cups prepared juice (about 3-1/2 lb. fully ripe Concord or you may use other loose-skinned grapes)
1-1/2 cups water
1 box Fruit Pectin (Sure-Jell or Ball Brand)
1/2 tsp. butter or margarine (optional)
7 cups sugar, measured into separate bowl

Preparing the juice:

STEM and crush grapes thoroughly, one layer at a time. Place in large saucepan; add water.


Bring to boil. Reduce heat to low; cover and simmer 10 minutes, stirring occasionally.

Place 3 layers of damp cheesecloth or jelly bag in large bowl. (I had none at the time. I improvised using a clean old pillowcase with a small cheesecloth sandwiched inside.) Pour prepared fruit into cheesecloth.


Tie cheesecloth closed; hang and let drip into bowl until dripping stops. Press gently (If you squeeze hard, you might end up with turbid jelly). Measure exactly 5 cups prepared juice into 6- or 8-quart saucepot.

(I did this juice preparation at night and let it drip overnight. Then I proceeded with the next step the next morning)

Making the jelly:

BRING boiling-water canner, half full with water, to simmer. Wash jars and screw bands in hot soapy water; rinse with warm water. Pour boiling water over flat lids in saucepan off the heat. Let stand in hot water until ready to use. Drain well before filling.


STIR pectin into juice in saucepot. Add butter to reduce foaming, if desired. Bring mixture to full rolling boil (a boil that doesn't stop bubbling when stirred) on high heat, stirring constantly.

Stir in sugar all at once and keep on stirring until dissolved.


Return to full rolling boil and boil exactly 1 minute (set the timer!), stirring constantly. This is how a full rolling boil looks like, where any stirring won't keep the bubbles down (hence, if the pot is not big enough, it might overflow). After one minute, remove from heat.


Skim off any foam with spoon.

Ladle into the hot jars.


Wipe with damp paper towel the sealing surfaces.

Pick the lid and screw band submerged in boiling water using the magnetic picker, then cover the jars and close, fingertip-tight.


Turn upside down for 5 minutes then turn upright again (this is when you want to eliminate processing in boiling-water canner for 5 minutes).

Set them on a place without disturbing for at least 12 hours. Then watch out for covers that did not pop in (downward concavity). If there's one, or if a jar is not full like in the upper small jar in this phot, place in the fridge and consume immediately, preferably within 2 weeks.


I also make strawberry jams , blueberry jams, and raspberry jams (which are made almost in the same manner; the only difference being in the proportions). Our family's fave is the raspberry jam, and when I did bring one to work, to go with some Club crackers, everyone loved it. The nurse travelers (a couple) who were based in Florida even expressed how superior it was over commercially prepared ones. Maybe those in the Philippines can try to make jams out of aratiles or other lowly berries we have, and adjust the amount of sugar according to how sour or sweet they are....just a suggestion for those who are thinking of going into the food business for something less paid attention to, so competition is less. This process is almost a no-brainer and will require very little capital.

(To my Filipina readers/friends in the Philippines who might be interested in making home-made preserves, a web research lead me to this site which gives the telephone number for the pectin producer in the Philippines and globally.) [That link is not valid anymore!] I know that pectin is available in the Philippines because when I was still in college (BS Biology), two of my classmates worked on a thesis involving pectin. At the time I only knew that it was a gelling agent and knew nothing about it. Apparently it can be extracted (as hesperidin?) from citrus peels, also from apples. I do wonder what fruits will not need pectin to jell, given the proper proportion of fruits to water to sugar? These are the only ingredients to making jams and jellies, aside from pectin. Guava naturally has pectin as well.

Thursday, January 15, 2009

Chicken Roll-Up

This is a re-posting from my Old Kusina, when i was still linking my blog posts to geocities.I did not edit the story, so this story was from 2004.


I was looking at my collection of printed recipes and this idea was from Del Monte Kitchenomics, but the original recipe did not include using celery sticks, and also called for deep frying and using its famous tomato sauce. I try to avoid deep-frying as much as possible for health reasons, and also because it is messier and cooks only several pieces at a time. So I baked instead, together with the dinner rolls. And as usual, in this recipe I made use of the home-made stewed tomatoes from my Mom-in-law.


Ingredients:


4-6 chicken breasts or thighs, deboned

white cheese for filling

2-3 celery sticks, cut lengthwise in half

1/8 cup sesame seed oil (or melted butter or vegetable oil)

toothpicks


Coating mixture:

1/4 c corn meal

1/8 c all-purpose flour

1 tbsp grated parmesan cheese

3/4 tsp Italian seasoning

1/8 tsp garlic salt

1/8 tsp pepper


Italian Tomato sauce: (may use spaghetti sauce)

1 can/bottle stewed tomatoes

1/8 tsp Italian seasoning

salt, sugar, pepper to taste

1 tsp cornstarch + 1/4 c cold water


Instructions:


Pre-heat oven to 400 deg F.


Place the cheese and celery sticks at one short end of the chicken slices and roll up. Secure with toothpicks.


Brush to coat with sesame seed oil.


Coat with the above mixture. Place in a baking dish. Bake 40 to 45 minutes or until golden brown and tender.


In the meantime, prepare the Italian tomato sauce.


In a small saucepan, simmer the stewed tomatoes. Add Italian seasoning, pepper, salt and sugar to taste. Thicken by adding cornstarch-water mixture.


Spoon Italian tomato sauce onto baked chicken roll-up and serve with dinner rolls.

Tuesday, January 13, 2009

What's In Your Lunch Box?

I am making this post in response to FMB's Lunchbox Meme #2. I have no attractive photos to show what are inside, but the labels let you know the contents of these containers that I have in the fridge, ready for the kids (big or small) to take to school or work for lunch. Usually, after supper, we pack the leftovers into individual servings such as shown, or sometimes, we wait until the week is over, then prepare these prior to the start of the week.

This is the first school year that we have had to do this, since now that I am working, the kids do not qualify anymore for the reduced price or free lunch in school. This does not really bother me, because then I have less leftovers to worry about (sometimes they get forgotten and end up chucked to the trash; what a waste!)
Posted by Picasa

Pork Tocino

 My husband's verdict on Pork Tocino: "This is the best thing that ever happened to pork chops." It never fails to make his eyes closed in savoring this Filipino favorite. (That reminds me, I should get a lot of these on my trip to the Asian stores tomorrow.)

Very easy to prepare, all we need are tocino mix and pork cuts.

I use chops, and instead of the 1.1 lb suggested in the recipe, I marinate 2 lb of pork chops instead, for at least 3 hours or overnight. The result is a not-too-sweet pork tocino (hubby does not like too salty or too sweet chops).

Using a non-stick deep 10-inch saucepan, I add some water (about 1/4 to 1/2 cup) and put everything, chops and marinade, in the pan, simmer (#3) covered for 10 minutes. Then I uncover, turn up the heat to about #8 to reduce the sauce while turning the pieces often. When almost dry, I lower the heat again to avoid burning the sugar, then as the chops begin rendering fat (or I add some olive oil), I brown the pieces.

I serve this with rice (or potatoes for hubby) and salad greens.

I don't have to mention that this is one of the favorites of my kids as well.
Posted by Picasa

Monday, January 12, 2009

Baked Mac&Cheese with Ham & Brocolli

From Baked Mac&Cheese with Ham & Broccoli
The ham I used in this baked mac&cheese was leftover from New Year's Eve supper. In this part of the USA, we do not really celebrate NY. But the great contrast in comparison with Philippines where NY is celebrated with big bang (and also greeted with gunshots and sirens of fire trucks or ambulance), along with a bountiful table to invite prosperity to one's home, made me want to prepare a
From Christmas
small special supper, which consisted of roasted ham, black eyed peas sautee, and rice and potatoes. With this small "feast" we still ended up with lots of leftovers (what can you expect with 4 eaters?). Over the next days I ate the black eyed peas which I cooked like how I would mung beans (munggo guisado), and so was getting better and better the longer it sat in the fridge.

But the ham remained for some time in the fridge...waiting to be re-invigorated.

From Ham & Onion Omelet
One of the ways I cooked the ham was as omelet, with chopped onions as its companion.My sons loved this.

Another way I cooked ham leftover was to add
From fried rice with ham cubes
it to fried rice along with frozen veggies (carrots and peas). Actually, my older son was the one who cooked this.

I had lots of cheese leftover too, from having eaten chili, plus I always have Velveeta and parmesan cheese in the fridge. And so, I looked for recipes for homemade baked mac&cheese (since my husband is so fond of boxed mac&cheese, I figured he would love the homebaked more). I found one video showing how to cook it, and the cook also used leftover ham and some New England cheeses (Cabot brand).

I just added the broccoli leftover also (from that post on porterhouse steaks). As I expected, it was a hit with my hubby, as well as the kids (well, even stepd is a big fan of mac&cheese).

Ingredients:

6 tbsp butter
4 tbsp flour
1&3/4 cup half and half cream
1&1/4 cup shredded cheese
1&1/4 cup Velveeta cheese
1/2 cup parmesan cheese
3 cups diced ham
5 cups cooked macaroni
1 cup bread crumbs divided in two

Instructions:


Cook macaroni per package directions and drain.
Cook the rest of the ingredients as instructed in the slide show. Stirring CONSTANTLY is the key to avoiding making lumps.
Transfer to baking dish and bake at 350 deg F for 20 minutes.

This post is an entry to LaPiS with the theme Leftover.

Sunday, January 11, 2009

Porterhouse Steaks

I gotta admit, steaks are probably my waterloo in cooking. Though we have plenty
From porterhouse steaks
stored in our freezer, I seldom cook them, or like I am almost always prepared to get disappointing results. The thing that makes it worse is that, to my husband, steaks+potatoes+boiled veggies is the equivalent to us Filipinos eating fried fish, sinangag, and ensaladang kamatis with camote tops. My husband just misses this type of meal if I get into the "more fancier" (as he sees it when I prepare something else) cooking. It seems no matter how I cook steaks, they always end up tough and chewy, except for the tenderloins. Until I started to try Adolph's tenderizer, the main meat tenderizing ingredient of which is papain...yeah, that enzyme you get from papaya (I remember having papain as a subject of our Science Project in High School).

Ingredients are so simple:

olive oil
porterhouse steaks
freshly milled (or ground) pepper to taste
Adolph's tenderizer
[ADD salt only after cooking!]

Equipment:

Iron cast pan
Iron cast griddle

Instructions:


After thawing steaks, wipe surface with paper towels and sprinkle pepper.

Heat the pan on high. Start the broiler on high, with the griddle on rack placed on the upper most level. The ridges of the griddle should be facing up.

Once pan is hot, spray (or wipe) with olive oil.

Sprinkle the tenderizer on the surface to be cooked and place on pan. Cook for 2 mins.

Sprinkle the raw surface with tenderizer and flip and cook for another 2 mins.

Place on the griddle and broil for additional 4-6 mins.

Serve with A1 steak sauce (hubby's fave; an acquired taste for me and my boys), potatoes and steamed veggies. Dont' forget the butter, salt and pepper!

My hubby ends up enjoying his "typical" meal.

Saturday, January 10, 2009

Canning Bread & Butter (aka Pimento) Pickles

If you like atsarang papaya, you will like this. I did.

This is a re-posting from my Old Kusina. While this seems off-season in that I usually do canning in the fall, I figure it won't hurt to show this here at this time, so those who will try can plan ahead for what they want to plant in their gardens. (I usually have gardening catalogs during Jan-Feb. My MIL orders as early as Feb or Mar to start her seedlings indoor in April). It is best to can veggies yo yourself grow in your garden, and start the process on the very day you harvest your produce. (Although an exception for me is canning tomatoes. Sometimes I harvest my tomatoes as soon as they have red/yellow/orange streaks and let them ripen inside the house to avoid being attacked by slugs, then I process them).

During the winter of 2003-2004 my dear MIL gave me a quart of this BBP. (She gave me a jar of dill pickles prior to this.) She said her husband likes it so much that he can finish the whole quart in two weeks, and that he can't eat any roasted meat without it on the side. I tried it right away, and that day I decided that I had a new favorite pickle. The closest Filipino pickle that tasted like BBP is the atsara, but my! This one is a lot better! (I have tasted several atsara preparations in the PI, some with carrot slices, some with bittermelon slices (ugh!), and some just the grated papaya with onions and the brine. The best atsara I have tasted was the one that went along with Baliwag lechon manok, if my memory serves me right.)

That summer of 2004 when it was harvest and canning time for the cucumbers from my vegetable garden, I was so eager to learn how to make BBP. I first learned canning the dill pickles first, which was harder and fussier when it comes to processing (have to maintain at a point just below boiling). This one is way too easy...just half-cook the cucumbers and can. No more processing needed! The pure vinegar-sugar combination (as in no water) does not encourage growth of Clostridium botulinum and other microbes while the jar is not yet opened.

Browsing some websites about BBP, I learned that many required other ingredients not in this recipe from my MIL's canning book. Some required processing in a boiling water canner. MIL says you can't buy these at the grocery stores, and if ever you find one, they are not as good as what we are making. She first had a taste of this from a friend who shared with her the recipe.

Others are just so mushy and not as pleasantly tasting as these.

So, for those who are planning on planting cucumbers next summer, you might want to make these pickles. Your spouses might prefer the dill pickles (as mine does), but you will surely love this if you love atsara. Now for American wives to Pinoys, if your hubby likes atsara (pronounced ah-cha-rrra), they will surely appreciate this. For Filipinos in PI, you might want to try making these as substitute for atsara. Best served with roasted chicken. Also goes well with burgers and hotdog sandwiches. I love giving these away as Christmas gifts to friends. My friend Ana can finish a jar the very day she gets one from me.

Equipment:

knife
chopping board (better if you have a mandolin or a slicer either in food processor or as attachment)
nonreactive stockpot (stainless steel)
Jars and closures
magnetic picker
wide stainless steel funnel

Ingredients:

25 pickling cucumbers
8 fist-sized yellow onions (or the equivalent amount)
2 red and green bell pepper (1 each, or 2 bell peppers plus 1 small jar of pimento)
1 cup canning salt

For the brine:

12 cups sugar, dissolved in 12 cups vinegar
1/2 cup mustard seed
6 tsp ground turmeric

Instructions:

I did this in two consecutive days.

Day I: Preparation


Do on the same day of harvesting for optimum result. Wash cucumbers well. Remove ends. Group the cucumbers into 3. Slice the first group to the desired thickness (I like mine about 3/16 of an inch). Divide the onions into 2, slice into rings. Divide the peppers into 2, dice and discard the seeds.

Layer as follows: cucumbers; onion+peppers; cucumbers; onions+peppers; cucumbers.

Sprinkle 1 cup of canning salt on top. Cover and let sit overnight. The salt draws the excess moisture from the cucumbers, so that it will retain its crispiness even when canned.

Day 2: Canning

As usual, before proceeding, prepare jars and closures according to instructions in Canning Basics.

Next morning, rinse with cold water and drain. Taste cucumber. Rinse again and taste again. Repeat until the cucumbers are not that salty to your taste (just a bit).

Prepare the pickling solution and boil for 5 minutes, stirring constantly.

Pour into the stockpot of cucumbers, and heat near boiling point, stirring constantly to assure uniform cooking.

Bring back to heat up to just below boiling point then lower heat and maintain, stirring constantly to assure uniform cooking. After about 5 minutes, slices should start to become translucent. Check for doneness by trying some slices from different spots in the pot. Cucumbers should be just half-cooked and still crispy. Lower heat to the minimum to maintain heat yet not overcook the remaining cucumbers as you transfer them to jars little by little.

*Using wide-mouthed funnels, transfer to hot jars right away, with a good proportion of pickles to brine solution, making sure all slices are covered. Leave 1/2-inch headspace. (Headspace allows for volume contraction while the jars are cooling down so that later on the lid pops in, indicating proper seal.)

Release bubbles with a plastic spatula or a bubbler, wipe rim with damp cloth or paper towel, and close immediately with clean lid and screw band. Put on a sterile towel.**

Repeat steps *-** in one smooth flow jar per per jar, stirring again before ladling. Don't fill all the jars then proceed with covering because this will not be processed in a boiling water bath. (the pure vinegar-sugar combination makes it less prone to developing botulism and is less susceptible to bacterial/mold proliferation. For every new jar filled, stir the pickles, with the heat kept to the minimum to avoid overcooking yet maintain the heat, before ladling into the hot jars. After all jars are filled, cover with another towel. Only then can you allow open windows/draft. Wait for at least 3 hours for popping sounds when sealing. After 12 hours, take note of unsealed jars and place in refrigerator, to be consumed within 2 weeks. For the properly sealed jars, let sit in the pantry (should be dark and cool) for at least three weeks to further develop the flavor. Unopened jars will remain good within 1 year from canning.

This is now my favorite pickles (hubby's fave is the dill pickles) because it comes closest to the taste of the atsara that I liked, even better. I use this with any dry (not soupy) dishes, or when hunger strikes and I am not in the mood to cook and there are no leftovers to raid in the fridge. Now I am planning to turn them into holiday gifts for the few friends that I have made in the past year.

Do you want more ideas about pickling cucumbers? Click here.
Custom Search