Showing posts with label kitchen helper. Show all posts

Saturday, July 18, 2009

Cream Cheese Squares


Trabahong tamad...perfect with coffee. Got it from kraftfoods magazine.

I enjoyed it plain or with blueberry sauce (made by cooking 2 pints blueberries with 1/4 cup water and as much sugar as I felt it needed, cooked until syrupy).

Store leftovers inside plastic ziploc bags refrigerated. Good even when cold. No need to reheat.

Ingredients:
2 cans (8 oz. each) refrigerated crescent dinner rolls, divided
2 pkg. (8 oz. each) PHILADELPHIA Cream Cheese, softened
1 tsp. vanilla
1 egg, slightly beaten
3/4 cup sugar, divided
2 Tbsp. ground cinnamon

Instructions:

PREHEAT oven to 350°F. Unroll 1 of the cans of crescent dough. Press onto bottom of greased 13x9-inch baking pan to form crust, firmly pressing seams together to seal.

BEAT cream cheese, vanilla, egg and 1/2 cup of the sugar with electric mixer on medium speed until well blended. Spread onto crust.

UNROLL remaining can of crescent dough onto large sheet of wax paper. Pat out dough to form 13x9-inch rectangle, pressing seams together to seal. Invert over cream cheese mixture to form top crust; discard wax paper.

BAKE 30 to 35 min. or until golden brown. Combine remaining 1/4 cup sugar and cinnamon in small bowl; sprinkle over squares before cutting.

Saturday, April 25, 2009

KNB: Nu-Wave Infrared Tabletop Oven

I saw this in a catalog, and I was intrigued. A portable oven where I can cook a whole chicken even straight from the freezer??? For less than $100??? While I essentially have no need for an additional oven since my conventional oven does a good job already, my curiosity got the better of me. This seemed like a very good idea for those who do not have the space in the kitchen for a conventional oven, or for those who simply cannot afford one. How about college students? it also claims to be able to bake muffins or rolls...that I gotta try.

Anyway, I checked out the product reviews in amazon.com before I made this purchase. The first dish I made out of this is roasted cornish hen. While it took a while to bake, I realized I made a mistake of not cooking the back for half the time intially before turning it over to cook the breast part. But we ended up with very moist chicken which we loved.


Then I tried to cook steaks (marinated) in it, and they were tender and moist as well. My husband was very pleased with the results, and we were not sure whether it was the marinade that made the steaks moist though they were well done, or it was the oven itself.

The advantages are that I can cook frozen foods without having to pre-heat the oven, and end up with cooking time same as that using conventional oven minus the thawing time. Easy clean up as well (just like you would ordinary dishes). It does not heat up the kitchen as much as conventional oven does. The space it has for baking is just right for a family size meal (as long as I am not planning to bake other things like rolls or breads at the same time).

I did buy an extender ring (for additional $38++) so I could bake big chickens and small turkeys in it. The extender ring includes the transparent ring that makes the wall higher, and a rack that is 2 inches high, plus additional smaller nonstick baking pan.

While this is another clutter on my countertop, after I am done getting to know it, I will pass it on to my older son when he goes out of the house, living on his own, cooking for himself or with a friend. (Or I might love it all the more as time goes by!) I will still have to experiment baking yeast breads or muffins or cakes in it. If it really does as promised on ads, then I have got myself a winner at a bargain price.

This is what I got from my recent google ads and foodbuzz earnings. So my dear readers, if you have been enjoying my recipes here, paki-klik lang po ang mga gugel adverts for additional incentive for me to keep on posting. TY!

Thursday, April 02, 2009

KNB: Electric Gravy Boat/Warmer


I had been wanting this for a long time. Although I have a gravy boat that has nice prints, I wanted one like this, which will keep gravy warm during a meal.

This is not used to warm up gravy, but you will have to put warm gravy and this gadget keeps it warm. The warming base is also detachable from the cord, so that you can place it on the table during a meal and it will still keep the gravy warm for a period of time.

I am not sure if I can use other ceramic-type gravy boats on it, though.

What sucks, though, is I bought this a while back for >$30. I used the first month pay I got from foodbuzz (paid through paypal). Now that I am posting about it, the price is $19.40????

Bummer!

Saturday, March 28, 2009

Lemon-Pepper Grilled Salmon


Salmon has become my older son's favorite fish because "it's got real flavor unlike the haddock which does not taste anything at all to me."

I myself like salmon, especially when grilled. Actually, I almost always cook salmon this way, with only the basic of ingredients, then enjoyed with rice and some slices of ripe tomatoes sprinkled with salt.


I usually cook just half of the fillet (with intact skin), which will be all I and
my two sons can eat during a meal time (husband does not like salmon; too strong a flavor for him). Whereas before I cooked salmon on a iron griddle placed atop the stovetop, now I use the George Foreman grilling machine (small one, probably costs <$20 nowaadays). The cooking time is less since it cooks both sides at the same time (max 6 minutes depending on how thick the fillet is) and tends to close in the heat; clean up is easier; and I don't have to worry about flipping the fish over. To clean, I just let the machine cool down a bit, wipe it with non-abrasive slightly soapy dish sponge while still warm, then rinse with a bit of water, careful not to get water inside the machine (I hold it sideways).

Ingredients:
1/2 salmon fillet (actually amount depends on you)

Spices -- see slideshow so you know what I mean
garlic-salt
lemon-pepper

Instructions:


Sprinkle fillet with garlic salt, approximating how much you need for the amount of fish you have.

Generously sprinkle with lemon-pepper to really cover the whole surface. Let sit for about 5 minutes. Meanwhile, plug in the grilling machine.

When hot, spray or brush the grilling surface with oil.

Place the fillet on the grill and let cook for 4 to 6 minutes. (Fish is done when flaky all the way. Do not overcook!) For this piece, I had to turn around the fish after the first 4 minutes to cook the thin part further, as it was not touched by the upper grill. The closed-in heat further cooked that when turned around.

Sunday, February 15, 2009

Amco Swing A-Way Grease Separator


For the past 5 years my cheap 1-cup fat separator had served me well enough. But many times I wish I had one with bigger capacity, with a wide mouth and stable base, such that pouring the sauce off from pan would not be too much of a hassle. So I browsed amazon.com again to look for one with good reviews. This particular brand and style caught my attention, not only because of its strainer that would get rid of big chunks of veggies and meat or bones left there and still retain some small bits that add flavor, but also of its bottom-release feature, which allows for minimal, if at all, inclusion of fat when you are pouring that gravy to saucepan. The cover of the tiny hole at the bottom is released with a squeeze of a silicone part at the handle.

However, despite buying myself this gadget for the purpose of separating fat from the sauce, I found an additional use for it. As a matter of fact, I used it first as a batter dispenser before I even had the chance to use it for fat separation when making gravy (which I haven't done to this day since I got this wonderful gadget). This photo shows the kutsinta batter being poured effortlessly and with minimal mess into individual muffin cups. I love it, and I just hope it lasts.

So even if it was more pricey than most fat separators, the two-in-one feature (which I did not foresee when I made the decision to buy it) makes it worth the price.


Posted by Picasa

Wednesday, January 21, 2009

Food Processor

From food processor
My husband did not know what to give to me last Christmas (I already had every electronic gadget that I could possibly want, though not the latest ones. I tend to keep one as long as I could until it just breaks down.) Even if he would have wanted to surprise me, he did not want me disappointed with something I did not want. So, I asked for a food processor.

While a lot of homemakers with a food processor usually end up stacking theirs in the basement, I already had plans with what to do with it, especially that I love cooking and canning. The set that I got can also prepare dough, and every reader of this blog knows how I enjoy baking. With the plans that I had, I had to get a specialty disc set, because what I really would want to be able to do with this food processor is the fine grating -- of yucca, mainly, since I love pichi-pichi and cassava cake. Of course, aside from the fine grating, I also had in mind faster and easier chopping/pureeing, and slicing when I am canning produce from my garden during fall. I actually chose the fine grater first then the main gadget
to go with it (as recommended by amazon.com). The only brand that has this fine grating disc was Cuisinart. Nothing else. However, when I got the pair, they were not really a pair. I got the wrong model. I should have gotten another model that had a stem which would attach to different discs. Good thing there was no problem shipping back the item and getting the refund. (I love amazon!)

Recently, with a recent Filipina gathering, my trip to the Asian store and getting green papaya to turn into atsara, I went on to "break in" my new food processor, grating two big yuccas in 1/4 the time it usually took for me to grate them manually (minus the achy arm and wrist!); grating the green papayas, and slicing the other veggies. It took me seconds to grate what I would have grated in an hour. Wow! I was impressed! And the receptacle was large enough to hold a whole onion! Cool! I am so looking forward to making more jars of pickles, jams and jellies next year.

I also made ube haleya two nights ago, using pre-grated ube that I was not sure whether it was pre-cooked or not. And while I was cooking it, I realized it was uncooked, and it was drying up already without being fully cooked yet. I decided to add more liquid and puree it using the food processor (I was not sure whether I could have achieved the same result with the blender; I probably could), before putting back to the stovetop to cook further. I have been eating some haleya since then (my sons have been enjoying it as well), but saving some for an experiment with ube cake. Those two will be on future posts...

Verdict: Met my expectations and more. Easy to clean as well. Seems durable (time will tell, but I am hoping to make full use of it). Quite pricey, but it seems worth it for freeing up some of my time and wrist/arm aches. If you are into canning or even catering, this is a great help. If you are not going to make any slicing or grating in big volumes, this is not recommended.

Now if only there is an electric stirrer powerful enough to stir cooking ube haleya, and long enough to reach the bottom of a stock pot while preparing pasta sauce, I'd be a much happier cook! Not that I don't like burning the calories, but I hate having a sore arm and wrist and right shoulder after such a tedious task.

Thursday, December 18, 2008

KNB - Katas ng Blogging

I am hosting a Filipino Christmas party this Saturday...
From KNB
and I have been busy preparing for that. Good thing I have these early Christmas gifts: kitchen helpers -- which are KNBs.

I signed up for google adsense in 2006(? can't remember exactly when) and more frequently have been receiving my "blogger's compensation" in the past years. I used the previous ones for personal wants (a trip to Splashtown, etc.). (I also, at some point, signed up for kontera.) This time I thought...why not get things for my kitchen since the money is a fruit of my foodblogging hobby (In other words, katas ng blogging)?

So I did...

You can very well tell that I am a big fan of slow cooking. Well, there is another reason why I got more slowcookers when I already have a 6-qt and a 2-qt. As I was thinking of preparing several main entrees for the Filipino Christmas party I am hosting this Saturday, I wanted to have a means to keep them warm after preparing ahead (before guests arrive). Actually, I have cooked and frozen some of them since last week, and I plan to just start thawing and keeping them warm by morning of Saturday. I looked at chafing dishes and boy! Aren't they super expensive???? Beautiful and pleasing to the eyes were those that ranged $300+, and the ordinary looking ones were in the $40++, so I opted for slowcookers. The digital one I got from walmart at $30 (and may I say elegant). Plus I don't have to look for fuel to keep the food warm. Just plug them in. Well, I plan to use my countertop space (I have a lot if I keep it tidied up!) and my several outlets (I have them every 2 feet, as I requested to hubby to make them available for all my small kitchen appliances when he was building my kitchen). So my plan is to line up the dishes on the countertop and use the dining table solely for eating our food. The slowcookers are a good solution. I might have to borrow my friend's and my MIL's for some more entrees.

I have had an irrational fear (aka, phobia) of pressure cookers because I always imagine they would explode in front of my face. (Oh please don't lecture me about how easy it is to use, because, despite my phobia, I perfectly understand the scientific principles, aka physics, of pressure cooking. Maybe the same knowledge is responsible for my phobia...knowing if my kids topple this while on high pressure, they might end up with wrecked and severely burned face. Hence, I should never leave this alone while I am using it!) My Nanay used to own one, with the old-fashioned metal sitting on top regulating the pressure inside. I still remember our maid rushing to the sink to run cold water over it to quickly lower the pressure before she would open it. I was always afraid she was not intelligent enough to use the thing and was just thankful she never got injured. Well, after several years, the gasket gave up and my Nanay was never able to get a replacement. So it primarily served then as a thick-gauged stockpot. It was so heavy I was not sure whether the make was aluminum with something else, but it was not shiny as my stainless steel is.

I got this Fagor pressure cooker from amazon.com (I am a great customer of amazon).
I would have wanted to get the 10-qt pressure cooker so I could also do canning in it but it was so pricey my KNB will not be able to cover the cost! This 8-qt was $90 and just the right size for most of my cooking anyway. I finally summoned up the courage to get one because of my plan to serve lengua with mushroom sauce, and as stel had a post about how to peel the lengua, I thought I would need one! And she was right on that!!! It was sooo much easier to peel (not to mention so fast to cook to tenderness) the beef tongue. Why Fagor? Well, I googled the best pressure cooker reviews, and this had very good reviews, plus they had stainless steel ones! (They have cheaper aluminum ones too, but I have this irrational fear again that aluminum just might not be able to withstand the pressure). I made sure I watched to DVD first before I used it. Gives me security during my first try. Now that I have actually used it and have successfully overcome my phobia, I guess I will have more experimental cooking using the pressure cooker...more to blog about in the future.

And yeah, from now on, I will purchase kitchen gadgets, tools, etc. with my blogger's comp.

Wednesday, November 19, 2008

Savory Pot Roast

Here's another dish that makes use of spices (I love spices!)
From savory pot roast
And to save time, I get a packet of McCormick Savory Pot Roast Seasoning. Since this is slowcooked, prep time is short, then I just forget about it while it cooks, then as the aroma fills the house, I get reminded of what we are going to have for supper. One thing I like about McCormick is that, since it mainly uses natural spices, I can't really go wrong with it. Plus, I get a glimpse of how dishes are supposed to taste like per American standards instead of Pinoy standards. While this dish did not taste at all like the typical mechado or caldereta (more tamato-based) beef stews of the Filipinos, we all like the taste of it. We enjoy this usually with slices of freshly baked bread.

INGREDIENTS:

3 pounds boneless beef chuck or rump bottom round roast, well trimmed
5 cups cut-up fresh vegetables, such as carrots, celery, onions and potatoes
1 package McCormick® Slow Cookers Savory Pot Roast Seasoning
1 cup red wine or water

INSTRUCTIONS:

1. Place roast and vegetables in slow cooker.
2. Mix Seasoning and red wine until blended. Pour over roast and vegetables. Cover.
3. Cook 8 hours on LOW or 4 hours on HIGH. Remove roast and vegetables to serving platter. Stir sauce before serving.
IMPORTANT: For best results, do not remove cover during cooking.

Wednesday, October 29, 2008

Ultimate Melt-In-Your-Mouth Pancakes

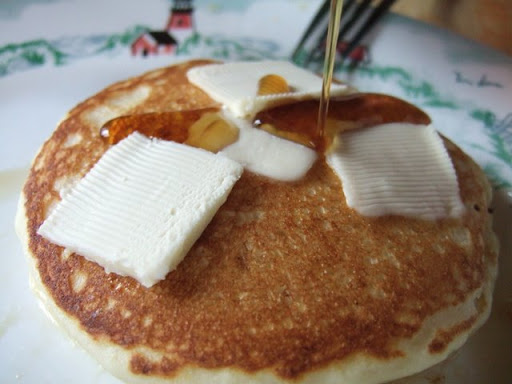
As I have repeatedly said recently, (kulit!!!) I have been using more and more of ready mixes. Bisquick is one of my faves, especially for waffles or pancakes. I particularly love this recipe that they have on the back if you want melt-in-your-mouth fluffy pancake types (achievable by adding the lemon juice and baking powder). My family absolutely loves them!
Below is a copy and paste of the recipe from the offical website of Bisquick.


Ingredients:

2 cups Original Bisquick® mix
1 cup milk
1 tablespoon sugar
2 tablespoons lemon juice
2 teaspoons baking powder
2 eggs

Procedure:

1. Heat griddle or skillet over medium-high heat or electric griddle to 375°F; grease with cooking spray, vegetable oil or shortening. (Surface is ready when a few drops of water sprinkled on it dance and disappear.)
2. Stir all ingredients until blended. Pour by slightly less than 1/4 cupfuls onto hot griddle.
3. Cook until edges are dry. Turn; cook until golden. To keep warm, place in single layer on cookie sheet. Cover with aluminum foil, and place in 200°F oven up to 10 minutes.


Monday, October 27, 2008

Beef Stew

How many times have I said that
From beef stew
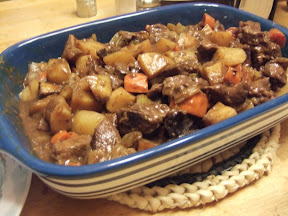
I have been using more and more ready mixes since I started working? Well, this beef stew is a recent addition to those dishes. I particularly like McCormick mixes.

Although my Filipino tongue prefers the tomato-based kaldereta style of beef stew, I figure, if I use these ready mixes, I cannot go wrong in that my husband's palate will probably be familiar with that taste. After all, they are just a mix of spices. As long as I use our home-grown beef, and fresh ingredients from the grocery store, then I am all set.

The ingredients and directions are in the back of the package itself, so I will not post it here anymore.


Friday, October 13, 2006

Chocolate Crepes

This recipe was from the recipe book "Chocolate: Cooking with the world's best ingredient" by McFadden and France. The original recipe was for crepes, souffle and pineapple syrup, but since I only wanted to re-serve the leftover chocolate pudding as previously posted, I made only the crepes and used the pudding as filling. I made use of apple jam (given by a friend) instead of the pineapple syrup as topping.

I first coveted making crepes when I saw thess's posts on crepe and fresh lumpia. I knew then that I had to have one. So I ordered one from Villaware sometime in May.

Hubby liked it so much that he had three ("Thanks for introducing me to something new. I have heard of crepes before but just had them today for the first time.") Sweet ba? Me kwento behind that over-expression of appreciation but I am not sure if I should post about it...

INGREDIENTS:
3/4 cup all-purpose flour
1 tbsp cocoa powder
1 tsp sugar
pinch of salt
1 tsp ground cinnamon
2 eggs
3/4 cup milk
1 tsp vanilla extract
1/4 cup unsalted butter, melted

PROCEDURE:
Sift the flour, cocoa, sugar, salt and cinnamon into a bowl. Stir, then make a well in the center. In a bowl, beat the eggs, milk and vanilla. Gradually add to the well in the flour mixture, whisking in flour from the side of the bowl to form a smooth batter. Stir in half the melted butter and pour into a pitcher. Let stand for one hour.

Heat a the crepe pan. Of course, I used my VillaWare crepe maker which I recently bought. (I have not had luck with trying to make egg roll wrapper with it, though. I need to find the right batter recipe that will work with it.) Using this, I just had to dip the gadget into the batter that I placed on the plastic pan that came with it for 2-3 seconds then let stand and cook for about 1-2 minutes. Peeling it off was so easy.

While I cooked the crepes I asked my older son to spread the chocolate pudding on half of each crepe then fold twice to make triangular crepes. The apple jam topping was optional, as is the jam flavor (you may use pineapple, strawberry, blueberry, etc.).

Friday, October 06, 2006

Bread Machine

For stel...

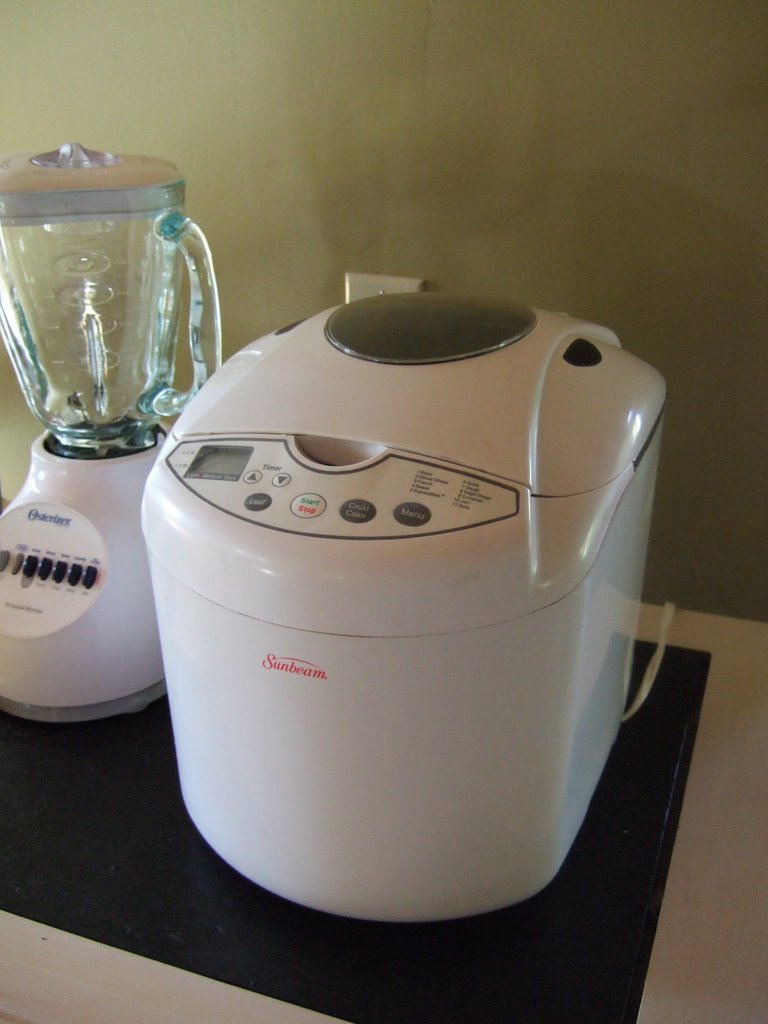
My bread machine was a wedding gift from my MIL. My husband was ecstatic that I got one, and he was so looking forward to homemade yeast breads. I myself was excited, and I asked my hubby to make the first bread as a demonstration of how to use it, which he did. He picked the recipe in the manual for a bread that could be prepared in just about an hour. We delighted in the smell of the yeast as the dough was rising and baking.

We were disappointed in the outcome (although not in the taste) because it was wrinkled and seemed to have shrunk.


Several tries later, I lost interest in using it, and resorted to going back to using my Kitchen Aid stand mixer and the conventional oven. I was feeling guilty because it was a gift from my beloved MIL. I hated seeing it just occupying a rather big portion of my countertop space (it is not as heavy as KA stand mixer, though). Until I thought of checking out the website written at the label of the Fleischmann's bread machine yeast and looking at their bread machine recipes...

One after another, I tried basic bread recipes the ingredients of which were usually found in my pantry. Some very good outcomes I have achieved were those of Basic Egg Bread, Rich Cheddar Cheese Bread, and Buttery Sweet Bread as they had well-formed dome and good crunchy crust, plus great taste. The Old-Fashioned Buttermilk Bread was superb in taste and crunch, although tended to have wrinkled dome.

Then as I examined the different settings, I added to my list some wheat bread recipes. Then I experimented with the dough setting using any of the above-mentioned recipes to try shaping them and baking them in the conventional oven.

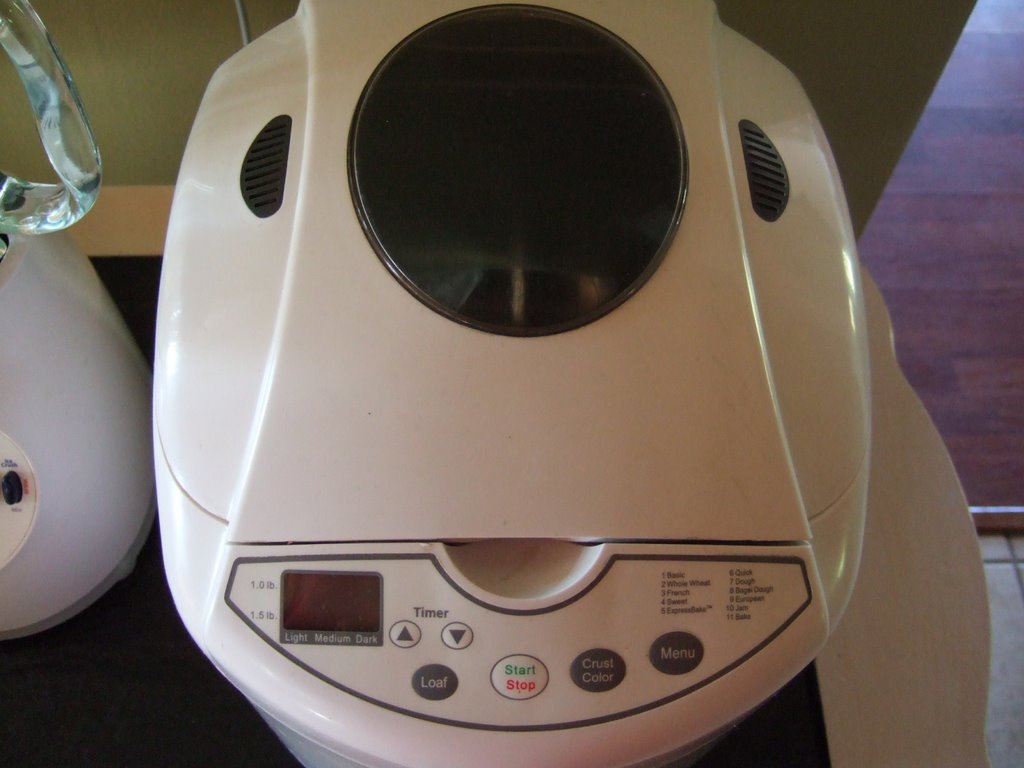
Lately I have been trying to use it just to mix up the dough to the point when it is ready for kneading (which I like because it is less messy). What I like best about these recipes is that the amount is for family size only, usually requiring only 2 cups of flour, so that I do not have to worry about trying to consume the leftovers (I LOVE FRESHLY BAKED YEAST ROLLS, not 1- or 2- or 3-day old ones). My latest experiments include using the bread machine for recipes calling for rapid rise yeast and all purpose flour instead of the usual bread machine yeast and bread machine flour. Right now I am trying to "perfect" (according to my standards) my ensaymada using the bread machine (for minimal mess). Needless to say, if its life comes to its end soon, it would "die" having served its purpose and more. I love my bread machine, and it has been a great kitchen helper for me. The brand I have is a Sunbeam bread machine.


Making a research on bread machines will lead you to poor review of Sunbeam. I think it is mainly because of the same problems I encountered with tmy first usage of it. King Arthur Flour recommends the zojirushi, but it is way too costly (like, 3-6 times more expensive). I am quite satisfied with my Sunbeam.

TIPS for cleaning the...

PAN - Whether you used to make dough or to bake bread, soak in COLD WATER until the dough/bread softens. Then rinse in warm water either plain or a bit soapy. Let air-dry before storing in the bread machine.

BREAD MACHINE - Wipe with damp cloth only.

DO NOT PUT IN THE DISHWASHER! This will damage the non-stick finish (and also will affect the grease in the underside that rotates, according to hubby).

More tips on bread machine here.
Custom Search