I miss the kind of Filipino Christmas Celebration...no matter how little money we had then, we would always have something special on the table for Christmas. I remember my usual role was to prep the leche flan and lumpiang shanghai. My Nanay would prepare the buko salad (or macaroni or fruit), and my younger sister would cook pancit. The men are usually busy with the bakery giveaways and distribution then. My older sister was not living with us anymore since she was in college, and would just visit us during holidays, often not really to join in the cooking. This preparation time I missed most because of the "stress" of preparing food in time for Noche Buena. Then we would always have some party-ing involving karaoke and some dancing, whether or not we actually knew how to. In the small subdivision where we lived then, we had a brief Christmas party with exchange gifts and some singing/dancing program and eating the potluck foods. Then we would come back home and have our own Noche Buena, followed by the most awaited moment by the kids: giving our gifts to them. They were always excited to receive theirs, no matter how cheap they were. The adults get gifts and had to be content with what the others could afford (don't we all?). Very little did we have in money terms, and it was with heavy heart that we indulge in this once-a-year important event...a time to forget about our worries no matter how short, and just bask in the presence and love of one another in the family.
Now here in the US, as I try to recreate the same atmosphere, I only have several established friends that I do these things with, although some are still quite shy to dance or sing, and most of the kids do not feel like joining in with the adults. They have their computer games to enjoy, in the company of other kids. I don't mind, really. As long as we are having fun, that's all that matters. However, I wish I had my family of origin to share this moment with as well. The photos below show the foods we prepared. They were all lined up on my countertops. We used the dining table mainly for eating.
In trying to recreate the hustle and bustle, I prepped quite a lot of foods, although it really got tiring to prep all I wanted singlehandedly. Of course my sons could pitch in some, but it is never the same preparing foods while chatting with the other females in the family. I created and sent out 20++ invitations to Filipinos here, both known to me personally or not. Only 4 were able to make it, one declined (out of state) and the rest did not even care to respond/leave a message on my phone. Would I dare do the same thing next year? Probably not. I will just call my closest friends and plan for the party, just like we did in the previous years.
My visitors all had some food to share. We had monito-monita both for us adults and exchange gifts for the kids. I made it a point to emphasize that the gifts be less than $15, only so we get into the spirit of gift-giving. While the kids did DDR, we adults just contented ourselves chatting with one another.
We had fun enough to somewhat satisfy our craving for Filipino companionship during this season.
I do not have any religious allusions to this season. Please do not attack me for being an agnostic Christian.
Tuesday, December 30, 2008
Thursday, December 25, 2008
Maligayang Pasko
Ang dami kong gusto i-post, but this season is such a busy time for me and many others...so I would just like to take this short time to greet everyone a very Merry Christmas! (there are 4 viewers online as I post this.)
Nakaka-miss ang Paskong Pilipino...
Nakaka-miss ang Paskong Pilipino...
Wednesday, December 24, 2008
Roasted Turkey
This is for my Ate Cris in Canada. We were talking on Skype last night, and she
asked me how I cooked the turkey when I visited her last 2006. I promised I would give her the instructions. She got a free turkey from the grocery store that time we cooked it. First time she witnessed turkey being cooked, and first time to have a taste of a deliciously prepared turkey (the prior ones she tasted were like cardboard, she said).
First check if your turkey is brined or not. Turkey should be completely thawed. If you bought frozen turkey, it might take 2-5 days to completely thaw in the refrigerator depending on the weight (or use cooler with some ice, if you place the cooler out in your garage or porch). Do not thaw in room temp.
Once completely thawed, if your turkey is not brined, brine it in kosher salt:cold water mixture of 2 cups:1 gallon (1 cup only if table salt). Use your cooler (clean first!) to submerge the whole turkey. Add spices like garlic, peppercorns, bay leaves and onions if you desire. Brine at least overnight, preferably two nights before you plan to bake the turkey. Then rinse, wipe and put on a cooling wire rack on top of baking pan, place in the fridge to let air dry for at least 4 hours (drying helps make the skin crisp when you bake). You can start the airdrying night before you are going to bake.
When ready to bake, prepare your spices:
whole garlic, cloves separated, roasted in oven toaster for 7 mins, mashed, and mixed with 1 tbsp each of rosemary leaves and crushed lemongrass. This is your garlic paste.
Separate skin from meat using your fingers or the blunt handle of wooden spoon. Place some garlic paste under skin. Massage to distribute. Wipe skin and cavity lining. Rub some paste onto skin and lining.
Stuff the cavity with:
1 whole onion, 1 whole garlic, bunch of lemongrass, rind of lemon (use the juice in something else), innards (liver and gizzard).
Place on a rack on top of roasting pan with chunks of onions, carrots, celery, and water to cover the veggies.
Place oven rack on lowest position. Heat oven to 400 deg and bake turkey covered with foil for 30 mins. Uncover, spray skin with oil (or brush), and sprinkle with garlic salt and freshly milled/ground pepper. Put back in, turn heat to 350 deg. Bake for additional 3 hours (or more depending on the weight -- check out below from guideline I got from wiki). If skin is crispy brown already, cover with foil and bake again for another 30 minutes or until done.
Take turkey out and let rest on the platter, covered loosely with foil. Wait at least 10 minutes before carving. This will redistribute the juice so you will not end up with dry meat on the breast part.
Prepare gravy. (Use fat separator if you have one.) Place the pan on stove top and using a silicone spatula, loosen the crust formed (if any). Add water (or white wine), season with salt and pepper and soy sauce if needed, to come up with around 2-3 cups of gravy. Don't forget to get the liver and mash it in the sauce. Once you got the taste right, continue to boil while you mix 1/2 cup flour with 1 cup water. Using wire whisk, while sauce is briskly boiling, add in thin streams the flour/water mixture and continue stirring until you have achieved the right thickness. Strain the gravy.
Of course, you prefer to eat this with rice, not mashed potato. But if you want to have mashed potatoes, peel and boil with some salt about 10 medium potatoes for 4-5 people (Yukon or Russet or White) for about 30 minutes on high (don't let water dry out). Add about 1/4 cup of butter, cut up to make them melt easily. Using hand beater, mash the potatoes first before turning on to medium setting. Add about 1/4 cup of half and half cream (or just enough to achieve consistency you want). Serve with butter on top, and let people sprinkle pepper and/or salt.
Hope my instructions are clear! Enjoy your turkey!
NOTES:
How long to thaw frozen turkey:
Turkey Thawing Time in the Refrigerator (40 degrees F):
Approximately 24 hours per 5 pounds
Whole Turkey Weight Thawing Time
8 to 12 lbs 1 to 2 days
12 to 16 lbs 2 to 3 days
16 to 20 lbs 3 to 4 days
20 to 24 lbs 4 to 5 days
Turkey Thawing Time in Cold Water: Approximately 30 minutes per pound.
Change water every 1/2 hour.
Whole Turkey Weight Thawing Time
8 to 12 lbs 4 to 6 hours
12 to 16 lbs 6 to 8 hours
16 to 20 lbs 8 to 10 hours
20 to 24 lbs 10 to 12 hours
Source: GlobalGourmet
How long to bake turkey:
USDA Roasting Timetable for Fresh or Thawed Turkey at 325° F.
These times are approximate and should always be used in conjunction with a properly placed thermometer. The USDA does not recommend cooking turkey in an oven set lower than 325° F.
Unstuffed
8 to 12 pounds 2 3/4 to 3 hours
12 to 14 pounds 3 to 3 3/4 hours
14 to 18 pounds 3 3/4 to 4 1/4 hours
18 to 20 pounds 4 1/4 to 4 1/2 hours
20 to 24 pounds 4 1/2 to 5 hours
Stuffed
8 to 12 pounds 3 to 3 1/2 hours
12 to 14 pounds 3 1/2 to 4 hours
14 to 18 pounds 4 to 4 1/4 hours
18 to 20 pounds 4 1/4 to 4 3/4 hours
20 to 24 pounds 4 3/4 to 5 1/4 hours
Source: WikiAnswers
 |
| From Roasted Turkey |
First check if your turkey is brined or not. Turkey should be completely thawed. If you bought frozen turkey, it might take 2-5 days to completely thaw in the refrigerator depending on the weight (or use cooler with some ice, if you place the cooler out in your garage or porch). Do not thaw in room temp.
Once completely thawed, if your turkey is not brined, brine it in kosher salt:cold water mixture of 2 cups:1 gallon (1 cup only if table salt). Use your cooler (clean first!) to submerge the whole turkey. Add spices like garlic, peppercorns, bay leaves and onions if you desire. Brine at least overnight, preferably two nights before you plan to bake the turkey. Then rinse, wipe and put on a cooling wire rack on top of baking pan, place in the fridge to let air dry for at least 4 hours (drying helps make the skin crisp when you bake). You can start the airdrying night before you are going to bake.
When ready to bake, prepare your spices:
whole garlic, cloves separated, roasted in oven toaster for 7 mins, mashed, and mixed with 1 tbsp each of rosemary leaves and crushed lemongrass. This is your garlic paste.
Separate skin from meat using your fingers or the blunt handle of wooden spoon. Place some garlic paste under skin. Massage to distribute. Wipe skin and cavity lining. Rub some paste onto skin and lining.
Stuff the cavity with:
1 whole onion, 1 whole garlic, bunch of lemongrass, rind of lemon (use the juice in something else), innards (liver and gizzard).
Place on a rack on top of roasting pan with chunks of onions, carrots, celery, and water to cover the veggies.
Place oven rack on lowest position. Heat oven to 400 deg and bake turkey covered with foil for 30 mins. Uncover, spray skin with oil (or brush), and sprinkle with garlic salt and freshly milled/ground pepper. Put back in, turn heat to 350 deg. Bake for additional 3 hours (or more depending on the weight -- check out below from guideline I got from wiki). If skin is crispy brown already, cover with foil and bake again for another 30 minutes or until done.
Take turkey out and let rest on the platter, covered loosely with foil. Wait at least 10 minutes before carving. This will redistribute the juice so you will not end up with dry meat on the breast part.
Prepare gravy. (Use fat separator if you have one.) Place the pan on stove top and using a silicone spatula, loosen the crust formed (if any). Add water (or white wine), season with salt and pepper and soy sauce if needed, to come up with around 2-3 cups of gravy. Don't forget to get the liver and mash it in the sauce. Once you got the taste right, continue to boil while you mix 1/2 cup flour with 1 cup water. Using wire whisk, while sauce is briskly boiling, add in thin streams the flour/water mixture and continue stirring until you have achieved the right thickness. Strain the gravy.
Of course, you prefer to eat this with rice, not mashed potato. But if you want to have mashed potatoes, peel and boil with some salt about 10 medium potatoes for 4-5 people (Yukon or Russet or White) for about 30 minutes on high (don't let water dry out). Add about 1/4 cup of butter, cut up to make them melt easily. Using hand beater, mash the potatoes first before turning on to medium setting. Add about 1/4 cup of half and half cream (or just enough to achieve consistency you want). Serve with butter on top, and let people sprinkle pepper and/or salt.
Hope my instructions are clear! Enjoy your turkey!
NOTES:
How long to thaw frozen turkey:
Turkey Thawing Time in the Refrigerator (40 degrees F):
Approximately 24 hours per 5 pounds
Whole Turkey Weight Thawing Time
8 to 12 lbs 1 to 2 days
12 to 16 lbs 2 to 3 days
16 to 20 lbs 3 to 4 days
20 to 24 lbs 4 to 5 days
Turkey Thawing Time in Cold Water: Approximately 30 minutes per pound.
Change water every 1/2 hour.
Whole Turkey Weight Thawing Time
8 to 12 lbs 4 to 6 hours
12 to 16 lbs 6 to 8 hours
16 to 20 lbs 8 to 10 hours
20 to 24 lbs 10 to 12 hours
Source: GlobalGourmet
How long to bake turkey:
USDA Roasting Timetable for Fresh or Thawed Turkey at 325° F.
These times are approximate and should always be used in conjunction with a properly placed thermometer. The USDA does not recommend cooking turkey in an oven set lower than 325° F.
Unstuffed
8 to 12 pounds 2 3/4 to 3 hours
12 to 14 pounds 3 to 3 3/4 hours
14 to 18 pounds 3 3/4 to 4 1/4 hours
18 to 20 pounds 4 1/4 to 4 1/2 hours
20 to 24 pounds 4 1/2 to 5 hours
Stuffed
8 to 12 pounds 3 to 3 1/2 hours
12 to 14 pounds 3 1/2 to 4 hours
14 to 18 pounds 4 to 4 1/4 hours
18 to 20 pounds 4 1/4 to 4 3/4 hours
20 to 24 pounds 4 3/4 to 5 1/4 hours
Source: WikiAnswers
Monday, December 22, 2008
Cassava Bibingka Espesyal
I got this from stel.
The first time I made this I used a small pan. Did not have enough space for rising while it baked, nor for the topping to be placed without spilling. It did taste good, and I shared the recipe with my friend's mom. She made it the next year, and I was so delighted with it, and I asked her for the recipe. "That's the recipe you gave me!"
So yesterday, I tried again the second time this year...with all the right
ingredients, but still managed to end up with small pan (I should have taken note of the lasagna pan measurement; I grabbed an aluminum foil pan in the store which was 13x9; should have been 14 x10, but the next size I saw was that of a roasting pan, so I settled for the smaller one. I did not want to use my ceramic or glass pans as I was using them for something else. Bad decision. It was still good, though, and I mananged to use the remaining topping mix for the leftover, when the top of the cassava cake shrunk as it cooled. I spread the topping mix and broiled for 5 minutes on high.
(For this recipe and that of pichi-pichi, I bought the yucca last week and grated them, pre-measured by the cups then froze until I was ready to bake them.)
Ingredients
4 cups grated cassava/yucca (or 2 packs thawed grated cassava)
1 can (12-oz) of evaporated milk
1 cup cream of coconut (coco lopez or other Spanish brand) (use the remaining for topping)
1 can (14-oz) of condensed milk (subtract 6 tbsps. for topping)
1 can (14-oz) of coconut milk (subtract 6 tbsps. for topping)
5 eggs
1/2 cup of brown sugar
1-2 cups strips of young coconut meat (or 1 jar of drained macapuno strings or a pack of thawed frozen shredded young coconut)
Topping:
remaining coco lopez (7-oz)
6 tbsp condensed milk
6 tbsp coconut milk
2 egg yolks
Instructions:
Blend all ingredients well and pour into a 14x10 baking dish (preferably lined with cleaned and dried banana leaves brushed with butter). Bake at 350 deg F for 40 minutes or until just set.
Meanwhile, prepare topping by blending well all the ingredients.
Increase heat to 400 and pour topping. Bake an additional 15-20 minutes or until topping is brown and bubbly. Watch closely so it does not burn.
Cool completely before cutting into squares.
EDITED:
The following is a recipe that my sis and I used when I was there in Canada on a two-week visit:
Recipe ng cassava:
1/2 cup butter,melted (123 grams)
3 eggs
1 3/4 cups sugar
1 cup evap milk
3/4 cup condensed milk
3/4 c. coconut milk or evaporated milk
1 cup buko or 1/2 cup Macapuno preserved
5 cups frozen cassava, grated (1kilo) Topping:
3/4 cup coconut milk (use kakang-gata)or evaporated milk mix with 3/4 cup condensed milk Grated quick melt cheese
Procedure:
Mix all ingredients(base). POUR ON 9x13x2" lined baking pan, butered and lined with aluminum foil pan. Bake for 40 mins at 350 degrees F oven. Remove from the oven and pour topping. Bake again for 20 mins or until golden brown.
To attain a darker topping, broil for 3-4 mins or use a blow torch.
And the following is another recipe by my friend Fe -
4 c. grated cassava
1 can (12-oz) evaporated milk
1 can(14-os) coconut milk
1 can(14-oz) condensed milk
2 cups young coconut
TOPPING:
1 can (12-oz) evaporated milk
1 can(14-oz) coconut milk
1 can (14-oz) condensed milk
2-4 TBSP flour
6 egg yolks
Bring to boil then pour to cassava cake
Broil for 5 minute or until brown
 |
| From special cassava (yucca) cake |
So yesterday, I tried again the second time this year...with all the right
 |
| From special cassava (yucca) cake |
(For this recipe and that of pichi-pichi, I bought the yucca last week and grated them, pre-measured by the cups then froze until I was ready to bake them.)
Ingredients
4 cups grated cassava/yucca (or 2 packs thawed grated cassava)
1 can (12-oz) of evaporated milk
1 cup cream of coconut (coco lopez or other Spanish brand) (use the remaining for topping)
1 can (14-oz) of condensed milk (subtract 6 tbsps. for topping)
1 can (14-oz) of coconut milk (subtract 6 tbsps. for topping)
5 eggs
1/2 cup of brown sugar
1-2 cups strips of young coconut meat (or 1 jar of drained macapuno strings or a pack of thawed frozen shredded young coconut)
Topping:
remaining coco lopez (7-oz)
6 tbsp condensed milk
6 tbsp coconut milk
2 egg yolks
Instructions:
Blend all ingredients well and pour into a 14x10 baking dish (preferably lined with cleaned and dried banana leaves brushed with butter). Bake at 350 deg F for 40 minutes or until just set.
Meanwhile, prepare topping by blending well all the ingredients.
Increase heat to 400 and pour topping. Bake an additional 15-20 minutes or until topping is brown and bubbly. Watch closely so it does not burn.
Cool completely before cutting into squares.
EDITED:
The following is a recipe that my sis and I used when I was there in Canada on a two-week visit:
Recipe ng cassava:
1/2 cup butter,melted (123 grams)
3 eggs
1 3/4 cups sugar
1 cup evap milk
3/4 cup condensed milk
3/4 c. coconut milk or evaporated milk
1 cup buko or 1/2 cup Macapuno preserved
5 cups frozen cassava, grated (1kilo) Topping:
3/4 cup coconut milk (use kakang-gata)or evaporated milk mix with 3/4 cup condensed milk Grated quick melt cheese
Procedure:
Mix all ingredients(base). POUR ON 9x13x2" lined baking pan, butered and lined with aluminum foil pan. Bake for 40 mins at 350 degrees F oven. Remove from the oven and pour topping. Bake again for 20 mins or until golden brown.
To attain a darker topping, broil for 3-4 mins or use a blow torch.
And the following is another recipe by my friend Fe -
4 c. grated cassava
1 can (12-oz) evaporated milk
1 can(14-os) coconut milk
1 can(14-oz) condensed milk
2 cups young coconut
TOPPING:
1 can (12-oz) evaporated milk
1 can(14-oz) coconut milk
1 can (14-oz) condensed milk
2-4 TBSP flour
6 egg yolks
Bring to boil then pour to cassava cake
Broil for 5 minute or until brown
A More Special,Easy and Quick Pichi-Pichi Espesyal Using Microwave
I posted before a recipe for
pichi-pichi espesyal using the traditional method of steaming. My long-time blogger friend JMom made a post using microwave (isn't that kewl?). So, with my hosting of Filipino Christmas party yesterday, I prepared pichi-pichi using the microwave. Basing on some comments at JMom's post, I tried adding pandan essence (actually, it was McCormick Buco Pandan Essence; thanks to Deb for sending me several bottles). What makes it more special? I used buko water instead of plain water.
I bought several young coconuts from hannaford to use for cassava cake. Out of the 4 I bought, 3 had the right chewy consistency of young coconut perfect for salads or buko pie or cassava cake. One was too young it had the mala-uhog consistency. The boys are in love with buko water and they asked if they could have some; of course I allowed them to. But as I was reading JMom's post and the idea of using buko water crossed by mind, I immediately stopped them and measured out 2 cups (my earlier steamed pichi recipe called for 2 cups water to 1 cup cassava and 1 cup sugar; JMom's recipe called for 1:1:1 ratio). So I used 2 cups buko water, 1 cup grated cassava, and 1 cup sugar. I knew the result would be very wobbly and quite soft, but that's how I really want it so it will still be soft even after chilling.
Ingredients:
1 cup grated cassava
2 cups coconut water
1 cup sugar
several drops of buco pandan essence (McCormick)
Instructions:
Blend everything well in an 8x8 or 9x9 microwavable dish. Microwave for 1 minute on high, stir with a wire whisk, microwave and stir repeatedly every 30 seconds until it becomes like soft paste (remember, this will continue to thicken as it cools down). I probably did this repeatedly 4-5 times, adding more buco pandan essence until I reached my desired color. I left it for a while to cool down before I took the hot dish out and let it cool completely. Meanwhile, I asked my older son to open the coconut (the mature one,as opposed to young coconut), then my younger son to grate it. (See my primitive coconut grater here.)
Using a
cookie scoop, I then rolled in grated coconut to coat each piece. I did buy sesame seeds upon seeing some suggestions from JMom's post, but opted to just serve it the traditional way. Only 3 pieces were left at the end of the day. My kids were leery of the greenish color, but I explained to them that the same color reminds us Filipinos of special buko-pandan salad (I tasted this in PI prepared by one of the midwives where she used the buco water boiled with pandan leaves to make runny green-colored gelatin and mixed with strips of soft buco, blocks of unflavored
green gelatin and condensed milk. It was so good!)
Now you wonder what I did with the buko flesh/young meat? I cut them in pieces and froze, then used for special cassava cake once I was ready to make it. (I had to restrain myself and the kids from eating them all!)
 |
| From pichi-pichi |
 |
| From buko |
I bought several young coconuts from hannaford to use for cassava cake. Out of the 4 I bought, 3 had the right chewy consistency of young coconut perfect for salads or buko pie or cassava cake. One was too young it had the mala-uhog consistency. The boys are in love with buko water and they asked if they could have some; of course I allowed them to. But as I was reading JMom's post and the idea of using buko water crossed by mind, I immediately stopped them and measured out 2 cups (my earlier steamed pichi recipe called for 2 cups water to 1 cup cassava and 1 cup sugar; JMom's recipe called for 1:1:1 ratio). So I used 2 cups buko water, 1 cup grated cassava, and 1 cup sugar. I knew the result would be very wobbly and quite soft, but that's how I really want it so it will still be soft even after chilling.
 |
| From pichi-pichi |
Ingredients:
1 cup grated cassava
2 cups coconut water
1 cup sugar
several drops of buco pandan essence (McCormick)
Instructions:
Blend everything well in an 8x8 or 9x9 microwavable dish. Microwave for 1 minute on high, stir with a wire whisk, microwave and stir repeatedly every 30 seconds until it becomes like soft paste (remember, this will continue to thicken as it cools down). I probably did this repeatedly 4-5 times, adding more buco pandan
Using a
 |
| From pichi-pichi |
green gelatin and condensed milk. It was so good!)
Now you wonder what I did with the buko flesh/young meat? I cut them in pieces and froze, then used for special cassava cake once I was ready to make it. (I had to restrain myself and the kids from eating them all!)
Sunday, December 21, 2008
Rotisserie
This is my entry for this week's LaPiS theme: kitchen gadgets.
It was my husband's birthday gift for me...which I used yesterday for making lechon using ham (see pic below to judge for yourself how crispy it appeared.)
I saw this first at my friend Ana's house. She was making lechon manok with it using cornish hens (the small ones). It does a good job of basting the chickens with its own juice as it cooks.
I actually asked my husband for it. I wanted to see if I can make pork lechon crispy in it, while basting itself with its fat drippings as it rotates. Maybe the skin will turn out crispy if only fat will coat it, and not watery juice. Maybe it will stay soft. I plan to use only a small cut of probably shoulder ham with skin on. If it won't turn crispy I might just end up using the oven still.
We'll see...
UPDATE as of 12-21-08:
I used this rotisserie yesterday instead of using the oven for lechon. As usual, I boiled the ham in water and spices for 30 minutes (smaller cut than my previous), let the excess fluid drip. I used the rotisserie's spit rods to do this, placed in the rotisserie itself to drip on the pan, with door open. The surface was very dry the next day, so that crisping the skin was very good, better than deep frying like in lechon kawali yet, less
fat!!! However, I started cooking about 2.5 hours prior to serving time (because that was how I guessed it would take to get the skin crispy and the interior hot enough), but it was actually ready after an hour! The burnt look here was because I re-heated twice: one was 30 minutes before the planned serving time, and the other 30 minutes before the estimated arrival of our latest expected guest. Next time, I will know to start running this one hour before lunchtime (or supper time). The skin was super crispy!
Hubby liked the meat portion of this ham. (Note: "Ham" is pork part from hip area to knee; it does not necessarily mean cured. However, all the ham I have in my freezer is cured. In the same manner, they refer to pork belly as "bacon," whether sliced thinly or not, whether cured or not. I have requested to keep slabs of pork belly instead of turning them to bacon, but apparently they are so used to curing these, that I ended up with slabs of cured bacon...maybe it will be ok to use for lechon kawali, or I might roast in this rotisserie as well.)
 |
| From rotisserie |
It was my husband's birthday gift for me...which I used yesterday for making lechon using ham (see pic below to judge for yourself how crispy it appeared.)
I saw this first at my friend Ana's house. She was making lechon manok with it using cornish hens (the small ones). It does a good job of basting the chickens with its own juice as it cooks.
I actually asked my husband for it. I wanted to see if I can make pork lechon crispy in it, while basting itself with its fat drippings as it rotates. Maybe the skin will turn out crispy if only fat will coat it, and not watery juice. Maybe it will stay soft. I plan to use only a small cut of probably shoulder ham with skin on. If it won't turn crispy I might just end up using the oven still.
We'll see...
UPDATE as of 12-21-08:
I used this rotisserie yesterday instead of using the oven for lechon. As usual, I boiled the ham in water and spices for 30 minutes (smaller cut than my previous), let the excess fluid drip. I used the rotisserie's spit rods to do this, placed in the rotisserie itself to drip on the pan, with door open. The surface was very dry the next day, so that crisping the skin was very good, better than deep frying like in lechon kawali yet, less
 |
| From rotisserie |
Hubby liked the meat portion of this ham. (Note: "Ham" is pork part from hip area to knee; it does not necessarily mean cured. However, all the ham I have in my freezer is cured. In the same manner, they refer to pork belly as "bacon," whether sliced thinly or not, whether cured or not. I have requested to keep slabs of pork belly instead of turning them to bacon, but apparently they are so used to curing these, that I ended up with slabs of cured bacon...maybe it will be ok to use for lechon kawali, or I might roast in this rotisserie as well.)
Thursday, December 18, 2008
KNB - Katas ng Blogging
I am hosting a Filipino Christmas party this Saturday...
and I have been busy preparing for that. Good thing I have these early Christmas gifts: kitchen helpers -- which are KNBs.
I signed up for google adsense in 2006(? can't remember exactly when) and more frequently have been receiving my "blogger's compensation" in the past years. I used the previous ones for personal wants (a trip to Splashtown, etc.). (I also, at some point, signed up for kontera.) This time I thought...why not get things for my kitchen since the money is a fruit of my foodblogging hobby (In other words, katas ng blogging)?
So I did...
You can very well tell that I am a big fan of slow cooking. Well, there is another reason why I got more slowcookers when I already have a 6-qt and a 2-qt. As I was thinking of preparing several main entrees for the Filipino Christmas party I am hosting this Saturday, I wanted to have a means to keep them warm after preparing ahead (before guests arrive). Actually, I have cooked and frozen some of them since last week, and I plan to just start thawing and keeping them warm by morning of Saturday. I looked at chafing dishes and boy! Aren't they super expensive???? Beautiful and pleasing to the eyes were those that ranged $300+, and the ordinary looking ones were in the $40++, so I opted for slowcookers. The digital one I got from walmart at $30 (and may I say elegant). Plus I don't have to look for fuel to keep the food warm. Just plug them in. Well, I plan to use my countertop space (I have a lot if I keep it tidied up!) and my several outlets (I have them every 2 feet, as I requested to hubby to make them available for all my small kitchen appliances when he was building my kitchen). So my plan is to line up the dishes on the countertop and use the dining table solely for eating our food. The slowcookers are a good solution. I might have to borrow my friend's and my MIL's for some more entrees.
I have had an irrational fear (aka, phobia) of pressure cookers because I always imagine they would explode in front of my face. (Oh please don't lecture me about how easy it is to use, because, despite my phobia, I perfectly understand the scientific principles, aka physics, of pressure cooking. Maybe the same knowledge is responsible for my phobia...knowing if my kids topple this while on high pressure, they might end up with wrecked and severely burned face. Hence, I should never leave this alone while I am using it!) My Nanay used to own one, with the old-fashioned metal sitting on top regulating the pressure inside. I still remember our maid rushing to the sink to run cold water over it to quickly lower the pressure before she would open it. I was always afraid she was not intelligent enough to use the thing and was just thankful she never got injured. Well, after several years, the gasket gave up and my Nanay was never able to get a replacement. So it primarily served then as a thick-gauged stockpot. It was so heavy I was not sure whether the make was aluminum with something else, but it was not shiny as my stainless steel is.
I got this Fagor pressure cooker from amazon.com (I am a great customer of amazon).
I would have wanted to get the 10-qt pressure cooker so I could also do canning in it but it was so pricey my KNB will not be able to cover the cost! This 8-qt was $90 and just the right size for most of my cooking anyway. I finally summoned up the courage to get one because of my plan to serve lengua with mushroom sauce, and as stel had a post about how to peel the lengua, I thought I would need one! And she was right on that!!! It was sooo much easier to peel (not to mention so fast to cook to tenderness) the beef tongue. Why Fagor? Well, I googled the best pressure cooker reviews, and this had very good reviews, plus they had stainless steel ones! (They have cheaper aluminum ones too, but I have this irrational fear again that aluminum just might not be able to withstand the pressure). I made sure I watched to DVD first before I used it. Gives me security during my first try. Now that I have actually used it and have successfully overcome my phobia, I guess I will have more experimental cooking using the pressure cooker...more to blog about in the future.
And yeah, from now on, I will purchase kitchen gadgets, tools, etc. with my blogger's comp.
 |
| From KNB |
I signed up for google adsense in 2006(? can't remember exactly when) and more frequently have been receiving my "blogger's compensation" in the past years. I used the previous ones for personal wants (a trip to Splashtown, etc.). (I also, at some point, signed up for kontera.) This time I thought...why not get things for my kitchen since the money is a fruit of my foodblogging hobby (In other words, katas ng blogging)?
So I did...
You can very well tell that I am a big fan of slow cooking. Well, there is another reason why I got more slowcookers when I already have a 6-qt and a 2-qt. As I was thinking of preparing several main entrees for the Filipino Christmas party I am hosting this Saturday, I wanted to have a means to keep them warm after preparing ahead (before guests arrive). Actually, I have cooked and frozen some of them since last week, and I plan to just start thawing and keeping them warm by morning of Saturday. I looked at chafing dishes and boy! Aren't they super expensive???? Beautiful and pleasing to the eyes were those that ranged $300+, and the ordinary looking ones were in the $40++, so I opted for slowcookers. The digital one I got from walmart at $30 (and may I say elegant). Plus I don't have to look for fuel to keep the food warm. Just plug them in. Well, I plan to use my countertop space (I have a lot if I keep it tidied up!) and my several outlets (I have them every 2 feet, as I requested to hubby to make them available for all my small kitchen appliances when he was building my kitchen). So my plan is to line up the dishes on the countertop and use the dining table solely for eating our food. The slowcookers are a good solution. I might have to borrow my friend's and my MIL's for some more entrees.
I have had an irrational fear (aka, phobia) of pressure cookers because I always imagine they would explode in front of my face. (Oh please don't lecture me about how easy it is to use, because, despite my phobia, I perfectly understand the scientific principles, aka physics, of pressure cooking. Maybe the same knowledge is responsible for my phobia...knowing if my kids topple this while on high pressure, they might end up with wrecked and severely burned face. Hence, I should never leave this alone while I am using it!) My Nanay used to own one, with the old-fashioned metal sitting on top regulating the pressure inside. I still remember our maid rushing to the sink to run cold water over it to quickly lower the pressure before she would open it. I was always afraid she was not intelligent enough to use the thing and was just thankful she never got injured. Well, after several years, the gasket gave up and my Nanay was never able to get a replacement. So it primarily served then as a thick-gauged stockpot. It was so heavy I was not sure whether the make was aluminum with something else, but it was not shiny as my stainless steel is.
I got this Fagor pressure cooker from amazon.com (I am a great customer of amazon).
I would have wanted to get the 10-qt pressure cooker so I could also do canning in it but it was so pricey my KNB will not be able to cover the cost! This 8-qt was $90 and just the right size for most of my cooking anyway. I finally summoned up the courage to get one because of my plan to serve lengua with mushroom sauce, and as stel had a post about how to peel the lengua, I thought I would need one! And she was right on that!!! It was sooo much easier to peel (not to mention so fast to cook to tenderness) the beef tongue. Why Fagor? Well, I googled the best pressure cooker reviews, and this had very good reviews, plus they had stainless steel ones! (They have cheaper aluminum ones too, but I have this irrational fear again that aluminum just might not be able to withstand the pressure). I made sure I watched to DVD first before I used it. Gives me security during my first try. Now that I have actually used it and have successfully overcome my phobia, I guess I will have more experimental cooking using the pressure cooker...more to blog about in the future.
And yeah, from now on, I will purchase kitchen gadgets, tools, etc. with my blogger's comp.
Wednesday, December 17, 2008
Dinuguan (Pork Chocolate Stew)
Not for the squeamish...
I once posted in my old kusina about dinuguan in a post
focusing on pork parts unwanted by many Americans (my husband is #1)and even some Pinoys. (Wala namang ka-art-art tong picture ko!) I figure I would repost here this Dinuguan recipe, as I think it warrants its own page.
I do not know who labeled it chocolate stew, but there is no chocolate in the ingredients of this, and I do not want to mislead any foreigners who are not familiar with this Filipino dish. If you are a foreigner, click on the "Read More" below ONLY IF YOU DARE...
Ingredients:
2 tbsps cooking oil
3 cloves garlic, minced
1 onion, minced
4 lbs. pork meat, diced
1 pc pork heart, boiled then diced
1 pork tongue, boiled then diced
100 gms. pork liver, diced
1 cup vinegar or more*
2 cups water or more*
1-1/2 cups pig blood
1/4 tsp ground red pepper
salt to taste
* Although I started with these amounts, I kept adding water and blood until I achieved the consistency and the proportion of the meat to sauce that I wanted. I probably used up about 4 cups of blood because I kept adding water to cover the meat. I also added more vinegar to adjust the taste.
Instructions:
Those ingredients that called for boiling and dicing, you can throw all at once in a stockpot and boil for 15 minutes.
Saute garlic and onion in cooking oil.
Add diced pork, tongue, heart, and liver. Bring to a boil and simmer until tender.
When meat is tender, add vinegar, broth, and hot peppers and bring to a boil. Add salt.
Add pork blood stirring continuously until thick. Simmer for 5 minutes. Adjust seasonings.
I cooked this last week and froze (after I got enough to eat), to reheat during my planned party hosting this weekend. I plan to serve it with puto.
UPDATE as of 12-21-08:
I served dinuguan yesterday with puto
but I did not use an original recipe for puto. I did a quick-fix, which was very very acceptable to my Filipino guests and loved by my husband and all the kids! I opted for the easy way because of time constraints and the tremendous stress of preparing for the party.
I will make a separate post for the puto.
I once posted in my old kusina about dinuguan in a post
 |
| From dinuguan |
I do not know who labeled it chocolate stew, but there is no chocolate in the ingredients of this, and I do not want to mislead any foreigners who are not familiar with this Filipino dish. If you are a foreigner, click on the "Read More" below ONLY IF YOU DARE...
Ingredients:
2 tbsps cooking oil
3 cloves garlic, minced
1 onion, minced
4 lbs. pork meat, diced
1 pc pork heart, boiled then diced
1 pork tongue, boiled then diced
100 gms. pork liver, diced
1 cup vinegar or more*
2 cups water or more*
1-1/2 cups pig blood
1/4 tsp ground red pepper
salt to taste
* Although I started with these amounts, I kept adding water and blood until I achieved the consistency and the proportion of the meat to sauce that I wanted. I probably used up about 4 cups of blood because I kept adding water to cover the meat. I also added more vinegar to adjust the taste.
Instructions:
Those ingredients that called for boiling and dicing, you can throw all at once in a stockpot and boil for 15 minutes.
Saute garlic and onion in cooking oil.
Add diced pork, tongue, heart, and liver. Bring to a boil and simmer until tender.
When meat is tender, add vinegar, broth, and hot peppers and bring to a boil. Add salt.
Add pork blood stirring continuously until thick. Simmer for 5 minutes. Adjust seasonings.
I cooked this last week and froze (after I got enough to eat), to reheat during my planned party hosting this weekend. I plan to serve it with puto.
UPDATE as of 12-21-08:
I served dinuguan yesterday with puto
 |
| From puto't dinuguan |
I will make a separate post for the puto.
Tuesday, December 16, 2008
Drunken Steamed Shrimps (Nilasing na Hipon)
I think I overcooked these drunken steamed shrimps (you can tell by the shrinkage of the shrimps compared to the shells).
I was trying to cook a lot of things at the same time. I was baking boxed scalloped potatoes and the spinach-feta cheese chicken rolls, and making fried rice (for my sons and I). Since I had only 4 chicken breasts and there were 5 of us, I was worried there might not be enough to feed my
family, so I steamed some shrimps as a back-up. I was sure I was not going to eat a whole chicken breast, nor would my stepdaughter and husband, but each of my two sons eat like big men (more than my husband does) so to make sure they would not be bitin, I prepared steamed shrimps. This steamer comes in handy on such occasions because I just throw the shrimps in after tossing in some sesame oil, sprinkle some spices (parsley, pepper, paprika, ground basil), add some white wine to the water, and set the timer. The whole bag of shrimps was frozen, and I set the timer for like 20 minutes, although my other dishes took a while longer to cook, so I extended the steaming time just to make sure the shrimps stayed warm. I think I overcooked them, but they still turned out not rubbery (thank God!)
Here is my plate with a little of everything.
Steamed shrimps, scalloped potatoes, SFC Chix roll, and fresh baby spinach. I tried not to put a lot on my plate as I did not want to gain too much weight. My husband and stepdaughter do not eat shrimps, so these are mainly for my sons and I.
Everyone was full at the end of mealtime.
 |
| From drunken steamed shrimp |
I was trying to cook a lot of things at the same time. I was baking boxed scalloped potatoes and the spinach-feta cheese chicken rolls, and making fried rice (for my sons and I). Since I had only 4 chicken breasts and there were 5 of us, I was worried there might not be enough to feed my
 |
| From drunken steamed shrimp |
Here is my plate with a little of everything.
 |
| From drunken steamed shrimp |
Everyone was full at the end of mealtime.
Thursday, December 11, 2008
Spinach and Feta Cheese Chicken Rolls
I have a co-worker who is a foodie as well, although not a foodblogger.
She shared with me this spinach and feta cheese chicken rolls recipe that was a hit with her husband (who seems to be the non-adventurous type as well). I tried it, and it was a hit with my family as well. Quite laborious and time-consuming, but definitely easy to make. And the taste? Cheesy-heavenly! Definitely good for a special family weekend dinner.
A note for newbies: "butterflied" only means that you make slices on the thick meat to make it have flaps on the sides (imagine yourself with your arms hugging your body, then open your right arm, and then the left, that is the kind of "movement" you want to observe in making the slices here) so that you end up with thinner meat and wider surface area, making layering and stuffing easier.
Ingredients:
5-6 boneless/skinless chicken breasts, butterflied
baby spinach (fresh)
1 pkg (8-oz) cream cheese
6-8 oz feta cheese (crumbled)
1/2 tsp dried basil
Deli Ham slices
egg+milk mixture
bread crumbs*
*Instead of bread crumbs, I had this unopened plastic pack of Club crackers flavored buttery garlic (a box contains about 3 plastic packs of them) which had been sitting on the bar countertop for probably a month now (I was in a temporary addiction to them until we got tired of eating them), so I thought that would add flavor. I placed them in the chopper, and added Italian seasoning. My husband particularly said the crumbs coating tasted good.
Directions:
Pound chicken to 1/4 inch thick. Mix cream cheese, feta cheese, and dried basil together spread over chicken. Put one layer of spinach on top of cheese followed by 1 slice of ham. Roll chicken and secure with a toothpick. Dip in egg+milk mixture, roll in breadcrumbs, and put in greased 9 x 13 inch pan. Bake at 375 deg F for 30-35 minutes or until done.
I happened to have just 4 big breasts and there were 5 of us. Although I was sure my husband, stepdaughter, and I could not eat a whole breast, I cooked shrimps in addition just as a backup.
I served these with the remaining baby spinach and scalloped potatoes.
 |
| From Spinach & Feta Cheese Chicken Rolls |
A note for newbies: "butterflied" only means that you make slices on the thick meat to make it have flaps on the sides (imagine yourself with your arms hugging your body, then open your right arm, and then the left, that is the kind of "movement" you want to observe in making the slices here) so that you end up with thinner meat and wider surface area, making layering and stuffing easier.
Ingredients:
5-6 boneless/skinless chicken breasts, butterflied
baby spinach (fresh)
1 pkg (8-oz) cream cheese
6-8 oz feta cheese (crumbled)
1/2 tsp dried basil
Deli Ham slices
egg+milk mixture
bread crumbs*
*Instead of bread crumbs, I had this unopened plastic pack of Club crackers flavored buttery garlic (a box contains about 3 plastic packs of them) which had been sitting on the bar countertop for probably a month now (I was in a temporary addiction to them until we got tired of eating them), so I thought that would add flavor. I placed them in the chopper, and added Italian seasoning. My husband particularly said the crumbs coating tasted good.
Directions:
Pound chicken to 1/4 inch thick. Mix cream cheese, feta cheese, and dried basil together spread over chicken. Put one layer of spinach on top of cheese followed by 1 slice of ham. Roll chicken and secure with a toothpick. Dip in egg+milk mixture, roll in breadcrumbs, and put in greased 9 x 13 inch pan. Bake at 375 deg F for 30-35 minutes or until done.
I happened to have just 4 big breasts and there were 5 of us. Although I was sure my husband, stepdaughter, and I could not eat a whole breast, I cooked shrimps in addition just as a backup.
I served these with the remaining baby spinach and scalloped potatoes.
Tuesday, December 09, 2008
Barley-Rice Porridge (Arroz Caldo with Barley)
It's snowing...It is during these days that I crave for comfort foods such as lugaw (aka congee or rice porridge).
I once brought to work a canned beef and barley soup, and it was my first time to have a taste of barley. It looks pretty much like rice, only chewey, sort of rubbery in a nice way. I had the idea of adding it in arroz caldo. As I was browsing through Julie's blog, I found out I was not the only one who had the same idea. This version, indeed, makes for a healthier lugaw.
I used chicken necks which I packed in 6's for use in broths or lugaw.
Ingredients:
chicken necks (of course, feel free to use your choice of cuts)
2 tbsp oil
3 cloves garlic, minced
1 thumb-size (or 2) ginger, sliced
1 cup rice
1/2 cup barley
5 cups (or more) water
salt and pepper to taste
optional toppings:
spring onions
crushed chicharon
sliced hard-boiled egg
toasted minced garlic
Procedure:
On medium heat, sautee chicken in oil to brown; add garlic and ginger until fragrant. Sprinkle salt and pepper and continue browning chicken for about 2 minutes. Add rice and barley and stir well. Add water. Turn heat to high to boil, then cover and simmer for about two hours, stirring from time to time. Add water to desired consistency, if needed.
Season with more salt and pepper to your liking. Sprinkle some lemon if desired. Top with crushed chicharon and spring onions (optional).
 |
| From Barley-Rice Porridge (Arroz Caldo with Barley) |
I once brought to work a canned beef and barley soup, and it was my first time to have a taste of barley. It looks pretty much like rice, only chewey, sort of rubbery in a nice way. I had the idea of adding it in arroz caldo. As I was browsing through Julie's blog, I found out I was not the only one who had the same idea. This version, indeed, makes for a healthier lugaw.
I used chicken necks which I packed in 6's for use in broths or lugaw.
Ingredients:
 |
| From Barley-Rice Porridge (Arroz Caldo with Barley) |
chicken necks (of course, feel free to use your choice of cuts)
2 tbsp oil
3 cloves garlic, minced
1 thumb-size (or 2) ginger, sliced
1 cup rice
1/2 cup barley
5 cups (or more) water
salt and pepper to taste
optional toppings:
spring onions
crushed chicharon
sliced hard-boiled egg
toasted minced garlic
Procedure:
On medium heat, sautee chicken in oil to brown; add garlic and ginger until fragrant. Sprinkle salt and pepper and continue browning chicken for about 2 minutes. Add rice and barley and stir well. Add water. Turn heat to high to boil, then cover and simmer for about two hours, stirring from time to time. Add water to desired consistency, if needed.
Season with more salt and pepper to your liking. Sprinkle some lemon if desired. Top with crushed chicharon and spring onions (optional).
Monday, December 08, 2008
A Glimpse into my Kitchen
I wonder if any of you wonders how my kitchen looks like?
One thing I can say is that my kitchen is truly custom-made. As some of you may already know, my husband has been building our house since 2003, and we are still building to this time. We still have to work on the stairs leading to 2nd floor where my kids' rooms are, and we still have to work on our bedroom/bathroom. Since the house itself is not yet done, our finances are channeled more towards the building itself, and only a little is left for decorating, if any. So our house is sort of bare.
Since I have been using my kitchen since 2003 when all I had for countertop was plywood, I knew where I wanted things, and how I wanted my cupboards and cabinets. Not everything turned out how I would have wanted it to, mainly because we had to make do with what space we had. We also do not have the budget to buy pre-made cabinets, so my husband drew on his inner artistic talent and came up with a room that I have come to love more, and will spend lots of time in...
So, if you want a glimpse of my humble custom-made kitchen, go ahead and see the slide show below. I took photos of open and closed cupboards and cabinets. There is nothing fancy, nothing hi-tech here...just functional and very homey. I ordered some of the hardware like lazy susan, pantry slides, drawer slides, and the stand mixer lift from rockler.com (they got cool stuff!).
This is my husband's labor of love. I love him and I am so proud of him.
The pot rack was a Christmas gift from my father-in-law, which he himself made using iron.
UPDATE: This is a retroactive submission to LaPiS's theme for this week (Mar 7-13) My Kitchen.
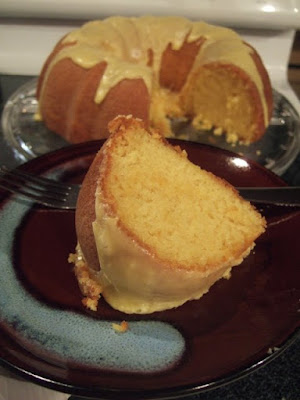
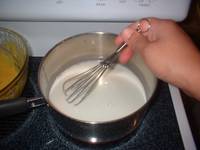
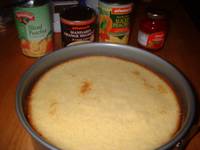
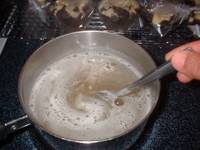
Florida Citrus Cake
One of my co-workers, Michelle, once brought
this at a night when it seemed like we were all in a party mood. I brought leche flan (as requested by one of our ED techs, Gloria), and Michelle brought this so I could have a taste. I loved it! It's perfect for coffee! Best of all, it is so easy to make.
Michelle made sure I had at least one slice left to take home to have my husband taste it. I could not help but eat the last piece, and I even scraped the plate clean.
So I baked this last night, finally...after I stressed out having my TNCC training and getting my certificate by passing the practical and written tests (yehey!). Baking (and cooking) has become a therapeutic activity for me. As I was waiting for the last minutes, I made coffee...then I frosted, sliced a piece although it was still too warm (couldn't wait!) and had my husband taste it...Approved!
The next day, my older son was telling me, "Ma, you should make this more often. It's so good, I already had probably 8 slices."
INGREDIENTS:
Cake:
4 eggs
3/4 cup water
3/4 cup oil
1 pkg yellow cake mix
1 small pkg lemon instant pudding and pie filling mix (4 servings)
Glaze:
1/6 cup frozen orange juice concentrate
1 tbsp melted butter
3/4 cup confectioner's sugar
PROCEDURE:
Preheat oven to 325 deg F. Pour all ingredients into a well-greased and floured tube pan (I borked here...looks like I failed to grease and flour well enough that some of the cake stuck to the pan. I covered with frosting.). Bake for 50 minutes or until done. Meanwhile, prepare the glaze by blending well. Glaze the cake while still hot.
 |
| From Florida Citrus Cake |
Michelle made sure I had at least one slice left to take home to have my husband taste it. I could not help but eat the last piece, and I even scraped the plate clean.
So I baked this last night, finally...after I stressed out having my TNCC training and getting my certificate by passing the practical and written tests (yehey!). Baking (and cooking) has become a therapeutic activity for me. As I was waiting for the last minutes, I made coffee...then I frosted, sliced a piece although it was still too warm (couldn't wait!) and had my husband taste it...Approved!
The next day, my older son was telling me, "Ma, you should make this more often. It's so good, I already had probably 8 slices."
INGREDIENTS:
Cake:
4 eggs
3/4 cup water
3/4 cup oil
1 pkg yellow cake mix
1 small pkg lemon instant pudding and pie filling mix (4 servings)
Glaze:
1/6 cup frozen orange juice concentrate
1 tbsp melted butter
3/4 cup confectioner's sugar
PROCEDURE:
Preheat oven to 325 deg F. Pour all ingredients into a well-greased and floured tube pan (I borked here...looks like I failed to grease and flour well enough that some of the cake stuck to the pan. I covered with frosting.). Bake for 50 minutes or until done. Meanwhile, prepare the glaze by blending well. Glaze the cake while still hot.
Sunday, December 07, 2008
Freezers Full of Meat
At this time of the year, my freezers are full. My MIL raises chickens and pigs for us all. My BIL and his wife took over the cows, and every year we have one slaughtered for our year-supply of beef.
Upright freezers seem better for access to the different cuts of beef and pork. Organization is so much easier to maintain. The slaughterhouse prepacked our beef for us. I did the packing of our pork, using the FoodSaver. I had to freeze some of them before I ran them through the machine, to lessen the fluid (which makes it harder to actually seal).
On the other hand, since we mostly use whole chicken, either roasted whole, or eventually cut up, I just packed most of them whole in big bags and chucked them in the chest freezer. I only had several bags of chicken necks, gizzards, and feet, which are easy enough to locate and access. I use the wire basket and the side "pocket" as containers for miscellaneous items like lamburger, lamb shanks, and veggies.
My MIL has chicken layers to continuously supply us with the freshest eggs. Sometimes I use eggs freshly laid for baking rolls, or for scrambled eggs.
It's quite an expensive season during this time of the year for us, with all these preparation for food, the Holidays, the winter heating using firewood and some oil, and of course, taxes, but we do prepare ahead for these.
Is it cheaper to raise your own foods? No. About the same as when you buy them from the grocery store, or maybe even more expensive. But the peace of mind knowing where our food came from, what lives they lived, the care they got, the lack of antibiotic and steroid load...PRICELESS. Someday, I hope to learn how to raise them, too...
Oh please don't ask me to play with the word organic...I would rather say, wholesome. Organic to me means C as in carbon (the basic building block of life, along with H for hydrogen, O for oxygen, and N for nitrogen).
 |
| pork freezer |
 |
| beef freezer |
Upright freezers seem better for access to the different cuts of beef and pork. Organization is so much easier to maintain. The slaughterhouse prepacked our beef for us. I did the packing of our pork, using the FoodSaver. I had to freeze some of them before I ran them through the machine, to lessen the fluid (which makes it harder to actually seal).
 |
| chicken and misc freezer |
On the other hand, since we mostly use whole chicken, either roasted whole, or eventually cut up, I just packed most of them whole in big bags and chucked them in the chest freezer. I only had several bags of chicken necks, gizzards, and feet, which are easy enough to locate and access. I use the wire basket and the side "pocket" as containers for miscellaneous items like lamburger, lamb shanks, and veggies.
My MIL has chicken layers to continuously supply us with the freshest eggs. Sometimes I use eggs freshly laid for baking rolls, or for scrambled eggs.
It's quite an expensive season during this time of the year for us, with all these preparation for food, the Holidays, the winter heating using firewood and some oil, and of course, taxes, but we do prepare ahead for these.
Is it cheaper to raise your own foods? No. About the same as when you buy them from the grocery store, or maybe even more expensive. But the peace of mind knowing where our food came from, what lives they lived, the care they got, the lack of antibiotic and steroid load...PRICELESS. Someday, I hope to learn how to raise them, too...
Oh please don't ask me to play with the word organic...I would rather say, wholesome. Organic to me means C as in carbon (the basic building block of life, along with H for hydrogen, O for oxygen, and N for nitrogen).
EggNog French Toast
Hubby likes EggNog especially around this time of the year...makes him feel the spirit of the Holidays more...
I, however, never did develop any liking to it, and neither have my kids...
Problem is, my husband can only drink about a cup or so, then he will not finish a whole jug (even if one as small as this). I thought of other ways to use it. I thought it would probably be good used for making french toast, since french toast is basically made from stale bread dipped in a mixture of egg, milk, nutmeg and cinnamon. I looked at the ingredients of eggnog once, and it was not too different.
Making french toast this way made me tolerate eggnog...even my kids like them.
 |
| From eggnog french toast |
Problem is, my husband can only drink about a cup or so, then he will not finish a whole jug (even if one as small as this). I thought of other ways to use it. I thought it would probably be good used for making french toast, since french toast is basically made from stale bread dipped in a mixture of egg, milk, nutmeg and cinnamon. I looked at the ingredients of eggnog once, and it was not too different.
Making french toast this way made me tolerate eggnog...even my kids like them.
Saturday, December 06, 2008
Rosemary-Dijon Pork Chops
This is from Shake n Bake box recipe. I first tried
this on plain (unmarinated) pork chops and hubby loved it. This time I tried making it again on pork chops I premarinated with soy sauce-lemon mixture. Didn't work out good. Hubby said it was too salty. So I am resorting to the original recipe.
Oh well, like hubby says always, his food taste really is not complicated at all...On this one, I had to agree with him.
INGREDIENTS:
4 bone-in pork chops (1-1/2 lb.), 1/2 inch thick
4 tsp. GREY POUPON Dijon Mustard
1/2 cup SHAKE 'N BAKE Original Pork Seasoned Coating Mix
1/4 tsp. dried rosemary leaves, crushed
PROCEDURE:
HEAT oven to 375°F.
SPREAD chops with mustard. Mix coating mix and rosemary in shallow dish. Add chops; turn over to evenly coat both sides of each chop. Place in center of foil-lined 15x10x1-inch pan.
BAKE 30-40 min. or until chops are done (160°F).
 |
| From Rosemary-Dijon Pork Chops |
Oh well, like hubby says always, his food taste really is not complicated at all...On this one, I had to agree with him.
INGREDIENTS:
4 bone-in pork chops (1-1/2 lb.), 1/2 inch thick
4 tsp. GREY POUPON Dijon Mustard
1/2 cup SHAKE 'N BAKE Original Pork Seasoned Coating Mix
1/4 tsp. dried rosemary leaves, crushed
PROCEDURE:
HEAT oven to 375°F.
SPREAD chops with mustard. Mix coating mix and rosemary in shallow dish. Add chops; turn over to evenly coat both sides of each chop. Place in center of foil-lined 15x10x1-inch pan.
BAKE 30-40 min. or until chops are done (160°F).
Thursday, December 04, 2008
Pork Spare Ribs
I used the same recipe for Korean Beef Ribs, adding ginger
as an afterthought (so it was not seen on the pics), and still using the slow cooker, only cooking this time up to 4 hours only.
This is purely for the enjoyment of my sons and mine. My husband does not like eating ribs..."takes a lot of energy to remove the meat from the bones."
Gotta have to make this post short as I have to study for my TNCC training the next 2 days...
HOW TO:
Take 4 tablespoons of brown sugar and sprinkle or rub onto the slices and marinade for 10 minutes while getting the rest of the ingredients ready. Mix in a small bowl: 4 garlic cloves crushed and minced, 4 tablespoons soy sauce, 2 tablespoons sesame oil, 1/4 cup rice vinegar, 1/2 teaspoon red pepper flakes, and 2 tbsp chopped ginger. Place some of the mixture on slowcooker, then put the ribs in, pour the rest of the mixture. Cover and slow cook on low for 3 hours, then switch pieces over then cook for another hour. Transfer to a broiling pan, set oven on low. Only start broiling once you get to start making the sauce.
Strain the sauce into a fat separator. Boil the sauce. Meanwhile, place the ribs in the oven to start drying them up so sauce clings better. Prepare water-cornstarch mixture, and add in thin streams once the sauce is boiling, stirring constantly. Adjust taste with white sugar, salt,and pepper. When sauce is thickened a bit, get some to glaze your ribs. Let broil some more while you continue to thicken your sauce to desired consistency.
Transfer to a bed of salad greens, garnish with either spring onions or toasted sesame (you can sprinkle sesame onto the pieces while broiling).
Serve with hot plain rice.
 |
| From Pork Spare Ribs |
This is purely for the enjoyment of my sons and mine. My husband does not like eating ribs..."takes a lot of energy to remove the meat from the bones."
Gotta have to make this post short as I have to study for my TNCC training the next 2 days...
HOW TO:
Take 4 tablespoons of brown sugar and sprinkle or rub onto the slices and marinade for 10 minutes while getting the rest of the ingredients ready. Mix in a small bowl: 4 garlic cloves crushed and minced, 4 tablespoons soy sauce, 2 tablespoons sesame oil, 1/4 cup rice vinegar, 1/2 teaspoon red pepper flakes, and 2 tbsp chopped ginger. Place some of the mixture on slowcooker, then put the ribs in, pour the rest of the mixture. Cover and slow cook on low for 3 hours, then switch pieces over then cook for another hour. Transfer to a broiling pan, set oven on low. Only start broiling once you get to start making the sauce.
Strain the sauce into a fat separator. Boil the sauce. Meanwhile, place the ribs in the oven to start drying them up so sauce clings better. Prepare water-cornstarch mixture, and add in thin streams once the sauce is boiling, stirring constantly. Adjust taste with white sugar, salt,and pepper. When sauce is thickened a bit, get some to glaze your ribs. Let broil some more while you continue to thicken your sauce to desired consistency.
Transfer to a bed of salad greens, garnish with either spring onions or toasted sesame (you can sprinkle sesame onto the pieces while broiling).
Serve with hot plain rice.
Tuesday, December 02, 2008
Pork Siomai (Shu-Mai)

This is a re-post from my old kusina.
 I got this recipe from The Book of Chinese Cooking by Jasper Spencer-Smith.
(Karen also has a post on the basic recipe for siomai here, including the recipe for the wrapper.)
My sons and I love these. Also a good finger food to bring during Pinoy get-togethers.
Ingredients:
3/4 pound ground pork
1/4 pound raw shelled shrimp, ground
(Believe me, I used a scale to measure these, but of course, you can approximate.)
1-1/2 tbsp soy sauce
1/2 tbsp Chinese rice wine or dry sherry
1/2 tbsp sesame oil
1/2 tbsp sugar
Dash of pepper
1 egg white
1-1/2 tsbp cornstarch
won-ton skins (I buy Nasoya brand)
green peas or chopped hard-cooked egg yolks for garnish
(Note: I usually buy pork chops then grind them using my Kitchen Aid attachment, since I can't find ground pork for sale here. I grind other ingredients as well, like the shrimp. when making lumpia, I also grind the garlic, onions, and other veggies.)
Procedure (I revised according to how I made it):
To make filling: Mix together ground pork, ground shrimp, soy sauce, rice wine or sherry, sesame oil, sugar, pepper and egg white until mixture is well blended and smoth. Stir in cornstarch.
Place filling in a storage bag and cut one corner big enough for the content to squeeze through. Place about 1 tbsp or so of filling in the middle of wonton skin and gather the skin around the filling. Alternatively, you can use a cookie scoop. Dip a spoon in water and use to smooth the surface of the meat. Garnish by placing a green pea or chopped egg yolk on top of meat.


Repeat with the rest of the wonton/filling. Line a steamer (or bamboo steamer) with a damp cloth; place each siomai about 1/2 inch apart so they don't stick together; steam over high heat 5 minutes or until done (do not overcook). Serve with your fave dip (I use soy sauce/kalamansi juice as a dip. When I was in PI, I used to like it with chili paste.)
Chicken Tinola with Corn, Cukes, and Pepper Greens
I cooked this last summer, when everyday I had cukes and corn more than I could use
(and when you have had sliced fresh cukes and corn for like a week already, you get tired of having them again and again).
So, I was going to cook this tinola, and was thinking, "I wish I had sayote or papaya." The papaya I could buy from hannaford here was too yellow/ripe for the purpose (I ended up eating that uncooked - manibalang was better for eating than the fully ripe, in my opinion). I combined with corn and bell pepper leaves from our garden (I chose only the youngest good-sized leaves; the more mature leaves are too strong). I was not disappointed with the result. My sons and I loved it.
Of course, the real main ingredients for tinola (aside from chicken meat) are:
green papaya/malunggay or
chayote (sayote)/dahon ng sili (fresh pepper leaves)
I cooked the breasts, thighs and legs separately as adobo. I made this for the soup and veggies.
My final ingredients for this dish:
Chicken, cut up into serving pieces
2 tbsp oil (or you can use the skin to render oil)
2 cloves garlic, crushed
thumb-size ginger, sliced
water enough to cover meat and veggies
1-2 cukes, cut in chunks
1 cup sweet corn kernel
1-2 handfuls of pepper greens
salt and pepper to taste
On medium high heat, sautee garlic and ginger until browned and fragrant. Add chicken pieces and sautee until browned. Sprinkle some salt, cover and lower heat to cook for 10 minutes. Take cover off, add water and turn on high to boil. Add cukes and corn and cook for another 5 minutes or until chicken is done. Turn off heat and stir in pepper greens until wilted.
 |
| From tinola corn cukes |
So, I was going to cook this tinola, and was thinking, "I wish I had sayote or papaya." The papaya I could buy from hannaford here was too yellow/ripe for the purpose (I ended up eating that uncooked - manibalang was better for eating than the fully ripe, in my opinion). I combined with corn and bell pepper leaves from our garden (I chose only the youngest good-sized leaves; the more mature leaves are too strong). I was not disappointed with the result. My sons and I loved it.
Of course, the real main ingredients for tinola (aside from chicken meat) are:
green papaya/malunggay or
chayote (sayote)/dahon ng sili (fresh pepper leaves)
I cooked the breasts, thighs and legs separately as adobo. I made this for the soup and veggies.
My final ingredients for this dish:
Chicken, cut up into serving pieces
2 tbsp oil (or you can use the skin to render oil)
2 cloves garlic, crushed
thumb-size ginger, sliced
water enough to cover meat and veggies
1-2 cukes, cut in chunks
1 cup sweet corn kernel
1-2 handfuls of pepper greens
salt and pepper to taste
On medium high heat, sautee garlic and ginger until browned and fragrant. Add chicken pieces and sautee until browned. Sprinkle some salt, cover and lower heat to cook for 10 minutes. Take cover off, add water and turn on high to boil. Add cukes and corn and cook for another 5 minutes or until chicken is done. Turn off heat and stir in pepper greens until wilted.
Monday, December 01, 2008
Crema de Fruta
This is a reposting from my old kusina.
Thanks to Celia K for her crema de fruta post, I thought this would be good alternative to the usual chocolate cake that my hubby always prepares for anyone's birthday in our family. I wanted for my in-laws to have something to look forward to during birthday celebrations, and not only to bring their gifts and greetings to the celebrant.
I deviated from CeliaK's method by preparing my own sponge cake. Why? Because when I told hubby about my plan, he grimaced a bit, saying that sponge cake is usually rubbery, chewy, tough and dry...and that he preferred the crumbly type of cakes. BUT he said, "if that's what you want, then go on. It's your birthday anyway."
Good thing I found a sponge cake recipe with this promise: " While most sponge cakes are light and somewhat dry, a sponge cake made with milk, has a softer more tender texture." The recipe is that of Boston Cream Pie which I got from Sarah's baking911 site.
Here's the recipe for the sponge cake:
Milk Sponge Cake
1 cup sifted cake flour
1 teaspoon baking powder
1/8 teaspoon salt
1/3 cup milk
3 tablespoons unflavored vegetable oil
3 large eggs, room temperature
1 egg yolk, room temperature
2/3 cup sugar
1 teaspoon vanilla
Instructions:
Adjust rack in lower third of oven and preheat to 350 degrees. Line a 9-inch springform pan with parchment or waxed paper; do not grease. Sift flour, baking powder and salt. In a small bowl add the the milk and oil; do not be concerned that they do not blend together.
In a large mixing bowl, whisk the eggs, yolk and sugar to combine. Using an electric mixer at medium speed, whip the egg mixture until it is light ivory in color and very fluffy, about 6 minutes. Add the vanilla toward the end of whipping. Using a rubber spatula, fold in the flour mixture in two additions. Pour the milk mixture down the side of the mixing bowl. (It will sink to the bottom of the bowl under the batter.) Gently fold until the milk mixture is thoroughly incorporated. Pour the batter into the pan. Bake 25 to 30 minutes or until the cake is golden on top and it springs back when lightly pressed in the center. Remove pan from oven to a wire rack until cool.


While baking the sponge cake I prepared the custard. Comparing CeliaK's custard filling with that of the Boston Cream Pie Recipe, I noticed the only difference in the ingredients were the amounts, and the inclusion of rum in the latter. I thought it would not hurt to follow that in BCP since I used a springform pan, so that the custard would just be enough to cover the top of the cake. I just eliminated the rum. I leave to you to include it or delete it from this custard filling recipe from baking911.
Boston Cream Filling
Only half of this rich, thick pastry cream, lightened with whipped cream is needed for the dessert. Enjoy the remaining filling with fresh fruit.
Then while cooling the custard, I sliced the top off the cake as soon as it was cool enough to do so. I just thought this would create more traction for the pudding and the fruits, plus it gave me an excuse to taste the cake. And guess what I discovered: It tasted like that of Special Mamon Tostado (almost like the Goldilocks' Mamon but without that greasy unpleasant film that it leaves on your palate). I had hubby taste it too, and he said it was not what he expected of sponge cakes as it was not tough.
Next I prepared the gelatin. I used Knox unflavored gelatin and then followed the instructions on the packet using 2 envelopes.

While it was cooling in the fridge, I started assembling the fruits (peaches, Mandarin oranges and Maraschino cherries) over the custard that I poured on top of the sponge cake. Then I placed inside the fridge covered with a plastic wrap to let them chill for about an hour, and then poured a thin film of gelatin. I let that thin film set for about 30 minutes, sort of like laminating the surface, acting like a seal, before I poured more gelatin to cover the fruits completely. Let the gelatin set. (It was a minimum of 3 hours from the approximated time of serving, but feel free to make this several hours earlier). (Note: I made a mistake before of pouring the gelatin while it was still very liquid, and the cake, custard and fruits were room temp. The gelatin seeped through the cake and soaked it, making it tough when the cake cooled completely. Believe me, you don't want to make the same mistake again.)
My visitors were intrigued by it. I served it very informally as such; only separating the sides off from the pan using a small silicone spatula, then gave them each a slice of the cake. No, the number of cherries did not correspond to my age (wish it did!) . They all said it was different and good. None was left (there were 13 of us in all; no leftover on their plates!) at the end of the day (much to my older son's dismay). Any Filipina can hold her head up high when serving this dessert to a foreign crowd.
Thanks to Celia K for her crema de fruta post,
 I thought this would be good alternative to the usual chocolate cake that my hubby always prepares for anyone's birthday in our family. I wanted for my in-laws to have something to look forward to during birthday celebrations, and not only to bring their gifts and greetings to the celebrant.
I deviated from CeliaK's method by preparing my own sponge cake. Why? Because when I told hubby about my plan, he grimaced a bit, saying that sponge cake is usually rubbery, chewy, tough and dry...and that he preferred the crumbly type of cakes. BUT he said, "if that's what you want, then go on. It's your birthday anyway."
Good thing I found a sponge cake recipe with this promise: " While most sponge cakes are light and somewhat dry, a sponge cake made with milk, has a softer more tender texture." The recipe is that of Boston Cream Pie which I got from Sarah's baking911 site.
Here's the recipe for the sponge cake:
Milk Sponge Cake
1 cup sifted cake flour
1 teaspoon baking powder
1/8 teaspoon salt
1/3 cup milk
3 tablespoons unflavored vegetable oil
3 large eggs, room temperature
1 egg yolk, room temperature
2/3 cup sugar
1 teaspoon vanilla
Instructions:
Adjust rack in lower third of oven and preheat to 350 degrees. Line a 9-inch springform pan with parchment or waxed paper; do not grease. Sift flour, baking powder and salt. In a small bowl add the the milk and oil; do not be concerned that they do not blend together.
In a large mixing bowl, whisk the eggs, yolk and sugar to combine. Using an electric mixer at medium speed, whip the egg mixture until it is light ivory in color and very fluffy, about 6 minutes. Add the vanilla toward the end of whipping. Using a rubber spatula, fold in the flour mixture in two additions. Pour the milk mixture down the side of the mixing bowl. (It will sink to the bottom of the bowl under the batter.) Gently fold until the milk mixture is thoroughly incorporated. Pour the batter into the pan. Bake 25 to 30 minutes or until the cake is golden on top and it springs back when lightly pressed in the center. Remove pan from oven to a wire rack until cool.
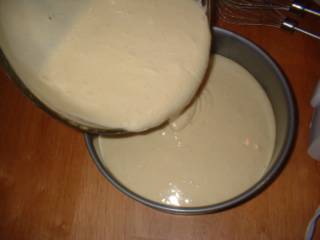
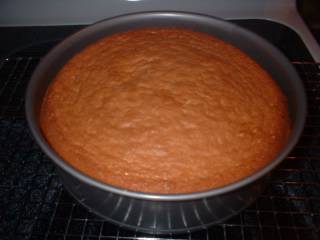
While baking the sponge cake I prepared the custard. Comparing CeliaK's custard filling with that of the Boston Cream Pie Recipe, I noticed the only difference in the ingredients were the amounts, and the inclusion of rum in the latter. I thought it would not hurt to follow that in BCP since I used a springform pan, so that the custard would just be enough to cover the top of the cake. I just eliminated the rum. I leave to you to include it or delete it from this custard filling recipe from baking911.
Boston Cream Filling
Only half of this rich, thick pastry cream, lightened with whipped cream is needed for the dessert. Enjoy the remaining filling with fresh fruit.
In a small bowl whisk to combine the egg yolks and 1/4 cup sugar, then the flour. In a medium saucepan over medium heat, combine the milk and 1/4 cup sugar and heat just until it comes to a boil. Remove, and pour half of the hot liquid over the yolk mixture, stirring to combine. Pour the yolk mixture back into the saucepan, and bring it to a boil again, stirring constantly. When it is thick and smooth, remove the pan from the heat and pour the mixture into a large bowl to cool. Cover surface with plastic and refrigerate. When ready to assemble the dessert, stir in the rum and vanilla until smooth, then fold in the whipped cream.1 cup milk
1/2 cup sugar, divided
3 egg yolks
3 tablespoons flour
1 teaspoon each dark rum and vanilla
1/2 cup heavy cream, whipped


Then while cooling the custard, I sliced the top off the cake as soon as it was cool enough to do so. I just thought this would create more traction for the pudding and the fruits, plus it gave me an excuse to taste the cake. And guess what I discovered: It tasted like that of Special Mamon Tostado (almost like the Goldilocks' Mamon but without that greasy unpleasant film that it leaves on your palate). I had hubby taste it too, and he said it was not what he expected of sponge cakes as it was not tough.
Next I prepared the gelatin. I used Knox unflavored gelatin and then followed the instructions on the packet using 2 envelopes.

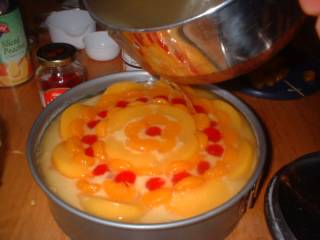
While it was cooling in the fridge, I started assembling the fruits (peaches, Mandarin oranges and Maraschino cherries) over the custard that I poured on top of the sponge cake. Then I placed inside the fridge covered with a plastic wrap to let them chill for about an hour, and then poured a thin film of gelatin. I let that thin film set for about 30 minutes, sort of like laminating the surface, acting like a seal, before I poured more gelatin to cover the fruits completely. Let the gelatin set. (It was a minimum of 3 hours from the approximated time of serving, but feel free to make this several hours earlier). (Note: I made a mistake before of pouring the gelatin while it was still very liquid, and the cake, custard and fruits were room temp. The gelatin seeped through the cake and soaked it, making it tough when the cake cooled completely. Believe me, you don't want to make the same mistake again.)
My visitors were intrigued by it. I served it very informally as such; only separating the sides off from the pan using a small silicone spatula, then gave them each a slice of the cake. No, the number of cherries did not correspond to my age (wish it did!) . They all said it was different and good. None was left (there were 13 of us in all; no leftover on their plates!) at the end of the day (much to my older son's dismay). Any Filipina can hold her head up high when serving this dessert to a foreign crowd.
Subscribe to:
Posts (Atom)

Custom Search