Saturday, September 30, 2006

LP 14: A La Espanyola - Panaderia

Panaderia (bakery), pan de sal (personal bread), pan de coco (bread with coconut), horno (oven), panadero (baker) -- these are all Spanish terms that we have incorporated into our Filipino language. Among the Spanish influences on Filipino foods, the yeast rolls have touched my life the greatest. (The influence on cooking, save for adobo, arroz caldo, and the usual guisado's, came at a much later time of my life, when I was already exposed to my classmates' and friends, and carinderia's dishes such as menudo, mechado, afritada, callos, caldereta, paella, etc.)

My father started "working" in Metro Manila (having come from Cagayan in northern Philippines) as a tricycle driver during the day, and his sideline was to deliver hot pan de sal every morning to houses in the neighborhood in the town of Bagong Pagasa, Quezon City. The panaderia was situated near the church (Our Lady of Hope Parish) and had the old-fashioned brick oven, with a small hole that would only allow the panadero to maneuver his paddle in moving the pans inside. My father would observe then to learn about baking, and dreamed of putting up his own one day. With his income then just being a tricycle driver, he was able to buy one modern commercial oven (the metal kind) that would hold, if I remember it right, 16 baking pans at a time, and some basic baking tools. He was the panadero who prepared the dough, and the rest of the family helped in shaping the dough and laying them on the pans and arranging them on layered shelves for rising, then my father would bake them. I got so adept at shaping balls, that it was common for us siblings to have a contest as to who would make the smoothest one. Of course, my brother (oldest) was the best. And he was also the only child privileged with mastering the skill of shaping the ensaymada and Spanish bread.

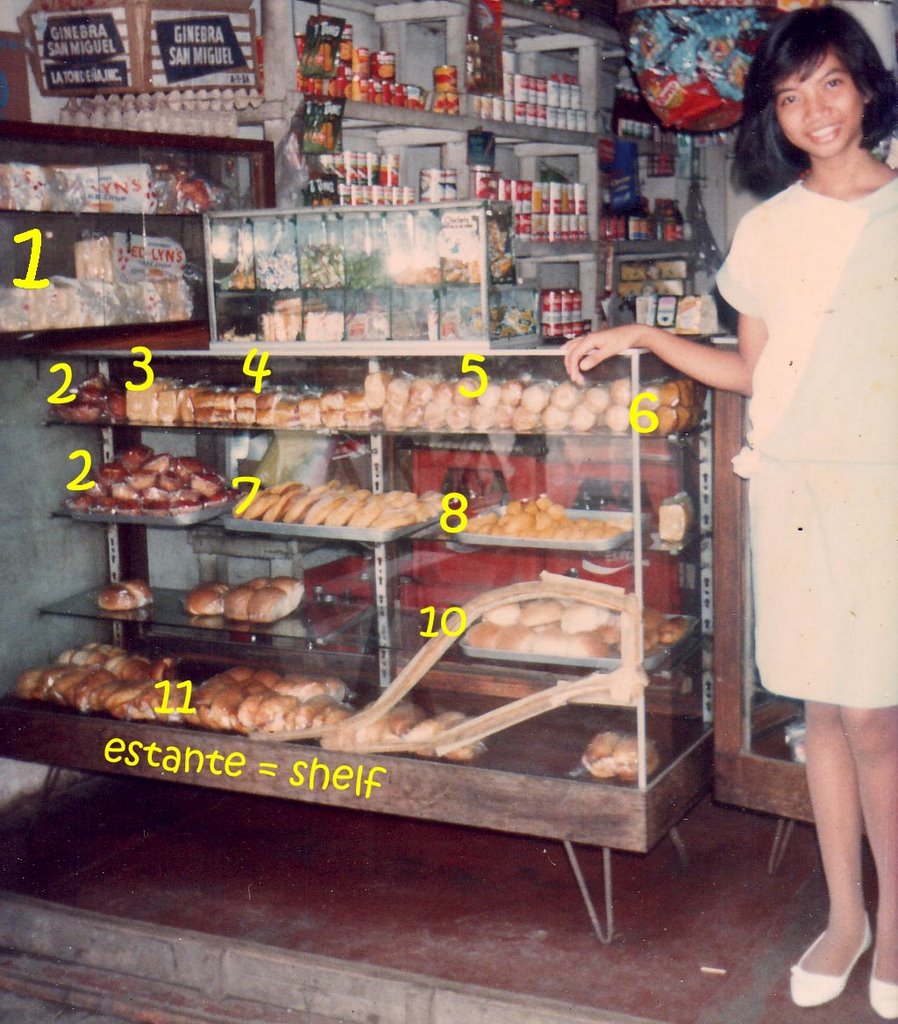
The demand for pan de sal was so great that time, that my father was able to raise some more money to buy additional equipment like a kneading machine with attachment for making breadcrumbs and a slicer to make "Tasty" [1] (equivalent of pan americano); get more ingredients; rent two units of an apartment 3 blocks away from where we actually lived; get another oven; hire more panaderos, and add some more items like pan de coco[5] and pandelimon[unnumbered in the pic] (the latter I am not sure whether it is of Spanish influence, but it is the equivalent of burger buns), then later Spanish bread[11], pudding (from old breads), pan de regla(?) [4](the one with red filling), pianono (this is a muffin batter baked like jelly rolls with sweet filling then sprinkled on top with sugar; one of my favorites), kababayan [6] (one type of muffins), our version of cheesecake [2] (which is actually ordinary muffin with grated cheddar cheese on top), ensaymada [7], monay [10] (very compact and delicious, this is made by kneading very well using the kneading machine; and the big sliced ones were also among my favorite, even plain), biscocho, patigas (a very compact white yeast roll with a crown brushed with eggwash and sprinkled with sugar), banana [9] (biscotti-shaped but nothing like it), hopiang baboy (which did not really contain any pork; just lots of onions sauteed in oil), and some other items which I cannot remember at this moment. My mother took some baking lessons to learn some special pan de sal recipe that contained more eggs, also to bake cakes such as custard cake and egg pie which are another favorites of mine. The problems was, she was not that interested, so that it was a short-lived endeavor on her part, and even if I ask her now, she cannot remember the recipes. She was more interested in sewing curtains and couch covers. (That is me on the picture when I was about age 16. The estante was all worn out by then, that's why it had those cracks. The part of the estante which had lots of space was waiting for some newly baked goods to be placed there. Notice that the pan holding the ensaymada was full; that means the ensaymada was newly baked and placed in the estante. Tip to those who like buying from the neighborhood bakery: choose the pans which are full, and point the ones you like. The store owners usually place the previous day's leftover, if any, on top of the newly baked ones.)

Pan de sal making was started around 2:00 in the morning to make available to consumers as early as 4:30. All the non-yeast dough would be made during the morning from 7:00, then the other yeast doughs would follow. There would be a (smaller) second dough-making for pan de sal that would start at around 7 pm, to be available for those who like midnight snacks, and for packing in cellophane by the dozens for those families who want (cold but soft) pan de sal delivered to their houses early the next morning. (My father is an amicable person and had made friends with some tricycle passengers to whom he offered the delivery service. Thanks to the oven toaster, families could simply reheat the packed pan de sal, sometimes with their favorite cheese or mayonnaise on it.)

On making pan de sal, we had a mini-boat for mixing yeast doughs then, and our panaderos were so muscular (they could compete for bodybuilding contests) because of the extreme work-out of kneading the big doughs, as big as 4 pillows combined, which they would lay on top of a dining table (for 6) that was modified by adding a sheet of aluminum on top, and the dough would be covered with plastic, and later on would be doubled in size almost as wide as the whole surface of the table. Towards the end of this first rising, some small bubbles would form on the dough that we kids would playfully pop. Of course, my father would castigate us when doing so, afraid to disturb the yeast cells in doing their job and might end up giving us flat breads. Bad for business. While waiting, we would apply thin coat of vegetable lard (shortening) on the pans. The other panaderos would take care of cleaning the equipment or washing their laundry and their aprons (made of flour sacks). Some take the time to nap.

The busiest time of the day was around 3:00 in the afternoon. Come time for shaping the dough, we would gather at the sides of the table. My brother (or another panadero) would use a metal dough cutter to cut long portions from the big dough, then form these portions into a log, in the process creating the same effect as "punching" the dough down. The log formed would be compact and soft, then we would roll these on a pan of breadcrumbs, then lay side by side in wooden "pans" (rectangular flat crates about 4 feet long by 2 feet wide and 4 inches deep) and let them rise as we try to finish the rest. Once done with log-making, we would get the first batches, and my brother (or the panadero) would use the wooden dough cutter to cut the logs into 1 to 1-1/2 inches portions, throw these pieces our way on to a pan of breadcrumbs, and we smaller kids would roll these pieces to coat all sides with breadcrumbs, then lay on the flat baking pans diagonally as 6x4 (so 24 pieces per pan), carefully carry the pan toward the shelf and let it rest there for at least 30 minutes (actually while working on the rest of the dough) before baking. (I tried to copy this method now that I am here in the US; see this page for step-by-step photos, using a bread machine recipe for the dough. I blogged about it in my old kusina with a poem inspired by the smell of the dough as it was rising inside the bread machine.) One of the reasons why pan de sal are so spongy is the time of rising. When you make and bake more, the longer the last batches have for rising, and the more airy it becomes. If it sits too long before entering the oven, the result is a somewhat dry, airy, sponge-like bread. So the best batches would be the first 3/4. It is not because the panaderos want to make it appear bigger to justify the cost, for the information of those of you who look at it that way. They usually weigh the first cut portion then approximate the rest by comparing sizes as they proceed with cutting, checking along the way if they are still maintaining the right weight. These panaderos are so skilled that they usually do not need to weigh at all.

I loved the hustle during the early morning hours when neighbors would troop to buy our freshly baked pan de sal, usually with Dari Creme or (my favorite) Reno liver spread. During school days, I would usually have these for my breakfast, especially when we had no maids. I particularly enjoyed the early mornings during misa de gallo, because then more people would make that trip to buy hot pan de sal, and usually at an earlier time of 4:00 in the morning.

Our bakery plus store was a good income source for us, and while we were not rich, we were not deprived; we lived comfortably...until SM city was built, and Goldilocks was there, plus some more baked goods in the grocery shelves, then the SuperSale was born, not to mention the sudden abundance of other neighborhood bakeries. We strived to keep our bakery going. It is rather the same with Wal-Mart versus small town stores. My brother later got a job as a baker in a Japanese-owned outlet in MegaMall, and the rest of us were already in college, so my father was left struggling to keep the bakery going. I sold some baked goods in my Medicine days by using hotdogs as fillings for the Spanish bread dough, Argentina corned beef with onions instead of coconut for pan de coco dough, and also by making chicken and ham sandwiches.

The competition was so great, that my father would often have lots of returned old breads, usually already moldy and not fit for making bread pudding. He resorted to using potassium bromate for what he thought not only prolonged the shelf life but also improved the texture and the taste (cheese-like), but it was later banned because it was found to be carcinogenic (read more here). So even before I left PI, our bakery had stopped operating. It was a sad and gradual event for us, which affected my father greatly. I often would see him lying on the bed, staring at the ceiling, and would sometimes voice regret that my brother did not support him in continuing the business...I felt that part of the problem could be blamed in not teaching us GIRLS to do at least small scale baking (my brother learned all the recipes down to baking per se; we girls only helped shape the dough and place them on pans), but then we had no small oven (which was not uncommon for the typical Filipino family). And I thought then that the heavy workload and the huge machineries and ovens were meant for men. Ironically, when I recently talked to my younger son about how I plan to teach them how to make yeast rolls, he said, "But that's for girls!" My quick reply was, "Annnoooo? Hindi ah!" (What? Of course not!) And I told him the above story, then thought of posting about it here as my entry for the LP 14.

Now that I am here in the US, I am trying to copy those goodies (especially the yeast rolls) and come up with my own baked goods using non-commercial (aka homemade) recipes and ingredients for family consumption (as in, I avoid leftovers) -- e.g., butter instead of margarine or shortening, real pork lard whenever I can have it instead of shortening, lots of eggs depending on the recipe, milk instead of water (also depending on the recipe), buttermilk, sour dough, potatoes and other new ingredients, and NO PRESERVATIVES (I do not let them go beyond 3 days as that would be inviting molds. For those of you who like buying breads from the grocery stores because "they last longer," think again...). While I seldom bother to ask for the recipes my father and brother had for those rolls and buns I grew up with, I do experiment with different recipes online and from books/co-foodbloggers and choose which ones I will use to make my version of pan de sal, pan de coco, ensaymada, etc., and modify accordingly, then I post them here in my foodblog as I learn, in an attempt to chronicle for my children's sake, and to share with other Filipina expats who may be interested. And as my own addition to the usual yeast rolls I had as a child, I am adding to my collection my own versions of other breads/rolls that I had in PI such the siopao, chicken or beef filled bread like beef asado roll (the pocket version of which I used to buy in Goldilocks for heavy merienda back in those times).

I am thankful to the Spaniards for introducing to the Filipino community (I presume it was their legacy to us) the PANADERIA.

Entry to Lasang Pinoy 14 hosted by purplegirl.

Thursday, September 28, 2006

Pan de Coco

Yesterday my Filipina friends and I were scheduled (or so I thought) to have a lunchdate at the house of another Filipina, but we decided to meet here at my home before going there. I was the first person called by that hostess, and I was tasked to inform the others about it.

So we went...and our hostess Vengie (in blue shirt, sandwiched by me in yellow and Fe in red) was pleasantly surprised to see us because we were supposed to meet NEXT WEDNESDAY...Ooops! Sorry! (blush!) Though surprised, since she was not able to attend our picnic last August at Ana's (in blue tank top) tabing-ilog, she was pleased nonetheless, although apologetic that she did not cook anything. No problem, because I bought a pan (last batch) of savory chicken feet, some palitaw (which she missed that day I made them the first time), and some pan de coco (one for each of us). Fe brought Alaskan salmon (caught by her husband), and Daisy (the one who holds a baby) brought veggies, rice and fried fish, which we ate with tomato-soy sauce dip. Ana was exempted because of her two babies to take care of.

Anyway, I was not planning to make pan de coco. The night before, I was debating on which one to prepare: palitaw or pan de coco. I thought palitaw was easier to make, so I made those, about 15 pieces, but had excess coconut (about 7 heaping tablespoons), so I ended up planning to bake them the next morning (Wednesday). I used the Parker House Rolls recipe (same dough I use for siopao) was able to make only 9 pieces, and I left the rest of the dough plain. Fe came to my house first, so I offered it, with a warning to have only one ("Tig-iisa lang kayo!"). When she finished it, she was looking longingly at the rest. "Bitin ba?" (Do you want more?) "Bakit kasi konti lang ginawa mo?" (Why did you make only a few?) You know the story...Hehe...

Here's how:

INGREDIENTS:
Prepared dough (any sweet bread recipe; I used same dough as in siopao, but I have also tried Buttery Sweet Bread recipe using bread machine)
grated coconut (either bought frozen, or grate your own; see my palitaw post in old kusina)
white or light brown sugar (Note: I had about 2-1/2 cups of mixed coconut-sugar, proportion of 1 part coconut:2 parts sugar)

Buttery Sweet Bread recipe (dough cycle only; I used 1-1/2lb loaf to make 21 pcs)-

1/2 cup milk
1/3 cup water
1 large egg
1/4 cup butter or margarine, cut up
1 tsp salt
3-1/3 cup bread flour
1/4 cup sugar
2 tsp BM yeast

To prepare Buttery Sweet Bread dough:
Warm all liquid ingredients to room temp (80-100 deg F) and place in BM pan. Then place all dry ingredients. Run on dough cycle (about 1.5 hrs)

INSTRUCTIONS:
The night before you serve, mix grated coconut with granulated sugar (white or light brown), 1:2 ratio (i.e., I had 7 heaping tbsp of grated coconut which I mixed with 14 exact tbsp (not heaping) of sugar (you may want to taste first then adjust; really , it is up to you). Let this sit in a covered container in the fridge, so that it draws out moisture from the coconut and creates a wonderful caramel-y coconut-y taste. If you plan to bake right away, at least prepare this before your dough so it will sit for sometime before baking. Also, prepare the dough (you may want to use Parker House Rolls; see my beef asado siopao post) and leave it in the fridge overnight. You may also use the Buttery Sweet Bread recipe as above on the day you are going to bake.

Pinch off dough about size of pingpong balls and place on greased baking sheet to let rise for about 10 minutes, covered with greased plastic.

Proceed with filling the buns the same way you would the siopao. Place on parchment paper-lined baking pan. FLATTEN a bit. See slide show.

Allow the filled buns to rise for 30 minutes, in a warm place free of draft (on top of a flat stove covered with damp flour sack or greased cling wrap, or inside a warm oven).

Bake in 400 deg F for 12-15 minutes (it browns quickly). Brush with softened butter as soon as they come out. Let cool about 1-2 minutes before eating, or about 10 minutes those you will not consume right away, then transfer to wire rack to cool completely before storing in ziploc bags.


When I removed these from the oven, some of the coco-caramel oozed out of the buns and made a somewhat chewy caramel film on the paper, which I detached and savored. Yum!

Vengie, the hostess, asked me to bring pan de coco next week (the real schedule), as she has some Filipino friends who will be coming over from NY. Oh, and she requested to have some yeast rolls baking session with me in the near future (I feel flattered and honored!). She loves baking muffins and cakes, but does not know how to deal with yeast rolls. I love yeast rolls, because I grew up with such (typical ordinary) bakery goodies in PI. Back then, cakes and muffins were more expensive and bought only from SM or some specialty bakeshops, and what I had for ordinary snacks were mostly yeast rolls and breads, in the likes of pan de sal, pan de coco, monay, patigas, "tasty" (American pan bread), spanish bread, ensaymada, pan de regla (we at my father's bakery called them "pula"), etc., and I was lucky to have had any of these fresh and hot out of the oven before they even made it to the display area of our store. Now, I am getting more and more comfortable baking them, and loving the nostalgic trip as I knead and shape the dough. My husband happens to love yeast rolls as well, so although it is quite laborious and more time-consuming than muffins and cakes, I do enjoy making them.

UPDATE: 11-24-08
A very inspiring email was sent to me:
Hi Manang,
Hafa Adai from the island of Guam U.S.A!

Isa ako sa mga taga-hanga mo,mahilig din akong magluto pero di sing galing mo.
Marami na ko na-try na recipes online pero most of them ay palpak.I tried your pan de coco recipe at ako ay humanga pati asawa ko kasi perfect talaga.Mula ngayon site mo na lang pagtitiwalaan ko at gusto ko try lahat nga recpes mo.

Hanga ako sa blog mo ,sa slide show ,recipes at sipag mo.Superwoman ka yata ah!Pano mo nmn nagagawa lahat yan!!!Hanga ako talaga.You're the best.

People like you give me the motivation...Thanks a bunch for the kind words!

Lady Diana and the Moss Etsy Shop

I was trying to check out where my visitors (old kusina, that is) most often come from, and I noticed this link, clicked on it, and lo! Was I surprised to see a very talented Filipina in Oregon! Check out her shop!

I am posting about her today because I admire (and envy) her talent and her capacity to earn income with what she enjoys most. Not only that, her husband is so supportive and brings out his talent as well to contribute to her work! What a team! She is currently preggy and this is an excellent way to earn some dough at home.

I hope some other Pinays will get ideas about their skills/talents to earn at home like Lady Diana does. (And this is another reason why I am posting about her here.)

Tuesday, September 26, 2006

Chicken Alfredo with Fettuccine Pasta

I got the recipe for this on the box of the fettuccine (grocery brand). But while it did not contain the chicken, I added cubes of chicken breast. And when I tasted it, it lacked something, so I added the sour cream.

Husband liked it so well he asked to bring some for his lunch pack the next day. As long as I do not add veggies on such recipes (which I tend to do often, for health reasons), he is all set. So I just served pickles on the side. Shown on this plate is kosher dills (sliced version of my dill pickles, which I chilled only, not processed in water bath).


INGREDIENTS:
1 lb chicken breasts, cubed
1 lb Fettuccine
3 cups heavy cream
12 tbsp butter
1 cup parmesan cheese
salt and pepper to taste
1/2 cup sour cream

PROCEDURE:
Cook pasta according to package directions. When pasta is "al dente," drain and set aside. Meanwhile, heat large skillet and season the chicken with salt and pepper. Melt the butter and let clarify, then brown the chicken cubes in it. Add the heavy cream and cook to a medium consistency while constantly stirring. Add fettuccine and parmesan. Serve pasta and sauce separately in case you will have leftovers.

TIPS: When reheating the sauce, it is better to do so on the cooktop instead of microwave, because the fat tends to separate. Reheat on low, stirring constantly. The stages will be such that it will seem the oil is separating, but keep on stirring. Once the sticky part starts to heat up well (later than the butter part), it will eventually blend.

Monday, September 25, 2006

Upgrading my Kitchen

I have been talking about how my husband and I are working on our kitchen...

At the same time, I have been trying to upgrade my online KUSINA. Still under construction...

Last time I checked, my slides host was updating so you may not see the slides yet. My first food post there was about beef asado siopao.

Please update your links. Thanks to all who keep visiting my blog(s). You are a source of inspiration!

UPDATE: I think by now I have made all modifications that I need in my new kusina and it is quite ready now.
Please visit my new Kusina ni Manang and update your links as well. Thank you very much!

Sunday, September 24, 2006

Beef Asado Siopao

When I was still in PI, during college days I used to buy siopao from Kowloon. I like their siopao because it had lots of filling, although the dough is not too well distributed - quite thin on one side, and thick on the other. However, I am not really a big fan of siopao dough made with rice flour. I prefer the ones made with all-purpose flour.

When I was a mother already, there was this aisle in SuperSale where I would get my beef asado siopao. They came in packs of 6, and must be chilled or frozen right away, and steamed to reheat/consumed. I liked its dough, but the filling was rather skimpy and had more starchy sauce than meat, although tasty.

Of course, since coming to the US, I have been experimenting. At first I made beef asado roll with the leftover beef pares and the Basic Egg Bread recipe. But that was baked. I had the theory that the same dough used for baking in the oven, when steamed, would give me siopao. The first how-to I found online was Sassy's post on pork asado siopao. (Update as of 3-7-2010: Latest siopao I have is pork siopao, which is sooo yummy! Check it out! Kids gobbled them up quickly!)

However, this time when I experimented, I made use of the dough for Parker House Rolls recipe, which has become one of my favorites, and I have made it my Master Dough for such things as pan de coco, pan de lemon, pan de sal, and anything where I use fillings. It is just so airy and light, and I like its taste. But you may want to consider other classic bread recipes featured in Breadworld.com, like Basic Egg Bread, Old-Fashioned Bread, etc.

What I used, of course, was the leftover from beef pares. I chopped it coarsely (not ground). I heated the excess sauce, seasoned it with sugar, soy sauce, salt, and pepper, then thickened with water-cornstarch mixture. Then I mixed the chopped beef, and chilled in the fridge until I was ready to use it. (Please see my siopao using leftover pork roast here.)

Than I prepared the dough using Parker House Rolls recipe as per intructions UP TO THE INITIAL RISING. The reasons why I like this dough, aside from those mentioned above, was that I could make this at night and refrigerate it for use in the morning or the next supper time. That means I can divide it in half (two birds with one stone), and it is suitable for get-togethers in that I only have to shape and bake them on the day of the party.


PARKER HOUSE ROLLS

Makes 36 Rolls

4-3/4 to 5-1/4 cups all-purpose flour
1/3 cup sugar
2 envelopes FLEISCHMANN'S RapidRise Yeast
1-1/2 teaspoon salt
3/4 cup milk
3/4 cup water
1/4 cup butter or margarine
1 large egg
1/4 cup butter or margarine, melted

Directions
In large bowl, combine 2 cups flour, sugar, undissolved yeast, and salt. Heat milk, water, and 1/4 cup butter until very warm (120o to 130oF). Stir into flour mixture. Beat 2 minutes at medium speed of electric mixer, scraping bowl occasionally. Add egg and 1/2 cup flour; beat 2 minutes at high speed. Stir in enough remaining flour to make a soft dough. Knead on lightly floured surface until smooth and elastic, about 8 to 10 minutes. Cover;* let rest 10 minutes.

Divide dough in half; roll each half to 12-inch square, about 1/4-inch thick. Cut each into 6 (2 x 12-inch) strips. Cut each strip into 3 (4 x 2-inch) rectangles. Brush each rectangle with melted butter. Crease rectangles slightly off center with dull edge of knife and fold at crease. Arrange in rows, slightly overlapping, on greased baking sheets, with shorter side of each roll facing down. Allow 1/4-inch of space between each row. Cover; let rise in warm, draft-free place until doubled in size, about 30 minutes.

Bake at 400oF for 13 to 15 minutes or until done. Remove from sheets; cool on wire rack. Brush with remaining melted butter.

* If desired, allow dough to rise in refrigerator 12 to 24 hours.

Source: Breadworld.com


Then I proceeded as depicted in the following slideshow:


Please note that it is entirely up to you what dough to use, be it using rice flour, or even using a biscuit dough recipe (like what my friend Ana does; it is time-saving!).

I used coffee filters instead of parchment/wax paper to line the underside of the buns. It was easier to fold several coffee filters into 1/4 size, then cut off the edges to come up with squares.

Before proceeding with the below procedures, start boiling the water in the steamer.

DETAILED PROCEDURE:

1. Prepare the dough and let rise for 10 minutes. (Note: For my rolls which I fill with something like siopao or pan de coco, I have found that handling and filling the dough is easier when it is cold. The same goes for the filling, especially for siopao and empanada. Do not try to fill the dough with lukewarm, runny filling. It will be frustrating.)

2. Cut the dough using a dough scraper/cutter into 2-inch wide logs, then cut further to make approximately 2x2 cubes. You may use your hand to just pinch off, as long as you don't squeeze them flat.

3. Lay them on a lightly greased baking sheet about 2 inches apart and let rise for further 10 minutes. Not only will this give you more airy buns later, but also allow for easier manipulation when filling them.

4. Using your hands, flatten each piece to about 1/4 inch thickness, thinnest at the sides.

5. Place about 1 heaping tbsp of the filling at the center.

6. Gather the edges and pinch together to seal. Place the dough on the paper with the seam under.

7. Arrange on the steamer pan about 1 inch apart. Cover and let rise 10 minutes.

8. Steam for 12 minutes. Prepare the next batch while waiting.
Notes: (1)I read in another blog to add vinegar to water to help make buns come out whiter. (2) It was advised to put clean dish towel (I used flour sack here) above the siopao doughs to prevent water condensing beneath the cover to drop onto the buns and make them soggy. (3) I tried to steam the first batch for 30 minutes with only a layer of flour sack under the cover, but I had a poor outcome as shown in the photo. Compare the wet bun on the left with the smooth and spongy bun on the right. So I also placed flour sack under the pan of buns, and those two covers gave me the smoothest spongy buns.

9. Cool for about 5 minutes then transfer to wire rack, then proceed with making the next batch.

10. You may eat this now, or let cool completely then place in freezer bags for future eating. (I covered with one coffee filter to help absorb moisture and lessen freezer burn). While I am not in a position to tell you how long it will last in the freezer, I am sure it won't reach one month before you (or family or friends) will consume them. When frozen, reheat for about 1 minute in the microwave. If it is just chilled in the fridge, reheat for 30 seconds.

I made some with chicken-mushroom filling (just shredded chicken mixed with cream of mushroom) because out of the 36 pieces, I had 10 more when I ran out of beef filling. My older son loved the beef, my younger preferred the chicken. Then I offered both types to my in-laws, and they loved the beef as well (It's their first time to try steamed buns). I had hubby try the beef, and he said (in his usual unenthusiastic way) it was good. Oh well, he really prefers plain yeast rolls, especially ones made with wheat.

Special thanks goes to my friend Ana for lending me her steamer (sa uulitin!).

If you do not have enough beef fillings for all the dough pieces, you may keep them refrigerated covered with cling wrap and then bake the next morning at 350 F for 12-15 minutes (depending on the size; watch out as it browns) to enjoy plain buns, or roll each piece first on a plate of breadcrumbs to have pandesal.

UPDATE [1/25/09]
For those who want a recipe for siopao sauce, here's one shared to me by an online friend (and a good singer) Jen. I have not tried making this because my siopao does not usually need additional flavor; the filling is already tasty. So, if you feel like experimenting, here it is.

sio pao sauce

1 T oyster sauce
1 1/2 t dark soy sauce
2 t catsup
2 1/4 t white sugar
pinch of ground white pepper
2 1/4 t tapioca starch
5 T chicken broth

1 T vegetable or peanut oil
1/2 c dice onion
3/4 c thinly cut Barbecued Pork
1 1/2 t gin
1/2 t sesame oil

1. In small bowl, combine sauce ingredients and reserve.
2. Heat a wok and add oil. Add onion and cook for 5 minutes. Add pork, gin, reserved sauce mixture and cook for 1 to 1 1/2 minutes, until sauce thickens. Add the sesame oil and mix well. Turn off heat and transfer filling mixture to a shallow dish. Cool to room temperature, then refrigerate until ready to use.

TO BAKE SIOPAO instead of steaming:
Well, after I tried steaming in small batches, I thought it would be easier to bake them, which I have tried (although no pics of those here). Baking the siopao instead of steaming (though by definition, siopao is steamed) , you will come up with rolls which has meat filling instead (sort of like those sold in red ribbon if you shape them like triangles), almost like Hot Pockets. Just flatten them a bit to achieve a more browned look. Bake at 350 for 12-15 minutes or until golden brown. Brush with melted butter right after baking. Refrigerate the leftovers (for the sake of the filling, as that cooked meat will spoil if left in room temp for a long time).

About this Blog and the Blogger

A Filipina's (unabashed) chronicles of adaptation in a kitchen in rural America. Some recipes (and photos) might offend the typical American, so be forewarned! Recipes featured here are what I usually cook/bake/prepare, without paying much attention to the visual appeal. No gourmet effect here. Just plain homecooking, Pinoy-style, in my American kitchen. If you are looking for some fancy foods that look great but taste so-so, this is not the place for you. I would say a lot of recipes here taste great as far as my Pinoy taste buds are concerned, which may not be the same for foreign tongues.

This blog started (in old Blogger) as a means to evade insanity and for me to maintain self-esteem by being useful although unemployed at the time; e.g., I had hoped to be of help to other Filipinas newly married to foreigners by blogging about my kitchen (and garden and housebuilding) experiences as I try to adjust to a new life in a new country, and I am glad that my call for other Pinay expats to share their own experiences was answered. I have a list of other Pinay foodbloggers if you scroll down the page, and adjusting had become a breeze because of them. If you are a foodblogger who is not in my list, kindly drop me a note so we can exchange links. I would love to have additional references!

This blog, obviously, chronicles my adaptations in the kitchen, and my posts include also anything about food and kitchen in general, whatever comes to my mind. While it serves as an online notebook of my adaptations, it is also an answer to homesickness, trying to re-live my Philippines days, creating a blanket of Filipino-ness that warms my heart, a process of keeping traditions in the family by passing on to my kids what I had as a child. Blogging about it has greatly widened my Filipino blanket, so while I cannot share my products of toiling physically with other Filipinos, at least other Filipinos worldwide get a share of the recipes. Some recipes here might be valuable to others, some might be useless because they are ubiquitous, but I do keep note nevertheless at least for my kid's reference...so they will know "exactly how Ma made it." (I hope blogger does not lose my files, though.)

Please feel free to print or copy any post, just do not claim them as your own. I believe in open source and free information. A little note of appreciation from readers (by comments or emails) is greatly appreciated, and all that motivates me to keep blogging despite a more hectic schedule now that I am working. I would appreciate it better though, if instead of printing my recipes, you just bookmark my site or recipes and refer to them from time to time to increase my traffic stats (and clicking on some google ads somehow give me compensation without passing on the burden to you readers). Also, if you want to forward a recipe to a relative or a friend, kindly use links instead of copy-paste. Not that I need extra income (I can earn as an RN in 4 hours what this blog gives me in a month.) but somehow it justifies the time I waste spend in blogging, and the money I invest in my tech and kitchen gadgets.

DISCLAIMER: Manang is not a culinary expert nor a nutritionist. This blog is an "upgrade" of my old KUSINA which used the old blogger. Since I still have to review and revise some posts I imported from that, I am providing a link on my sidebar, aside from other blogs that I have.I have imported the old posts although I have not edited a lot of them and therefore I have not labeled them yet. If you try to use the google search to look for some recipes it might still lead you to my old kusina. So if you want to see the older posts, kindly go to the archives instead.

MORE ABOUT ME AND MY FAMILY...

I am a Filipina who is quite adventurous when it comes to food, so cuisines I enjoy are a mix of Filipino, American, Italian, French, and others unclassified. Let us just say that most often I am asked "What would you NOT eat?" I used to work as a doctor in PI, and then as a medical transcriptionist upon coming to America, and now is currently pursuing a nursing career; still considering on reviewing for the USMLE but I wonder if that would make me happy and give me the flexibility in schedule so I can juggle family, work, and play (that involves blogging, baking, cooking, and canning)... However, please do not expect me to post about what is healthy for you, or to give you recipes for healthy eating. I eat as I please, with some deeply ingrained healthy must-haves in my menu. So this blog is not about preaching. Please don't make me.

My husband is an American who is such a fussy eater, even in American standards. His mom confesses of frustration during the time when he was still living with them (his parents). This is my predicament, which is compounded by his daughter's tendency to copy his food preferences (thanks to his influence!).

We have a mixed family of two sons (mine) and a daughter (his). We currently are working on our DIY homebuilding (lifetime, it seems) project. We try to maintain a garden during summers. I try to maintain these blogs, but usually do not have the time to do so nowadays since I joined the workforce, so please bear with me.

If you have comments not pertaining to any of the food/kitchen posts, please post them here.

Enjoy!

Recommended Magazines

Home Magazines


Food & Cooking Magazines


Women's Interest Magazines


Books

Wednesday, September 13, 2006

Biscocho

As a young child who grew up in a small neighborhood bakery, I had the privilege of making some special versions of our commercial goodies. One of which is biscocho, made from bread slices which were returned to us after not being sold for 3 days. When the regular ones are made with just one side of the bread slathered with a thin layer of margarine not quite covering the whole surface then coated with sugar, I made my own special batch (1 pan) of slices well covered with a thin layer of margarine on both sides, then coated with lots of sugar (I made sure sugar covers the whole area that had margarine). It was one of my favorite snacks.

One time I had craving, and it popped into my head to make some. I was with hubby then, and I asked him to try. He liked it and requested that I make some for him too, with a sprinkle of cinnamon after toasting (and he did not like it too toasted). Whoa! Another discovery for my hubby!

Then yesterday, my younger son was looking for something to eat, but he was getting tired of the usual pan de pizza that we make using homemade pizza sauce, slices of ham or pepperoni, and mozzarella cheese. I thought of offering to make biscocho for him. He was not sure what it was but he was ready for a new kind of delight. He was not disappointed, and he asked that I make some for his breakfast today. So I made some for both my sons, and the older one told me I should have doubled his share. But I have used up all the bread slices. I told him I would get more next time I go to the grocery store.

Here's how:


I usually use stale bread or hotdog rolls for this purpose, and the oven toaster. I watch carefully as I bake, because if I overdo it, the caramelized sugar burns and gets bitter. I also want to cool it down a bit before biting to it, as the caramelized sugar can be very very hot.

Don't be tempted to use a thick layer of butter or margarine, as this will only get the bread soggy, then you won't get the crunchy result that you want. A thin layer is enough, and you won't get disappointed with the crunch and the taste.

I think the best tasting biscocho would be one that is made from leftover sponge cake (but who would have leftover sponge cakes? They are too good freshly baked!)

Friday, September 08, 2006

Savory Chicken Feet

Before I give the recipe for the chicken feet, here's a slide of instructions on how to prepare them.


When I was still in the Philippines during review days for the medical boards, my friends and I would often buy savory chicken feet from a Chinese restaurant.  I used to just know chicken feet a la adidas (the grilled ones) which was a common merienda for me when I was still in elementary school.  When I had a taste of this super tender savory chicken feet dish, I was hooked.

Here's my version for Savory Chicken Feet (It does not taste like the ones we ate back in PI, but tastes good nonetheless.)


Ingredients:
12 chicken feet
3 tbsp dark soy sauce
2 tabsp rice wine
1 tbsp red wine vinegar
3 slices ginger
3 cloves, finely minced
3 sliced green onions
3 tbsp dark brown sugar
1 star anise
1/4 tsp pepper
1 tbsp sesame oil
2 cups water
1 tbsp cornstarch dissolved in 1/4 cup water

Instructions:
Place all chicken feet in the slow cooker. Combine the rest of the ingredients and pour over chicken feet. Cover and set in slow cook for 5-6 hours (I did this overnight from midnight). Then uncover and stir so those on top will be at the bottom and cover again to cook for two hours more.

Transfer the chicken feet onto a baking pan. Transfer the sauce into a fat separator first to pour out the sauce without the fat/oil into a small saucepan. Boil then slowly add while stirring the cornstarch-water mixture to thicken to desired consistency. Brush the chicken feet with the sauce and broil for about 5 minutes to glaze, then turn the pieces over, coat with sauce again and broil for another 5 minutes. Serve with hot plain rice (or pampulutan. Tagay na!)

Thursday, September 07, 2006

Lasang Pinoy 1st year Anniversary

The theme is to come up with Filipino dish(es) that define(s) what being a Pinoy is all about. With the dishes I am presenting here, I am defining what being Pinoy is all about by generalizing that:

Filipinos who grew up in PI are usually raised to avoid waste.

I remember when I was still a child and in those times when I could not finish my food, my parents (or aunts, or yaya) would often go on guilt-tripping by telling me to think of those hungry children in Africa, or even the streetchildren in PI roaming the streets and scavenging for food, and to be thankful that we had something to eat at least 3 x a day, and that the best way to show appreciation is to not waste any...So I would gulp down the last spoonful of food on my plate although I was almost turning green from having had too much.

This kind of upbringing is reflected on the advertisement of Max's Fried Chicken that says "Sarap to the bones" (which is kinda the equivalent of A1 Steak Sauce's commercial where the consumer could not let the last drop be wasted). It is very usual for us Filipinos to scrape the meat completely off the bone.

This is also the reason why our street foods in the Philippines showcase not only meaty grilled/deep fried chicken thighs/legs, or pork, but also the isaw (both chicken and pork), adidas, cubed pork blood, chicken neck, deep fried small intestines with the intact mesentery (chicharong bulaklak), chicken head, pig ears, etc. And when we do cook fish, whether fried, steamed, grilled, boiled, or smoked, we do include the head. (Photo courtesy of Victor Paul Borg of fiery-foods.com)

A lot of Westerners shake their head that we eat such things, sometimes grossed out, but often feel sorry that we "had to make the most" of what we had because we "did not have plenty." What they do not realize is that, many of us have a choice and can afford to get the meaty parts instead of the "useless" parts. However, while we do have that choice, we have also developed the taste for these exotic dishes that we cook using the "rejects" (by the foreigners) and that we actually look for them. Now that a lot of us are scattered all over the world, we often would spend the money to get such items as frozen pork blood, pig head, etc., if at all we had access to these.

I consider myself lucky in that respect. Because while I am already here in rural Maine, my in-laws like raising chickens, pigs, and cattle (they find the grocery-sold hard to take). Every year we have one cow slaughtered, they have several chickens, and at least one pig chopped up and frozen immediately for a whole year's supply (I would like to learn from them in the near future how to raise these animals). After knowing what I was "willing" to take home what they can't consume yet do not wan't to waste as much as possible, I am now the regular recipient of such parts, so that I get the chance to try cooking exotic delicacies (which I previously just bought when I was still living in PI), and I am also coming up with new westernized dishes using them.

So, let me re-phrase what to me defines being a Filipino when it comes to food: Nothing is wasted.

While Market Manila shows the items typically found in a Filipino pantry, I am showing here what I tend to stock in my freezer to make use of these "rejects" (rejected by the typical Westerner), and the dishes I come up with.

Due to my SIL's recent slaughtering of chickens for a whole year's supply, I now have these parts ( I did not ask for the intestines not because of embarrassment but because I dreaded the work that would be needed to prepare them, when it was most likely only me who will enjoy them):

chicken feet, which I slowcooked adobo+pares style until almost fall-off-the-bone tender, then broiled. I had it for lunch today, and reminded me of those times when I, as a 4th grader, would walk home with my classmate, stopped by her house to have adidas for my merienda. (I will post later about how to clean them, for the benefit of those who have access to them but do not know how to prepare them.)


I froze these chicken skin (labeled chicharon, uncooked still), chicken neck (labeled leeg), and chicken a** (labeled puwet; I will grill these on skewers; they're my fave part in a roasted chicken, but I managed to keep it a secret from my husband up to now...shhh!). I had to label them in Tagalog so as not to gross out my husband in case he happens to raid the freezer for an ice cream.


chicken backs (from those chickens my SIL cut up). I have boiled some of them here (seasoned with garlic, peppercorn, salt and pepper). I removed the meat that clung to the bones (in a bowl here, shredded) then placed the bones back to the pot to continue boiling for at least an hour to extract the flavor.


I can do a lot with the shredded meat and the stock. The following are things that I have made before, and again and again, not only today (for sauteeing as instructed below, use 1-2 tbsp oil, 2 cloves minced garlic, 1 medium sliced onion, 1 sliced medium tomato):

empanada


chicken sopas (I sometimes use leftover Mac & Cheese instead of shell macaroni because my husband and stepdaughter love M&C, so we tend to have leftover very often, but it seldom gets eaten when just reheated in the microwave, so this is one creative way to make use of that). Sautee garlic, onion, tomatoes and chicken shreds, add stock (4 cups), let boil, add the pasta (1/2 cup), add carrots, then add chinese cabbage. Season with salt and pepper. Turn off heat. Add some cream and stir.


chicken sotanghon soup. Boil the stock with some chicken pieces. Add enough sotanghon (a small package for 2 quarts of broth) and cook until soft (about 2 minutes), add spinach (I used to use bittermelon leaves or thin slices of the fruit when I was in PI). Consume right away lest the noodles will soak up the soup.


pancit sotanghon. Sautee, in order, garlic, onion, tomatoes, chicken pieces, carrots, pea pods, and bell peppers, add stock and let boil. Season with salt, pepper, and soy sauce. Add shrimp as desired and cook for 1 minute followed by greens to blanch (regular cabbage or chinese cabbage), dish out the ingredients and add sotanghon to the simmering stock (approximately 1 big package to 2 quarts broth). Let cook until tender (about 2 minutes). Place noodles onto a dish, drizzle with sesame oil and mix well, then top with the other ingredients. Serve with patis-mansi.


chicken balls (a variation of fish balls, homemade by making a batter with the finely chopped chicken meat, chopped carrots, onions, and garlic, using egg, flour, and milk, baking powder and baking soda, and seasoned with salt and pepper, then deep fried)


chicken fettuccine (adaptation of an Italian dish, but enriched with veggies as shown, so I have "Filipinized" it). Cook fettuccine according to package directions and drain. Meanwhil, sautee garlic, onion, chicken pieces, and optional mushroom, corn, carrots, and peas. Add 1 tbsp flour to the oil and stir to make a paste, then add stock in thin stream to make it creamy. Add (optional) thin slices of hotdogs. Serve atop pasta.


chicken dumplings (made with the same batter as chicken balls, only dropped in boiling stew of seasoned tomatoes; another adaptation). Prepare stewed tomatoes by sauteeing garlic, onion, and lots of peeled, cored, and chopped tomatoes (about 30 pieces medium, simmered then blenderized and simmered again. Add dried basil and oregano, salt and pepper to taste. Into the boiling stew, drop the batter by the teaspoon, with enough space in between. Cover and let simmer for about 5-10 minutes.)


or as quesadilla. I now use the George Foreman grill to make individual servings of quesadilla. I like using lots of mozzarella cheese and American white cheese along with chopped bell peppers and onions, sandwiched by a folded flour tortilla and heated for about 7 minutes, the topped by homemade tomato salsa.


(added today, sep. 8)
chicken mami. Boil the stock, add the mami noodles and cook for 3 minutes. Dish out the noodles, then add chicken pieces and sliced stems of chinese cabbage, let re-boil. Turn off the heat then add slices of the soft parts of the chinese cabbage and thin slices of carrots. Serve immediately.


Other uses: arroz caldo, chicken roll (sorry, no photo, but it is like making the usual dinner roll but using chicken mixed with cream of chicken soup or cream of mushroom as a filling; makes it like siopao but baked instead of steamed).

These are just some examples of the Filipino's no-waste attitude when it comes to food. I also have frozen pork blood in my kitchen, for what else but dinuguan.

Allow me to reiterate what to me defines being a Pinoy when it comes to food: The ability to come up with dishes utilizing all edible parts of the food so that NOTHING IS WASTED.
Custom Search