Saturday, June 24, 2006

Palitaw

This is my second entry for the LP 11.

Like I said in my most recent post, palitaw is one Filipino snack item that, as a child bored during summer, I learned to make through the recipe pages of Liwayway Magazine. I can't remember whose column it was, but I liked the recipes featured there. The original recipe called for galapong. I had no idea then what that was, but I asked my mother for money so I could try making this, and off I trekked to the wet market one sunny afternoon when most market vendors were taking their nap. Galapong turned out to be sticky rice soaked overnight (at least 8 hours), then ground as soon as there was a buyer. Once ground, it should be consumed immediately; otherwise it will spoil (panis). I have always loved to make this kakanin because of the ease of finding the ingredients and the simple process of making them. It was a bit of a challenge, though, now that I am here in the US. It took quite some time for me to finally come up with substitutes and the tools.

First, I tried to make my own galapong, but I did not know the proper proportion of water to rice, and my first attempt was not successful, I ended up throwing the rice. I was discouraged for a while, until I had an epiphany of using sticky rice flour and water instead! So now I had to start with these two basic ingredients: coconut and sticky sweet rice flour.

When it comes to the freshly grated coconut, I knew matured coconuts were available in Hannaford. I bought one several months ago and tried to grate that with fork. I got tired and swore 99% of the time. I did not want to do that again.

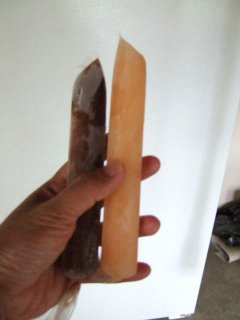
But when my friend Ana went on a vacation to the Philippines, I requested that she buy me a coconut grater. She did get me one for manual grating (left most in this photo), one as an attachment to a machine (middle one). I am hoping hubby could turn it like the Kitchen Aid attachment I have for grinding (right most). But until he could find the time to do that, I will content myself with the manual tool.

I attached it to a small piece of plank, which I could sit upon when placed on a bench or a chair or an ottoman.

This is my friend Fe doing the grating when we had a lunch as a welcome to Ana.

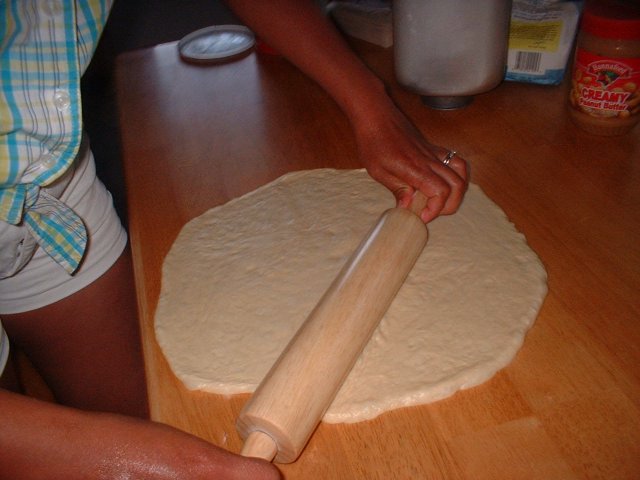
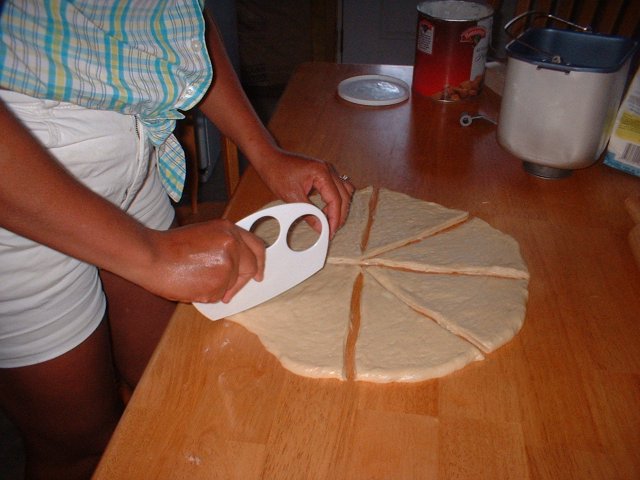
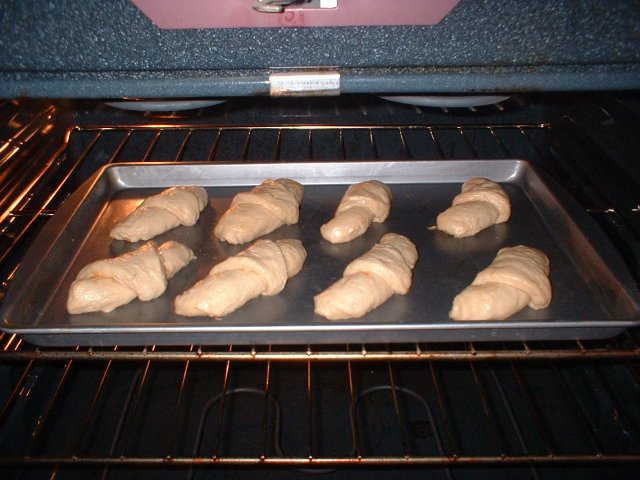
Now, going to the sticky rice patties, first, boil water in a big pot (wider than tall). While waiting for it to boil, prepare the patties by mixing cold water with some flour. I did it by approximating, I wanted to create a smooth dough, not mushy or super sticky, but not too dry. As soon as it is good to shape into balls, make the balls and flatten them into disks. Once the water is boiling briskly, drop these disks one by one, leaving enough space for each patty so they do not stick together.

Once they come up to the surface/float (lumitaw sa ibabaw - hence, the name "palitaw"), scoop them out and let the excess water drip.

Roll each patty into the freshly grated coconut (I do not like using the dry coconut flakes), then lay on the plate, as illustrated in the first photo. Never add the sugar-sesame seed mixture as this will draw out the water and make it very wet, which will dissolve the sugar. Rather, serve the palitaw with the sugar-sesame in a separate bowl, to be added only once the palitaw pieces are on the eater's plate, to be consumed very soon.

How to prepare the sesame-sugar: toast/roast the sesame seeds (either white or brown are okay) on very low heat. If you are using the white, it will start popping, which heralds that it is almost ready. You must swirl or stir constantly so as not to burn. With the brown one, you just have to go by the smell. Let cool then add the sugar (1:1 proportion, or according to your preference).

I had enough leftover for each of the visitor to take home 3 pieces each (of course I had some too!) What to do with leftovers: Put in the fridge without the sugar-sesame. When you want to eat them, microwave for 30 seconds (if only one patty), then add the sugar-sesame.

My kids still have to develop the taste for this dessert/snack. I plan to serve this during Pinoys' Christmas get together or during my birthday to serve to my in-laws.

I would love to learn how to make pichi-pichi as well (another favorite of mine), and I hope someone can share the how-to's. Maybe it is already featured in past LPs. I gotta have the time to read them...

I also want to be able to find coconut juice (the real coconut juice, even if it is canned) with some young coconut bits so I can make buko-pandan ice candy or drink, and also buko-brown beans popsicle. Any such info?

UPDATE:
JMom posted an easy recipe on pichi-pichi (Yehey!!!), found here.

LP 11: Summertime Coolers and Memories of Summer


Wow! After a long hiatus from blogging, this is my first time to participate in the Lasang Pinoy Series. Thanks to JMom for the invitation.

As the title implies, it's about what I used to indulge in during those summers when I was younger (and now I am sharing with my children).

In the LP 10, it had the same theme, and Tina posted about the same thing I made last night and which I am posting about today -- ice candy. This is just one of those delicious and thirst-quenching ways by which Filipinos (kids especially) try to beat the summer heat.

I made chocolate (using my untouched-for-months Nesquick) and melon. I have to share one technique that I have learned from I-can't-remember-who on how to make the ice candy (that's what we call the equivalent of icee or ice pops in the US) easy to bite (I still remember the first time I tried making ice candy, it was so hard that it was annoying to eat it!). It just involves boiling the water (that you are going to use for the mix) first then adding a little bit of cornstarch-water combination to the boiling water, like making it thick as in soups, but not too thick. Let's say for a big pot of boiling water, you add half a cup of cold water in which you have dissolved 2 tbsp of cornstarch. I have long been wondering about how it could bring about the desired effect, and in my "scientific" kuno mind, it seems that the complex starchy colloidal suspension hinders the lattice formation via the strong hydrogen bonds that form when water turns to ice, such that, instead of ice-like consistency of the ice candy, it becomes like packed snow. Once I mastered to do the trick, I even tried selling ice candies in our subdivision when I was in high school. Bad thing was, I did not use a tray, so the sticky substance oozed out of the plastic with small holes, that it stuck to the gadget of the freezer door, nasira!

Anyway, back to making my chocolate ice candy, I just poured Nesquick into 1 liter of the cooled-to-RT pre-boiled water, tasted as I went along, making it a bit sweeter than I could tolerate, because I had to add milk by taste, and of course, I had to provide allowance for the freezing. You know how ice makes sweet taste less sweet, and how heat tends to amplify the sweetness.

For melon, I did not add milk, because in recalling how chilled melon+condensed milk resulted in a bittery mettalic taste, I did not attempt to add milk here; just sugar. So, 1 liter of the same water, plus 1/4 melon processed in a blender, plus sugar to taste and a bit more, then I poured the whole thing into a bowl and added melon strips (kinayod).

After an hour, my younger son was eager to try it, but I could not give him any because it was not yet solid. I told him to wait til the next morning, which was today.

He woke up very early and asked for these ice candies first thing.

As you can very well see in the right photo, he still had that bed-head, but already was excited with the frozen goodies, and upon tasting, finally exclaimed, "Oh, I know these! I had these in the Philippines!"

Another memory from my childhood days is the Palitaw...it is one of those things I learned to make (experimented with) during the boring summer days, when I always looked for something to do aside from watching TV or reading or biking or trekking. But I will post on that next time (my photos are all ready).

Wednesday, June 21, 2006

EGGS: A Comparison Between Homegrown and Grocery Source

One time when I had lunch at my friend's house (with other Filipinas) I brought an egg with me (My eggs all come from my in-laws who raise chickens). Then I asked for an egg from my friend who was hosting the lunch, an egg which she buys from the grocery store. Both had brown shells. I wanted to compare and see for myself the truth in the photo in a magazine article my sister-in-law showed to me recently.

I was quite a bit careless when I cracked my friend's egg open; hence, the broken yolk. Regardless, it was still quite obvious how different the two are when placed side by side in this bowl.

I remember when I first came here, I was quite surprised at the almost-orange yolk, it made me wonder that maybe the brown shell had to do with it. Now I know better. And yes, that article reminded me about that first time I had an egg here. But during that time, I was comparing it to eggs that I was used to eating in the Philippines. This made me realize that those commercial eggs in PI are no better than the commercial factory farm-produced eggs here.

The physical appearance is only one clue as to the superior quality of eggs from chickens raised with tender loving care. A comprehensive comparison illustrated by a bar graph can be found in Mother Earth News's Chicken and Egg page. Nutrition-wise, they say:
In 1988, Artemis Simopoulos, co-author of The Omega Diet, found that eggs from
pastured hens in Greece contained 13 times more omega-3s than eggs from U.S.
supermarkets. In 1974, a British study found that eggs from pastured hens had 50
percent more folic acid and 70 percent more vitamin B12 than eggs from
factory-farmed hens. In 1997, a study in Animal Feed Science and Technology
found eggs from free-range chickens had higher levels of both omega-3s and
vitamin E than those from hens maintained in cages and fed commercial diets.
Most recently, in 2003, Pennsylvania State University researchers reported that
birds kept on pasture produced three times more omega-3s in their eggs than
birds raised in cages on a commercial diet. They also found twice as much
vitamin E and 40 percent more vitamin A in the yolks of the pastured birds.

Many vegetarians are forced to be so, even refusing to eat eggs because of cruelty to animals. While some cannot get themselves to slaughter (sacrifice) animals for their own consumption, others just plainly do not want to consume products raised under the most horrible conditions one can imagine (so they do not want to support such factory farms), as depicted in the video below, nor would they like to ingest such hormone-laden, probably previously sick products and have some dire health consequences.


Other related videos are the Meatrix I and II.

Have you noticed how the grocery stores are now teeming with "organic" produce? I am afraid it may be another "meatrix" where the produce is labeled as organic, but turns out to be another fantasy created by the profit hungry companies who want to take advantage of the "fad." If you feel at a loss now as to where to get foods you can trust (which can be quite a problem for the city dwellers), read here.

I feel privileged to have a taste of REAL GOOD FOOD, though not as completely as I would like it to be. Some people consider foods prepared in fancy restaurants as good food. To me, homegrown, safe, hormone-free, and healthy (as opposed to sick) nutritious foods are the real good foods.

I am contemplating on saving some money to have a contract with my SIL or MIL so they can raise chickens and pigs (in addition to beef) for my family's consumption (I do not have their expertise). There is also a local farm where the milk is organic and pasteurized (not homogenized). It may be quite costly, but the health benefits will be all worth it. Most of all, I will have the peace of mind on what I am feeding my family. Posted by Picasa

Monday, June 19, 2006

Sloppy Joe

There was one time when hubby picked a can of Sloppy Joe, for one of those items to be added to the pantry for a quick fix supper (we had been doing more of this time-saving measure since I started working at home). I have tasted the canned one, and looked at (and tried to bury in my memory) the ingredients. I thought I probably could make my own (the control freak that I am strikes again!). This is my version of Sloppy Joe.

Ingredients:
1 pound ground beef
3 cloves garlic, minced
1 medium onion, chopped
1 red bell pepper, chopped
1 small can tomato sauce + 1 can water
1/4 cup ketchup (approximate)
3 tbsp sugar (or to taste)
Shredded cheese (for topping; optional; hubby likes it so)

Procedure:
Brown the beef. When it renders oil, remove extra oil and leave about 1 tbsp. Saute the garlic followed by the onion. Give it a dash of salt and pepper, then add the rest of the ingredients. Stir well, and let simmer for at least 10 minutes, then add salt and pepper to taste. You may try to adjust the sugar and ketchup as well. Serve on burger buns and top with shredded cheese as desired.

Sunday, June 18, 2006

Turkey Deli Sandwich

This is still part of my diet.
For me, it is cold lunch: 3 slices of the deli, a handful of salad greens (Romaine lettuce), 1 slice of American white cheese, 4 slices of Bread and Butter Pickles, and a burger bun (or two slices of bread). Nothing else added (like ketchup or mustard).

One sandwich is all I need for lunch. For my kids, though, if I will serve the same, they need two, either as cold lunch or merienda (snack).

Quick fix for a busy day, and they love it!

(I am down now to 123 pounds, but having a hard time losing more pounds because of several get-togethers. It is more like fluctuating now, averaging 124 plus/minus 2. I am quite satisfied with that nonetheless.)

Thursday, June 15, 2006

Peanut Butter & Chocolate Rolls

Manang's Note: This recipe reminds me so much of a Philippine roll which could be bought in any bakery there. I am referring to the "Spanish bread" which makes use of margarine mixed with sugar as filling, then breadcrumps to roll the pieces on prior to laying them on the baking sheet (pretty much like pan de sal). This recipe is from breadworld.com but I revised this in that I did not arrange the rolls in a spoke fashion, and I replaced the chocolate chips with granulated sugar because I had none at the time, then just used the Hershey's chocolate syrup to drizzle on top in addition to the peanut butter icing. The below nutritional information is for the original recipe. My children loved this, and my husband liked it as well.

Makes 8 rolls. Dough can be prepared in all-size bread machines.


Dough
1/2 cup milk
1/3 cup water (70 to 80oF)
1/4 cup creamy peanut butter, at room temperature
1/2 teaspoon salt
2-1/4 cups bread flour
1/4 cup sugar
1-1/2 teaspoons FLEISCHMANN'S Bread Machine Yeast

Filling
2 tablespoons granulated sugar
2 tablespoons creamy peanut butter

Icing

1/2 cup sifted powdered sugar
1 tablespoon creamy peanut butter
2 to 4 teaspoons milk

Hershey's chocolate syrup

Directions
To make dough: Measure dough ingredients into bread machine pan in the order suggested by manufacturer. Process on dough/manual cycle.


To shape and fi
ll: When cycle is complete, remove dough to floured surface. If necessary, knead in additional flour to make dough easy to handle.

Roll to 14-inch circle.


Cut into 6 wedges;


sprinkle filling, dividing evenly, at wide end of each wedge.


Beginning at wide end, roll up tightly; curve to form crescent.


Arrange crescents, seam side down, on greased large baking sheet. Pinch ends at center to seal. Cover; let rise in warm, draft-free place until doubled in size, about 30 to 45 minutes. Bake at 375oF for 15 to 20 minutes or until done.


Remove from pan; cool on wire rack.


To make icing: In small bowl, combine icing ingredients except Hershey's chocolate syrup; stir until smooth.


Drizzle on rolls. Drizzle Hershey's chocolate syrup.


Nutrition Information Per Serving:Serving size: 1 rollcalories 458; total fat 16g; saturated fat 5g; cholesterol 2mg; sodium 299mg; total carbohydrate 70g; dietary fiber 3g; protein 13g

Inday_adin has a different recipe here that she has tasted and recommends as well.


Tuesday, June 13, 2006

Chocolate Mousse Cake


This is my second attempt at making this cake which is so loved by my husband and my kids.

My first one was not as artistic as this one though. The recipe was shared by stel, and can be found here.

The only revision I made was the addition of Piroulle (sp?) . I placed them along on the inner side of the heart-shaped pan after the base was baked and some mousse was poured so I would have some form of "glue" to stick the Piroulles in. I cut them first to the level of the pan before sticking them into the cake base. Ads by AdGenta.comOnce in place, I then poured the rest of the mousse and followed the rest of the directions. Instead of chocolate shavings only, I added Lindt chocolate truffles. The Piroulles (sp?) were good for munching alone, but used for this purpose, it becomes chewy, so that it serves mainly a decorative purpose.

I thank stel for this recipe!

Posted by Picasa

Saturday, June 10, 2006

Asparagus Sautee with Shrimp Paste

My MIL recently had had enough of asparagus from her garden, so she asked me whether I would like to get the rest of them. Of course, I jumped at the opportunity! Who would not want such freshly harvested goodies?!!!Ads by AdGenta.com


I got a grocery bag full of them, so I immediately washed them with cold water, then I set aside enough to cook for one week to set them aside in the fridge. Since I could not consume all of them and I was pretty sure I would get sick of them after a week, I set aside several to pre-cut and blanch for 3 minutes, pack in storage bags and froze them.

Once way I cook asparagus is like adobong kangkong. I did that last year when I first had my MIL's asparagus giveaway. I have not had kangkong here, but asparagus makes a good substitute for purposes of adobo.

The very first recipe I made out of them this time is stir frying them with shrimp paste. My kids loved them! Though I cooked only about 3 cups of them when sliced as in the photo (probably a bundle if bought in the grocery store), we managed to finish the whole batch! Don't bother to ask how my hubby liked it, though, as he is not a big fan of asparagus. I never saw him eat them.

Ingredients:
asparagus
1 carrot, sliced in disks
2 oz salt pork sliced thinly (optional; I use them for the flavor and the oil derived from the fat; if you do not like to use pork, you may just use 1 tbsp olive oil for greasing the pan. Wok works best (They are cheap at Asian Food Grocer.)Ads by AdGenta.com
2 cloves of garlic, crushed and sliced thinly
pepper
2 tbsp of shrimp paste (to taste)

Procedure:
If using pork pieces, separate the fat and use it to render oil. If you don't use pork, you may use any oil of preference (e.g., olive oil or peanut oil)

Once fat is rendered, remove excess oil and leave about 1 tbsp.

Sautee garlic. Add the rest of the meat if using, and let it cook for about 2 minutes or until browned.

Add the veggies. Season with pepper and add 2 tbsp (to taste) of shrimp paste. Stir fry for about 2 minutes. You may add 1/4 cup water if you prefer (I like stir-fried veggies better if there is no added water.)

Serve with hot plain rice and enjoy!


Powered by Qumana


Thursday, June 08, 2006

You're the Chef - Baking Bread

This is a very educational video for those who want to make homebaked goodies not having to rely on the bread machine. (Now I do not have to post step-by-step nor do I have to contemplate of making a video myself! )

Enjoy the video and enjoy baking!


Saturday, June 03, 2006

I'm on a DIET!!!

Since coming here, I have gained weight gradually. Predisposing factors: sedentary job (MT), working at home (I barely go out), easy access to food (anytime; i have a stock of frozen meat and enough flexibility in my work schedule that I can eat whenever I feel like), winter months (confined to home).

You see, when I gave birth to my first son, I became plump. I was resigned that I would be like my Nanay, gaining weight with every pregnancy. My sisters were biggies after pregnancies as well, although I had always been the slim one among us. Well, I thought I had no hope to be slim again, especially that I always ate my son's leftovers.

That frame of mind changed when my sister, who was so big when she left to work in Taiwan, came back home after three years looking like a she had never had a kid!

That was a wake up call for me. So I started reducing weight, avoiding leftovers, eating less, exercising more. I succeeded but shortly thereafter, I was pregnant again. This time, I was resolved to slim down as soon as I gave birth to my second son.

I did, and after six months post-partum, some of my friends could not even remember me having given birth to my second son (asking, "Di ba buntis ka?" to which I would answer "Nanganak na ko no!"). When I was working already, at age 32, some thought I was just 27 and that my first son was my younger brother.

Then I came to US of A with the same body built I had when I was 22. One would only know I was already a mother when she/he would see my stretch marks and the loose fat on my tummy.


Three years have passed...

I was sorting through my clothes earlier in the spring, getting ready for the change in weather pattern, looking for my sleeveless shirts and shorts. The pants that I brought with me no longer fit, as in they could not get past my thighs!. My sleeveless shirts cut through the skin around my armpit. I thought..."Hindi maaari ito!!!"

I resolved to lose weight.

First I calculated my basal metabolic rate using the calculator on this page (shortcut!).

Results are:

1379.27 calories per day is your Basal Caloric Rate. This is:
no more then 45.98 grams of fat (30%) for your Basal Caloric Rate
51.72 grams of protein (15%) for your Basal Caloric Rate
189.65 grams of carbohydrate (55%) for your Basal Caloric Rate

1793.05 calories per day recommended for your Active Caloric Rate. This is:
no more then 59.77 grams of fat (30%) for your Active Caloric Rate
67.24 grams of protein (15%) for your Active Caloric Rate
246.54 grams of carbohydrate (55%) for your Active Caloric Rate

No less then 1200 calories per day recommended for safe consistent Weight Loss. This is:
no more then 40.00 grams of fat (30%) for your Weight Loss Caloric Rate
45.00 grams of protein (15%) for your Weight Loss Caloric Rate
165.00 grams of carbohydrate (55%) for your Weight Loss Caloric Rate

At this safe consistent Weight Loss Caloric Rate,
you will lose 1 pound every 19.52 Days


Then I went to MyPyramid.gov to get food exchange lists for the various food groups to plan how much I should eat limited by the above results. My diet was in such as way as to consume much less than that in my calculation results, nothing patterned after Atkins or South Beach or Jenny Craig. My diet is typically as follows: Almost-liquid diet for breakfast and lunch (with the addition of a slice of toast or none in the morning, and grilled cheese sandwich plus banana or salad plus matchbox-size white meat), and a full meal for supper. I drink cold milk (1/2 cup) or plain cold water if I get hungry, munch a small cracker or banana, just to relieve the hunger pangs if any. When I feel giddy, that's how I know I am becoming hypoglycemic, so I would give myself some fuel, enough to keep me going until my major meal for the day. I would have wanted the full meal during lunch, but suppertime is the only time I could eat meals with my whole family. I am more lax during weekends.


MY TYPICAL LUNCH

mixture of cubed rhubarb stalks, baby spinach, shredded cheddar cheese, cubed chicken breast about 1-1/2 matchbox size 1/2 cup milk, 1 banana, grilled cheese sandwich
Salad: baby spinach
cubed rhubarb stalks, shredded cheese
cubed chicken breast 4 oz
Italian dressing
Grilled cheese sandwich with
milk and banana

Then I bought a Health-O-Meter, which has built-in BMI calculator, saves up to 10 weight recordings for up to 4 users, tells the difference between the recordings, tells the total lost weight from starting, and tells how much more you have to lose according to your targeted weight.

Of course, exercise should be incorporated. I have always been exercising, but I admit I have no discipline and quite inconsistent. Anyway, I resolved to do 15 minutes or jogging or elliptical in the morning and at night (or 30 minutes in the morning), plus some upper arm toning exercises using elastic bands (short and long), jumping rope x 100 at a time, and warming up/stretching exercises, all at least 3 times a week. Not just to burn calories, but also to tone up muscles and strengthen bones. I usually do my exercise before breakfast (fat mobilization happens more if you are in a fasting state, especially during aerobic activities).

Well, now after one month, my weight has gone down from 137 to 124 pounds. I can now wear my pants and actually zip them up, although it is still quite uncomfortable for me to wear them the whole day. And my sleeveless shirts no longer cut through my skin. Not bad eh?

My Goal: If I reach and maintain a weight between 115 and 120 pounds (for my height of 5' 2.5"), I would be happy.

Tags: , ,


Ads by AdGenta.com
Ads by AdGenta.com


Powered by Qumana

Custom Search