This is one of the many ways I cook sotanghon...my typical ingredients are the usual ingredients for pancit: holy trinity of ginisang bawang, sibuyas, at kamatis (sauteed garlic, onions, and tomatoes), carrots and cabbage, with chicken broth, chicken/pork meat or shrimps and squid, with some soy sauce, patis, oyster sauce, ground pepper, and a drizzle of sesame oil
However, one day I had an intense craving, and all I had at home were the garlic and onions, carrots, and celery, with some leftover chicken and turkey breasts. And in my pantry were (Asian ingredientrs) canned baby corn, straw mushrooms, water chestnut, and quail eggs...and I had in my freezer several pints of chicken broth.
Hmmm...seems like I can make a somewhat more-Chinese-ish version of pancit. So I did, and I managed to satisfy my cravings.
Ingredients:
2 tbsp oil 3 cloves garlic, sliced 1 medium onion, sliced 1 carrot, sliced thinly 3 stalks celery, sliced thinly 1/2 the contents of each canned straw mushrooms, baby corns, quail eggs, and water chestnut (don't forget to drain) 1 cup cubed chicken/turkey breasts 2 cups chicken broth salt and pepper to taste cornstarch+water to thicken a bit
You might be wondering why only half of the canned products...well, I had to save some for another batch this time using a cup of squid and 1/2 pound of shrimps (seafood version, which I made the next day).
1 pack of bean vermicelli noodles (about 14 ounces?) hot water to soak noodles in for 5 minutes 2-3 cups chicken broth to cook the noodles in 2 tbsp oyster sauce soy sauce, salt and pepper to taste 1 tbsp anatto oil (optional- see here for instructions) drizzle of sesame oil
Instructions:
Soak the noodles in HOT water for 5 minutes. Drain well.
Sautee, in the following order, garlic (until golden brown), onions (until translucent), carrots, celery, baby corn, water chestnut, and straw mushrooms for about 2 minutes, stirring constantly. Remove from pan. Put the 2 cups broth into the pan and let boil. Thicken a bit with cornstarch-water mixture. Season to taste with salt and pepper.
Place the veggies back into the pan, add the quail eggs and stir until veggies are coated with the slightly thickened sauce. When it starts to boil/bubble, cook some more, uncovered, for additional 1 minute, stirring occasionally.
Set aside. (Note: I gave some to my friend Anna, with the noodles separated. She ate this with plain rice, not realizing that it was supposed to go with the noodles, which she was saving for another meal time, thinking it was complete pancit already.)
For the noodles, bring the broth to a boil, season with the other ingredients except sesame oil, and dump the wet noodles into it. Stir, stir, stir until noodles have absorbed the broth. Bite into a noodle. If it still is too tough, add some more broth (or water). Do not be too concerned if it is not that salty, as you can easily adjust the salt with soy sauce once you serve. Remove from heat, drizzle with sesame oil, and stir.
Pour the prepared sauce/veggie/meat (or seafood) on top of hot noodles.
My family went skiing today (it's my first time!) and my body is S-O-R-E all over. Blame my blogging for the lack of exercise, so my muscles were not in their optimum condition to be subjected to this new activity. My upper body strength proved to be almost nil as I tried to get up several times when I chose to fall to the ground rather than roll down the (almost flat) hill. Pathetic...I (alone) never had the courage to go up the hill. My excuse: I am too old for this...I can easily get a fracture with one major wrong move.
Anyway, that is the reason why this is another teaser post the first in 3 (1/3) in my Hopia Series. I will continue tomorrow and the next day as I recuperate from my seemingly major injuries (muscle strain...akkk! I need a soak in the tub but my husband temporarily disconnected it from the pipe as he works on our bedroom...sigh!)
Of course, at least a day before, we ought to prepare the filling. It will be much easier to wrap the filling when it is cold and easily moldable.
My favorite fillings are ube and munggo (mung beans). As you probably know by now, I made ube haleya recently. I had several 8-oz jars in the fridge, some of which were used for the ube cake roll and ube cream cheese filling, and some I reserved for hopia.
Needless to say, I do not have to post here what the recipe for ube filling is for this hopia.
Following is how I prepared the yellow split mung bean filling, following a recipe found here (I did make my own version of the dough).
Ingredients: 14 ounces dried peeled split yellow mung beans 1 cup sugar 1/2 teaspoon salt
Instructions: Soak beans for at least 8 hours. Drain and rinse well. Add more water to about an inch above. Boil for about 30 minutes (keep watching so it does not dry out). Skim the scum as it arises. Puree in food processor by batches (see the max capacity of your container). You may want to leave some intact for interesting texture (my kids did not like it, though). Place back in saucepan and continue cooking. When almost dry, add salt and sugar. Continue stirring to cook further until dry enough. Transfer to jars and refrigerate.
Stage 2 - HOPIA DOUGH
Photo above shows the very first homemade hopia I sunk my teeth into.
As promised, I am posting here today the dough for hopia. Thanks to these two recipes that gave me the idea on how to make this pinoy favorite snack that I have missed so much. When my older son tried it, he said that the dough was very much like that of the eng bee tin hopiang ube that I made him taste several days ago, but I noticed the big difference in taste because of 100% ube haleya I used here (the bought one just did not taste quite like the hopiang ube I used to buy back in the Philippines. I don't know if eng bee tin has changed their recipe). The only thing is that the underside is quite thick because of several layers of dough, but it was not too bad once baked.
Just like in one of the above links, I used lard in making the dough. But I used my homemade pork lard. My Nanay has taught me how to render the fat of some meat to use for sauteeing, and I learned how to render my own pork lard when I came to the US. Others might say "ew!" but nothing beats pork lard when it comes to flaky pie crust. Besides, it is very mildly sweet scented with the flavor of pork fat, it is so subtle and pleasant. Every year, I make this after our pig has been slaughtered, so I know where the pork came from, how it was raised, what it ate during its lifetime. In other words, my pork source would be the envy of a lot of real food foodies. You want to question the health implications for this? Here is a quote coming from my previous correspondence with fanatic, a nutritionist by profession.
My opinion about pastry ... there's nothing better than lard for making pastry (with a little butter for flavor). Lard is almost 100 percent fat, where butter is only about 80 percent fat, the other 20 percent is protein and moisture. Butter's moisture (water) makes it a poor choice for pastry (when used exclusively), since water will form gluten when it comes in contact with flour ... making the final product chewy instead of flaky.
I stay away from vegetable shortening. Even though it has about the same fat content as lard (making flaky pastry), the trans fatty acids from the process of hydrogenation are now supposedly more of a health concern than the saturated fat in lard. Shortening is pretty tasteless too.
The lard I can purchase here, believe it or not, is hydrogenated. It also contains BHA and BHT (known carcinogens) as preservatives. It's hardly a product I would consume. You deserve a pat on the back for rendering your own lard!Just yesterday I purchased a new product. It's an organic non-hydrogenated shortening, made from palm oil. Palm oil is very saturated naturally, so it's more solid at room temperature.
Another benefit of using animal fat (lard) for use in cooking ... it has a high smoking point so you can brown with it and it will not break down (oxidize). Most vegetable-based liquid oils cannot be exposed to high temperatures without oxidizing, and oxidized (rancid) fat is carcinogenic. And as your Nanay says ... fresh lard tastes better. I think you need to weigh the costs and benefits of the fat you plan on using.In the end, as long as you eat in moderation and are relatively active in life, I don't believe small amounts of animal fat are deleterious.
With that said, I present to you my recipe for a special hopia dough (I have a hunch that the same practice is done by hopia makers in the Philippines.) If you want, you may use shortening or vegetable lard. If you are interested to make your own, feel free to approach the butcher in your grocery store to inquire. They might even give this to you for free. You can freeze pork lard to keep them fresh longer. Thaw in the fridge when you are about to use. I also use it nowadays for making pie crusts, instead of vegetable shortening.
Ingredients: Dough 1: 1 cup flour 1/4 cup pork lard
Mix together until crumbly (or it appears like coarse meal). Use your hands. Divide into 4.
Dough 2: Mix together until crumbly (same as in dough 1): 2 cups flour + 1 tbsp sugar 1/2 cup pork lard
Once thoroughly mixed, add 1/2 cup water to the above and mix with your hand. Divide into four. This dough is not really sticky compared to my pie crust dough, but the principles are almost the same.
Once the two are ready, proceed as follows for each part of the two types of dough (which you now have 4 of each):
Use cling wrap above and under dough 2 to make it easier to maneuver. Flatten with rolling pin and shape into a rectangle. Distribute dough 1 above. Roll the two together. Wrap tightly with cling wrap and chill in the fridge for at least 30 minutes.
Note: The contact of water in the above mixture will result to gluten formation. Gluten is what makes dough pliable and chewy. The rest time is necessary for the full development of gluten and making this dough more pliable come rolling and wrapping time. Chilling ensures that dough 1 remains physically "unmixed" with dough 2 despite proximity. The flour+lard (or flour+oil or flour+shortening) in between sheets of flat glutinous dough will create air pockets in between the sheets during baking and the results is hopia pastry with very thin flaky "crust" which is not at all crunchy or hard.
[You might be wondering why I have gloves on. Since working as an RN, I have developed dishidrosis, aka "homemaker's hands" and for me, I can very well call it "nurse's hands" because this condition develops when the hands are subjected to frequent handwashing. My skin gets tiny blisters that itch a lot, then turn flaky and super dry, then they crack and it's ouch! So I try to avoid washing my hands as much as possible. Using gloves and washing them instead of my skin helps me avoid exposure to too much handwashing, especially if I want my cracks to heal before my next duty at the hospital. It's not because I am too particular about "cleanliness" when cooking or baking. It's merely to protect my hands. Baka sabihin nyo, ang arte ko. Hindi no!]
Stage 3 - WRAPPING THE FILLING & BAKING
This is my final hopia post in a series of 3. I am writing this while waiting for my cinnamon rolls to rise (using supersoft ensaymada dough).
Photo above shows my first batch, with experimentations on different wrapping. Slideshow below shows few hopia I made with the last roll of dough I prepared before (one of 4 rolls), baked in oven toaster set at 450 deg F for 15 minutes or so. Each roll of dough could make 4-5 pieces of good-sized hopia. (Suggestion: Maybe a better method would be to flatten the whole roll and then punch out circles before putting filling in, rather than flattening each piece. )
The slideshow is pretty much self-explanatory.
While my first batch was baked in my oven set at 350 deg F, I figured, I would try baking at almost the same temp I bake my empanada. The main objective anyway is to cook and brown the dough wrapping. The filling itself was precooked, so there is no danger of underbaking.
And since I was left with only a roll of the dough I prepared earlier, I had only 8 pieces to bake. I did not feel like wasting that much energy by heating up the big space of conventional oven, so I opted to use the oven toaster. The only thing to keep in mind when doing this is not to burn the ones closest to the heating element; i.e., the middle row. So after about 10 minutes, I rotated the pieces so that the brownnest ones I placed at the periphery and vice versa, to achieve even browning of all pieces.
Baked at this temp, the crust had more crunch to it, which will only hold true for when it is freshly baked, of course. If you refrigerate then reheat later, you might not have the same crunchiness anymore. Not that a lot of Filipinos will miss this "freshly baked" sensation because a lot of us are used to the already cold hopia in the bakeries. I myself had only a few chances of getting really freshly baked hopia when I was still in PI. The hopiang baboy my Manong and the other bakers in our cheap (neighborhood type) bakery was not one I really liked, mainly because I knew there really was no "baboy" in it; only lots of onions in oil. (That said, please know that I will never have a recipe here for hopiang baboy. Now that I have shared how to make the dough and wrap the filling, it will be up to you to experiment making hopiang baboy or hopiang hapon (although I think hopiang hapon uses a different dough recipe/method).
UPDATE: Here is a recipe for hopiang hapon by Mrs. Rusty. (Note to Mrs. Rusty: Many times I would have wanted to leave a message on your site but I would have to register in Multiply so I back out. I tried to look for a way to send you a message, but it's the same thing. Please know that I love visiting your site!)
I have long posted about how I turn leftover beef pares into siopao or the baked version beef asado roll. Now I made use of leftover pork roast (the one with Mang Tomas Sarsa, but if you plan to do the same, you can also use the simple pork roast with just salt and pepper, or leftover meat from a whole lechon, as long as you remove the fat first).
I got the sauce ingredients from Gary Lee's WOK Appetizers and Light Snack cookbook. It has wonderful flavor! I brought these to my friend's birthday (along with Pandan Chiffon Cake) and our kids just gobbled them up in no time!)
1 medium onion, chopped (optional) 1 tbsp oil (optional) 2 tbsp cornstarch 1 tsp sugar 1 tbsp sesame oil 1 cup water 2 tbsp oyster sauce
Trim fat and chop the meat, then set aside. (optional) On medium heat, sautee onion in oil. [Since I had onions in my leftover pork, I skipped this part) Mix all other ingredients and whisk well. Add to pan and whisk to cook until thick. Add sauce to meat and mix well. Chill overnight or until cool enough to feel solid.
Dough (I used my favorite siopao dough for Parker House Rolls, as I posted in previous siopao entry)
4-3/4 to 5-1/4 cups all-purpose flour 1/3 cup sugar 2 envelopes FLEISCHMANN'S RapidRise Yeast 1-1/2 teaspoon salt 3/4 cup milk 3/4 cup water 1/4 cup butter or margarine 1 large egg 1/4 cup butter or margarine, melted
Directions In large bowl, combine 2 cups flour, sugar, undissolved yeast, and salt. Heat milk, water, and 1/4 cup butter until very warm (120o to 130oF). Stir into flour mixture. Beat 2 minutes at medium speed of electric mixer, scraping bowl occasionally. Add egg and 1/2 cup flour; beat 2 minutes at high speed. Stir in enough remaining flour to make a soft dough. Knead on lightly floured surface until smooth and elastic, about 8 to 10 minutes. Cover;* let rest 10 minutes.
Instructions to assemble:
Cut or pinch off dough into just a tad bigger than a pingpong ball and lay on greased baking sheet. Let rest for further 10 minutes to develop the gluten some more and give you more volume to play with as you fill each piece with the meat mixture.
Flatten each piece using your palm, making the edge thinner than the center. Scoop out roughly a tbsp of the filling and place at the center of the dough. Pull the edges to envelope the filling and pinch to seal. Place seam side up (if you want it smooth like I do), of you may want to do it the same way the Chinese make them (turn them into graceful pleats that are positioned at the top). Place on coffee filters cut into squares (cut in half, then fold and cut again, then trim off the rounded sides to come up with squares).
Boil about a cup of water with 1 tbsp of vinegar (I used distilled). Position the buns about 1-2 inches apart on the bamboo steamer lined with either flour sack or parchment paper. Spray with some oil to lessen possible sticking to the side of the steamer or to one another. Cover and steam on briskly boiling water for 12 minutes.
Transfer to wire rack to cool before storing in ziploc and refrigerating if not consuming right away. You can also freeze at this point (lay on pan first before stuffing them all into plastic bag. To reheat, microwave each piece for 30 seconds for chilled and 1 minute for frozen while still in its ziploc bag or use a covered plate (the idea is to let it steam again with its own juice, without drying it up). It will be piping hot, so let it sit at room temp for about 1 minute before you eat. If reheating a big batch, steam again, or you can try microwaving them in a covered container for about a minute then check for hotness/coldness and heat some more in increments of 30 seconds until you are satisfied that they are hot enough.
Since working on 12-hour shifts, our family had spent more and more time eating at a Chinese restaurant nearby, which is open until 9pm. My husband has developed a liking for their fried rice, peanut chicken, chicken pepper, and general tso chicken. The peanut chicken seemed like it was baked as whole breast with coating of crumbs with chopped peanuts, sliced into strips then poured with peanut sauce. I thought it was easy enough to re-create. The chicken pepper looked like they were small pieces of chicken meat (as if they were scraped from the bones), dipped in some sweet batter then deep fried, then stir-fried with bell peppers. I imagined it to be a very tedious task for some recipe made out as an afterthought of what to do with the small almost insignificant pieces of chicken meat, so I was not at all interested to re-create it at home the way I imagined it to be. Maybe someday I will try to come up with my own version. General Tso recipe can be found everywhere, but I am not too inclined to have it -- too sweet and hot for me. The first time I tried to make peanut chicken, I did good with the baked chicken, but not the sauce (trying to make it without a recipe as a reference). This time, I looked for a recipe that had a photo that looked like the peanut sauce we are familiar with now, then looked for an alternate recipe that had almost the same ingredients except the coconut milk, since I never imagined the peanut sauce from that Chinese restaurant having any coconut taste.
I baked the chicken using my nu-wave since I was gonna cook only one breast (I marinated the other breast along with other cuts for grilling sometime later). To supplement this (I knew it was not enough to feed my family for one supper), I cooked shrimps with ketchup sauce (a favorite of my sons), and stir-fried some small chicken meat pieces with zucchini for the vegetables (All the chicken came from one whole that I pulled out from my freezer last night to thaw. The bones were almost stripped of all meat, but I still simmered it for stock). All were eaten with plain rice. Husband likes eating plain rice flavored with nutmeg, salt and sugar, and half n half. This peanut chicken earned his approval!
I ended up having some leftover chicken and shrimps, and lots of leftover stir-fry.
Ingredients:
Baked Peanut Chicken 1 cup roasted peanuts, coarsely chopped (I got raw Spanish peanuts from Spice of Life) 1 packet Shake n Bake (extra crispy) 1-2 tsbp soy sauce 1 whole chicken breast
Peanut Sauce 1 cup creamy peanut butter (do not use old-fashioned style or freshly ground) 1 (14 1/2-ounce) can chicken broth (I used my homemade chicken stock) 1/4 cup fresh lime juice (I actually used lemon; that's what I had on hand) 3 tablespoons brown sugar 2 tablespoons plus 1 teaspoon soy sauce 2 tablespoons chopped peeled fresh ginger 1/2 teaspoon dried crushed red pepper
Instructions: Marinate the chicken breast with the soy sauce for about 30 minutes to one hour.
Meanwhile, prepare the sauce ingredients. Mix peanut butter with chicken broth thoroughly, then add the rest of the ingredients and mix well.
Bake the chicken at 350 deg F on one side for about 15-20 minutes then flip over and cook another 15-20 minutes or until done. If it tends to burn easily on a 4-inch high grate, use the 2-inch. (I am still trying to get to know nu-wave, so I am still groping my way through here.)
(For conventional oven, pre-heat oven to 400 deg F, then grill chicken for about 20-25 minutes on each side. Bake until done.)
While waiting for chicken to cook, simmer the peanut sauce for about 30 minutes or until you achieve desired thickness.
This is my final hopia post in a series of 3. I am writing this while waiting for my cinnamon rolls to rise (using supersoft ensaymada dough).
Photo above shows my first batch, with experimentations on different wrapping. Slideshow below shows few hopia I made with the last roll of dough I prepared before (one of 4 rolls), baked in oven toaster set at 450 deg F for 15 minutes or so. Each roll of dough could make 4-5 pieces of good-sized hopia. (Suggestion: Maybe a better method would be to flatten the whole roll and then punch out circles before putting filling in, rather than flattening each piece. )
The slideshow is pretty much self-explanatory.
While my first batch was baked in my oven set at 350 deg F, I figured, I would try baking at almost the same temp I bake my empanada. The main objective anyway is to cook and brown the dough wrapping. The filling itself was precooked, so there is no danger of underbaking.
And since I was left with only a roll of the dough I prepared earlier, I had only 8 pieces to bake. I did not feel like wasting that much energy by heating up the big space of conventional oven, so I opted to use the oven toaster. The only thing to keep in mind when doing this is not to burn the ones closest to the heating element; i.e., the middle row. So after about 10 minutes, I rotated the pieces so that the brownnest ones I placed at the periphery and vice versa, to achieve even browning of all pieces.
Baked at this temp, the crust had more crunch to it, which will only hold true for when it is freshly baked, of course. If you refrigerate then reheat later, you might not have the same crunchiness anymore. Not that a lot of Filipinos will miss this "freshly baked" sensation because a lot of us are used to the already cold hopia in the bakeries. I myself had only a few chances of getting really freshly baked hopia when I was still in PI. The hopiang baboy my Manong and the other bakers in our cheap (neighborhood type) bakery was not one I really liked, mainly because I knew there really was no "baboy" in it; only lots of onions in oil. (That said, please know that I will never have a recipe here for hopiang baboy. Now that I have shared how to make the dough and wrap the filling, it will be up to you to experiment making hopiang baboy or hopiang hapon (although I think hopiang hapon uses a different dough recipe/method).
UPDATE: Here is a recipe for hopiang hapon by Mrs. Rusty. (Note to Mrs. Rusty: Many times I would have wanted to leave a message on your site but I would have to register in Multiply so I back out. I tried to look for a way to send you a message, but it's the same thing. Please know that I love visiting your site!)
Photo above shows the very first homemade hopia I sunk my teeth into.
As promised, I am posting here today the dough for hopia. Thanks to these two recipes that gave me the idea on how to make this pinoy favorite snack that I have missed so much. When my older son tried it, he said that the dough was very much like that of the eng bee tin hopiang ube that I made him taste several days ago, but I noticed the big difference in taste because of 100% ube haleya I used here (the bought one just did not taste quite like the hopiang ube I used to buy back in the Philippines. I don't know if eng bee tin has changed their recipe). The only thing is that the underside is quite thick because of several layers of dough, but it was not too bad once baked.
Just like in one of the above links, I used lard in making the dough. But I used my homemade pork lard. My Nanay has taught me how to render the fat of some meat to use for sauteeing, and I learned how to render my own pork lard when I came to the US. Others might say "ew!" but nothing beats pork lard when it comes to flaky pie crust. Besides, it is very mildly sweet scented with the flavor of pork fat, it is so subtle and pleasant. Every year, I make this after our pig has been slaughtered, so I know where the pork came from, how it was raised, what it ate during its lifetime. In other words, my pork source would be the envy of a lot of real food foodies. You want to question the health implications for this? Here is a quote coming from my previous correspondence with fanatic, a nutritionist by profession.
My opinion about pastry ... there's nothing better than lard for making pastry (with a little butter for flavor). Lard is almost 100 percent fat, where butter is only about 80 percent fat, the other 20 percent is protein and moisture. Butter's moisture (water) makes it a poor choice for pastry (when used exclusively), since water will form gluten when it comes in contact with flour ... making the final product chewy instead of flaky.
I stay away from vegetable shortening. Even though it has about the same fat content as lard (making flaky pastry), the trans fatty acids from the process of hydrogenation are now supposedly more of a health concern than the saturated fat in lard. Shortening is pretty tasteless too.
The lard I can purchase here, believe it or not, is hydrogenated. It also contains BHA and BHT (known carcinogens) as preservatives. It's hardly a product I would consume. You deserve a pat on the back for rendering your own lard!Just yesterday I purchased a new product. It's an organic non-hydrogenated shortening, made from palm oil. Palm oil is very saturated naturally, so it's more solid at room temperature.
Another benefit of using animal fat (lard) for use in cooking ... it has a high smoking point so you can brown with it and it will not break down (oxidize). Most vegetable-based liquid oils cannot be exposed to high temperatures without oxidizing, and oxidized (rancid) fat is carcinogenic. And as your Nanay says ... fresh lard tastes better. I think you need to weigh the costs and benefits of the fat you plan on using.In the end, as long as you eat in moderation and are relatively active in life, I don't believe small amounts of animal fat are deleterious.
With that said, I present to you my recipe for a special hopia dough (I have a hunch that the same practice is done by hopia makers in the Philippines.) If you want, you may use shortening or vegetable lard. If you are interested to make your own, feel free to approach the butcher in your grocery store to inquire. They might even give this to you for free. You can freeze pork lard to keep them fresh longer. Thaw in the fridge when you are about to use. I also use it nowadays for making pie crusts, instead of vegetable shortening.
Ingredients: Dough 1: 1 cup flour 1/4 cup pork lard
Mix together until crumbly (or it appears like coarse meal). Use your hands. Divide into 4.
Dough 2: Mix together until crumbly (same as in dough 1): 2 cups flour + 1 tbsp sugar 1/2 cup pork lard
Once thoroughly mixed, add 1/2 cup water to the above and mix with your hand. Divide into four. This dough is not really sticky compared to my pie crust dough, but the principles are almost the same.
Once the two are ready, proceed as follows for each part of the two types of dough (which you now have 4 of each):
Use cling wrap above and under dough 2 to make it easier to maneuver. Flatten with rolling pin and shape into a rectangle. Distribute dough 1 above. Roll the two together. Wrap tightly with cling wrap and chill in the fridge for at least 30 minutes.
Note: The contact of water in the above mixture will result to gluten formation. Gluten is what makes dough pliable and chewy. The rest time is necessary for the full development of gluten and making this dough more pliable come rolling and wrapping time. Chilling ensures that dough 1 remains physically "unmixed" with dough 2 despite proximity. The flour+lard (or flour+oil or flour+shortening) in between sheets of flat glutinous dough will create air pockets in between the sheets during baking and the results is hopia pastry with very thin flaky "crust" which is not at all crunchy or hard.
[You might be wondering why I have gloves on. Since working as an RN, I have developed dishidrosis, aka "homemaker's hands" and for me, I can very well call it "nurse's hands" because this condition develops when the hands are subjected to frequent handwashing. My skin gets tiny blisters that itch a lot, then turn flaky and super dry, then they crack and it's ouch! So I try to avoid washing my hands as much as possible. Using gloves and washing them instead of my skin helps me avoid exposure to too much handwashing, especially if I want my cracks to heal before my next duty at the hospital. It's not because I am too particular about "cleanliness" when cooking or baking. It's merely to protect my hands. Baka sabihin nyo, ang arte ko. Hindi no!]
Final post will be wrapping the filling and baking your hopia, coming up next.
My family went skiing today (it's my first time!) and my body is S-O-R-E all over. Blame my blogging for the lack of exercise, so my muscles were not in their optimum condition to be subjected to this new activity. My upper body strength proved to be almost nil as I tried to get up several times when I chose to fall to the ground rather than roll down the (almost flat) hill. Pathetic...I (alone) never had the courage to go up the hill. My excuse: I am too old for this...I can easily get a fracture with one major wrong move.
Anyway, that is the reason why this is another teaser post the first in 3 (1/3) in my Hopia Series. I will continue tomorrow and the next day as I recuperate from my seemingly major injuries (muscle strain...akkk! I need a soak in the tub but my husband temporarily disconnected it from the pipe as he works on our bedroom...sigh!)
Of course, at least a day before, we ought to prepare the filling. It will be much easier to wrap the filling when it is cold and easily moldable.
My favorite fillings are ube and munggo (mung beans). As you probably know by now, I made ube haleya recently. I had several 8-oz jars in the fridge, some of which were used for the ube cake roll and ube cream cheese filling, and some I reserved for hopia.
Needless to say, I do not have to post here what the recipe for ube filling is for this hopia.
Following is how I prepared the yellow split mung bean filling, following a recipe found here (I did make my own version of the dough).
Ingredients: 14 ounces dried peeled split yellow mung beans 1 cup sugar 1/2 teaspoon salt
Instructions: Soak beans for at least 8 hours. Drain and rinse well. Add more water to about an inch above. Boil for about 30 minutes (keep watching so it does not dry out). Skim the scum as it arises. Puree in food processor by batches (see the max capacity of your container). You may want to leave some intact for interesting texture (my kids did not like it, though). Place back in saucepan and continue cooking. When almost dry, add salt and sugar. Continue stirring to cook further until dry enough. Transfer to jars and refrigerate.
I got this recipe from The Book of Chinese Cooking by Jasper Spencer-Smith.
(Karen also has a post on the basic recipe for siomai here, including the recipe for the wrapper.)
My sons and I love these. Also a good finger food to bring during Pinoy get-togethers. Ingredients: 3/4 pound ground pork 1/4 pound raw shelled shrimp, ground (Believe me, I used a scale to measure these, but of course, you can approximate.) 1-1/2 tbsp soy sauce 1/2 tbsp Chinese rice wine or dry sherry 1/2 tbsp sesame oil 1/2 tbsp sugar Dash of pepper 1 egg white 1-1/2 tsbp cornstarch won-ton skins (I buy Nasoya brand) green peas or chopped hard-cooked egg yolks for garnish
(Note: I usually buy pork chops then grind them using my Kitchen Aid attachment, since I can't find ground pork for sale here. I grind other ingredients as well, like the shrimp. when making lumpia, I also grind the garlic, onions, and other veggies.)
Procedure (I revised according to how I made it): To make filling: Mix together ground pork, ground shrimp, soy sauce, rice wine or sherry, sesame oil, sugar, pepper and egg white until mixture is well blended and smoth. Stir in cornstarch.
Place filling in a storage bag and cut one corner big enough for the content to squeeze through. Place about 1 tbsp or so of filling in the middle of wonton skin and gather the skin around the filling. Alternatively, you can use a cookie scoop. Dip a spoon in water and use to smooth the surface of the meat. Garnish by placing a green pea or chopped egg yolk on top of meat.
Repeat with the rest of the wonton/filling. Line a steamer (or bamboo steamer) with a damp cloth; place each siomai about 1/2 inch apart so they don't stick together; steam over high heat 5 minutes or until done (do not overcook). Serve with your fave dip (I use soy sauce/kalamansi juice as a dip. When I was in PI, I used to like it with chili paste.)
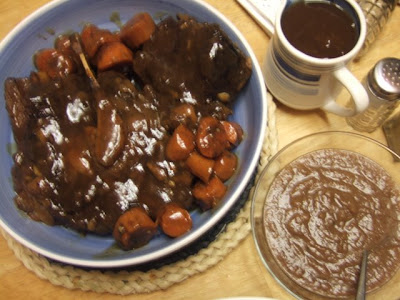
I used the Beef Pares recipe, and added carrots and ginger (per comment of one who tried adding these to my recipe), then instead of using frozen beef broth to top the chuck roast (to avoid drying it up), I used half of the apples I usually use for an apple pie, mixed with the usual spices cinnamon, nutmeg, allspice and ground cloves.
When cooked, I placed the apples in a bowl first and mashed with a fork. Then I strained the sauce (separating the spaces and carrots in the process), then thickened and finalized the gravy the usual way. Then I mixed some of the gravy with the mashed apples, tasted it and adjusted by adding some soy sauce as needed. The resulting applesauce was yummmmmylicious! Hubby liked it as well! (He usually does not use the sauce of beef pares; he likes savoring the flavor infused in the meat itself.)
Then we had very little leftover. At first I was considering making beef asado roll but since I did not have enough meat mixed with remaining applesauce, I decided to use it for fried rice (I had plenty of gravy remaining, perfect for flavoring the rice!)
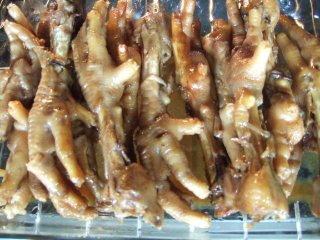
Before I give the recipe for the chicken feet, here's a slide of instructions on how to prepare them.
When I was still in the Philippines during review days for the medical boards, my friends and I would often buy savory chicken feet from a Chinese restaurant. I used to just know chicken feet a la adidas (the grilled ones) which was a common merienda for me when I was still in elementary school. When I had a taste of this super tender savory chicken feet dish, I was hooked.
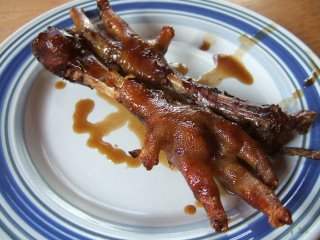
Here's my version for Savory Chicken Feet (It does not taste like the ones we ate back in PI, but tastes good nonetheless.)
Ingredients: 12 chicken feet 3 tbsp dark soy sauce 2 tabsp rice wine 1 tbsp red wine vinegar 3 slices ginger 3 cloves, finely minced 3 sliced green onions 3 tbsp dark brown sugar 1 star anise 1/4 tsp pepper 1 tbsp sesame oil 2 cups water 1 tbsp cornstarch dissolved in 1/4 cup water
Instructions: Place all chicken feet in the slow cooker. Combine the rest of the ingredients and pour over chicken feet. Cover and set in slow cook for 5-6 hours (I did this overnight from midnight). Then uncover and stir so those on top will be at the bottom and cover again to cook for two hours more.
Transfer the chicken feet onto a baking pan. Transfer the sauce into a fat separator first to pour out the sauce without the fat/oil into a small saucepan. Boil then slowly add while stirring the cornstarch-water mixture to thicken to desired consistency. Brush the chicken feet with the sauce and broil for about 5 minutes to glaze, then turn the pieces over, coat with sauce again and broil for another 5 minutes. Serve with hot plain rice (or pampulutan. Tagay na!)