Showing posts with label cookies. Show all posts

Sunday, April 18, 2010

Arrowroot Cookies

TYPE SUMMARY HERE

Ingredients:
MARCIA'S ARROWROOT COOKIES
My friend Marcia shared this more traditional recipe in the comments on the earlier post. Makes 3-1/2 dozen.

1/4 cup butter, softened
1/2 cup granulated sugar
1 egg
1/2 tsp pure vanilla extract
1 cup all-purpose flour
1/2 cup arrowroot
1/2 tsp baking powder
1/4 tsp salt

Preheat oven to 350°F. Line a baking sheet with a Silpat or parchment paper, or grease the baking sheet with butter. Set aside.

In a large bowl or in a Kitchenaid-type mixer, cream butter and sugar. Beat in egg and vanilla. In a small bowl, stir together remaining (dry) ingredients, and add to the egg mixture. Mix well. Flour your countertop or board, and roll dough to 1/8-inch thick (or slightly thicker, to taste). Cut into 2-1/2 inch rounds, and place on the baking sheet. Prick each cookie several times with a fork. Bake until golden, 8-10 minutes, or longer if your cookies are thicker.
http://www.theperfectpantry.com/2008/03/arrowroot-and-c.html
Instructions:


Wednesday, February 10, 2010

Butter Spritz Cookies

My new favorite spritz cookies because they are easy enough to press out the cookie press, bakes for 6-8 minutes only, tender enough for me, great-tasting, and easily slides off the traditional aluminum (non-insulated pan using a little nudge by a brownie spatula. Most of all, hubby does not really notice the difference from the first two recipes (or so he says).

Ingredients:
2-1/2 cups all purpose flour
1/2 tsp salst
1 cup (2 sticks) butter, softened
1-1/3 cups confectioners sugar
2 egg yolks
1/2 tsp vanilla extract
1/2 tsp almond extract

Instructions:
Preheat oven to 400 deg F. Sift together the flour and salt; set aside.
Cream together the softened butter and sugar. Mix in egg yolks, almond and vanilla extracts. Blend in dry ingredients. Fill cookie press and shoot cookies 1.5" apart on ungreased aluminum non-insulated cookie sheet. You may decorate with sprinkles or sugar before baking.
Bake 6-8 minutes until slightly golden brown at the edges.

Friday, February 05, 2010

Chocolate Oat Cookies

I got this recipe (original name Double Chocolate Oat Cookies) from a booklet sampling of favorite brand recipes. However, when I made this the first time, I found it too soft/gooey, although very good. So the second time I made it, I used the one on the internet, but that gave me very tough and dry cookies. So this time, I resorted back to the first one I used, but I doubled the amount of oats (which makes it healthier, doesn't it? Ok, ok, at least I have less guilt with this choco-laden recipe), and I got the consistency and taste that I expected.

Kids and hubby love these cookies, and so do I.

Ingredients:
2 cups swemisweet chocolate chips, divided in two
1/2 cup (1 stick) butter, softened
1/2 cup granulated sugar
1 egg
1/4 tsp vanilla
3/4 cup all purpose-flour
1-1/2 cup Quaker Oats (quick or old-fashioned, uncooked)
1 tsp baking powder
1/4 tsp baking soda
1/4 tsp salt (optional)

Instructions:
Heat oven to 375° F. Melt 1 cup chocolate chips in small saucepan; set aside.
Beat butter and sugar until fluffy.
Stir in melted chocolate, egg, and vanilla.
Combine flour, oats, baking powder, baking soda, and salt. Mix this with the liquid ingredients.
Stir ini remaining chocolate chips.
Drop dough by rounded tablespoon onto parchment sheet placed on cookie sheets (I used a cookie scoop).
Bake 8-10 minutes or just until set (Do not overbake. Centers should look soft.)
Cool 1 minute on cookie sheets; transfer to wire rack and cool completely. Store tightly covered.

Monday, January 18, 2010

Classic Spritz Cookies


This is the second recipe I tried for use with my new toy cookie press. I must say I and my kids prefer this recipe, as this is lighter than the Marcato biscuits. Plus, the dough itself was very easy to squeeze out, I did not have to use the force of my body. The downside only was that it was harder to remove from the baking pan than the Marcato biscuits once baked, even after cooling for some time. So maybe next time I can experiment by actually greasing the pan with butter before squeezing out the dough (with the possibility of the dough not sticking to the pan). Or I can just try using parchment paper and holding the paper before pulling the cookie press up after squeezing out the dough.

Hubby, as I said in my previous post, preferred the denser Marcato biscuits (although he found it hard to admit it to me).

Just a note on the cheaper Norpro brand (link shown here):
I received it already. Made of aluminum, it is lighter and thinner than the Marcato I bought earlier (which, interestingly, also bears the Norpro mark on the box, but is made in Italy). I would think it will not be up to denser cookie dough like the Marcato biscuits. However, I think it is still a better option than plastic ones. I will also someday try its butter spritz cookie recipe included in the manual. The light dough below should not be a problem with this cheaper Norpro cookie press.

Wilton's Classic Spritz Cookies

Ingredients:

3 1/2 cups all-purpose flour
1 teaspoon baking powder
1 1/2 cups butter softened
1 cup granulated sugar
1 egg
2 tablespoons milk
1 teaspoon clear vanilla extract
1/2 teaspoon no-color almond extract
Makes: 7-8 dozen cookies.

Instructions:
Preheat oven to 350ºF.

In bowl, combine flour and baking powder. In large bowl, beat butter and sugar with electric mixer until light and fluffy. Add egg, milk, vanilla and almond extract; mix well. Gradually add flour mixture to butter mixture; beat until combined. Do not chill. Fill cookie press with dough and with desired disks, press cookies onto ungreased cookie sheet.

Bake 10-12 minutes or until edges are light golden brown. Cool 2 minutes on cookie sheet on cooling rack. Remove from sheet; cool completely.

Saturday, January 16, 2010

Marcato Biscuits (Cookies)


I bought a cookie press sometime last year, foreseeing some cookie-making for cookie swap come Christmas...but in the busy-ness of the Holidays, I did not actually get to practice with my new gadget until after Christmas.

The motivation I had to get myself a cookie press was when hubby previously commented on lengua de gato that made me recall this neat gadget which my Nanay used to have (although I never actually saw her use it).

I got one that I realized now is too pricey, it seems, as I perused amazon.com for the same item. (Probably, amazon did not have the $14.99 at the time I purchased mine).  But I guess,  with this price and the good reviews as to how sturdy it is, I think I made a good choice nevertheless. Just out of curiosity, I got myself this $14.99 to see if it is the same sturdy construction. Then I will update you readers who might be interested to get it.

My first cookies were overbaked, tough, and brown.  I let hubby try one and he suggested I bake them for a shorter time. He then liked the ones baked only up to the point that edges start to turn brown.  I also had to get used to pumping out the dough, and to try not greasing the baking sheet. Probably oven temps and environmental conditions and baking pan differences accounted for my initial results despite following the recipe in the manual.  After I adjusted the baking time and omitted greasing the baking sheets (I used insulated nonstick aluminum), my hubby now has a new favorite homemade cookie. He can finish a whole batch in two days. (Sadly, my kids and I are not that crazy over this; we like the lengua de gato better.)

This is the first recipe I will post for cookie press.

Basic dough recipe:

500 g (~ 1 lb) flour
250 g (~1/2 lb) sugar
250 g (~ 1/2 lb or 2 sticks) butter
pinch of salt
2-3 oz milk
3 egg yolks

Instructions:

Preheat the oven to 350 deg F and place the rack at the middle.

Melt the butter in the microwave for about a minute and stir; set aside in room temp. Place the flour into a bowl mixing it with the sugar and a pinch of salt. Pour the egg yolks in the center and mix the dough with a fork. Add the butter previously melted, then the milk, and knead with your hands until completely uniform and soft.


Coming up is another recipe that I and the kids preferred, but my husband likes ok (he still prefers the more dense recipe above).

Wednesday, October 14, 2009

Double Chocolate Chip Cookies


After my first ever successful (as in not flat!) chocolate cookie chip recipe, I looked for another recipe to try to see if I would get another satisfactory result. And I did, with these cookies that have both semi-sweet and white chocolate chips. Recipe courtesy of Bev who posted it on recipezaar. I edited the procedure because it was quite confusing, and changed dark brown to light brown because that was what I had on hand and it turned out great anyway.

All the kids and the big boy (and me!) loved these cookies.

22 min | 10 min prep

36 Cookies
Ingredients:
3 1/4 cups all-purpose flour
1 teaspoon baking soda
1 teaspoon kosher salt
1 cup sugar
1 cup light brown sugar, packed
2/3 cup unsalted butter, softened
2/3 cup vegetable shortening
2 large eggs
2 teaspoons vanilla
2 cups semi-sweet chocolate chips
1/2 cup milk chocolate chips

Instructions:

Place oven rack at the center. Preheat oven to 350°F degrees.
Whisk flour, baking soda and salt together; Set Aside.
Cream the sugars, butter, shortening, eggs and vanilla together using handheld mixer.
Mix in Flour Mixture into Creamed mixture just until blended.
Then Stir in chocolate chips.
Scoop out and drop onto parchment paper on cookie sheet about 2 inches apart. For into pyramids for thicker cookies.
Bake on center rack of oven 12-14 mins, until lightly browned and edges are set.
Remove from oven; wait about 2 minutes to firm up; transfer to wire rack to cool.

Note: You can reuse the parchment paper after you have removed the baked cookies.

Saturday, October 03, 2009

Blue Ridge Mountain Chocolate Chip Cookies


A confession I have to make: I had always been afraid to bake chocolate chip cookies...until I tried this recipe.

Now why was I afraid? Well, I had always used the Nestle Toll House Cookie recipe at the label of the chocolate chips, and my stand mixer, then my cookies would always be flat. If I use the Choc-Oat Chip cookie recipe, they might not be that flat...but they are still too flat for me.

This is the first time I tried a recipe off recipezaar for a cookie. And this is the first chocolate chip cookie recipe that removed my anxiety over baking cookies.

I also realized that I should stick to creaming the butter within 30 minutes of being in room temp, and to only use hand mixer instead of the stand mixer.

Then maybe I will try again Nestle Toll House recipe...we will see if those were indeed the factors that make my cookies flat.

In the meantime, my kids are happy with these, and I am gonna have them in my recipe collection here in my kusina.


Blue Ridge Mountains Chocolate Chip Cookies


30 min | 10 min prep

2 -3 dozen

1/2 cup shortening
1/2 cup butter
3/4 cup white sugar
3/4 cup packed brown sugar
1 teaspoon vanilla
1/2 teaspoon almond extract
1 teaspoon baking soda
2 eggs
2 3/4 cups bleached all purpose flour (see note below)
1 teaspoon salt
2 cups chocolate chips (I use Ghirardelli brand)
Note: The recipe initially calls for 2 1/2 cups flour, but with the added note if you want them more softer and rounder cookie to add 1/4 cup flour. I add the 1/4 cup making it 2 3/4 cups total.
Cream shortening, butter, sugars, then eggs and vanilla and almond extracts.
Blend dry ingredients and add to mixture.
Stir in Chocolate chips.
Drop by large tablespoons (I use cookie scoop) onto ungreased cookie sheet, leaving 2-inches room in between to allow cookies to spread. I press down lightly with a measuring cup to bake more uniform cookies).
Bake at 375° for 10 minutes until lightly brown.
Makes 2-3 dozen cookies depending on size.

Thursday, October 01, 2009

Lengua De Gato (Cat's Tongue)


Who does not love lenguas de gato??? I have yet to meet one who doesn't.

I am not sure how and why I started looking for a recipe of this, but I ended up seeing a starting point with rushlynn's post here. I guess it was an attempt to use the 2 egg whites I had in the fridge, which was about 1/4 cup.

This post is a result of my third attempt at baking these delightful lenguas de gato.

The first time I tried to bake using the above link's recipe, I burned the first batch after baking for a full 10 minutes without watching carefully. I piped the dough thin and flat. The next unburned batches tasted very good, but I felt it was too tough for me. I thought maybe the flour was too much (the fluffiness of butter-sugar-eggwhites gone after beating in the flour). In any case, my kids liked it so much.

I attempted a second time, after gathering and printing out a lot of different recipes online, and experimenting with amounts, and piping them round instead of flat. It was a disaster.

So in the third attempt, I went back to the original recipe I saw, decreased the flour amount, and doubled everything, sifted the flour before adding gradually to the mixture, and beating slowly just until blended. The reason why I wanted double batch was so I would have enough to play with in case I bork up the first few batches again. I also modified the flavors, including lemon because a hint of lemon always results to more interesting flavors, and almond extract just because I love almond flavor. I went back to piping flat, bought a whole set of piping tips to get the biggest flat tip I could find, and disposable piping bags that were big enough and sturdy to remain intact as I squeeze. You will just have to excuse the odd shapes I created, as I never had artistic and steady hands.

I loved the result, and so did my husband and kids.

Hubby: (after I handed to him a handful, "Want some?") "Oh! Cat's tongue! I love that!"
(He remembered the name after I gave him some of the first batch I made!)
Later on he said to me, while still munching on them, "You know what makes them so good? They taste like the butter cookies, if you will be able to make them round with sprinkle of crystal sugars...hmmmm!"

Now that's an idea, but I don't know if they will have the crispiness if they are that thick. Maybe I should use cake flour instead, or add baking powder to puff them up...and use a cookie press. Made a mental note for such future experiments.

Kids: "Those are so good they are addicting!"

Here's my final recipe, and please feel welcome to experiment using cake flour.

Ingredients:
1 cup butter (soften at room temp for 30 mins)- I used salted butter
1-1/3 cup sugar
4 egg whites (about 1/2 cup)
1/2 tsp salt
1-1/2 tsp vanilla
1/2 tsp almond extract
few drops lemon extract
2 cups all-purpose flour (measure then sift)

Equipment/Tools:
piping tip (cake decorating) #47
piping bag
parchment paper (I measured out 4)
non-insulated aluminum baking sheet (I used two)
hand mixer
cooling wire racks

Instructions:
After getting the butter out of the fridge, time for 30 minutes and start measuring the other ingredients.
Cream the butter and sugar well. Add the egg whites gradually, beating well. Mix in salt, vanilla, almond extract, and lemon extract. Add half of the flour, beat some, add the rest of the flour, and beat just until blended. Assemble the piping bag and tip. Place some of the dough in the bag, and keep the rest chilled in the fridge. Pre-heat the oven to 375 deg F while you pipe out dough about 3 inches long, flat, and about 1/8 inch high, just a little bit wider than the piping tip, onto parchment paper. (If parchment paper tends to slide off the baking pan, stick it to the pan using a thin smear of Crisco shortening at the four corners of the pan). Space them apart about 1-1/2 inch to allow for expansion while it melts some more during baking. bake for about 5 minutes, rotate the pan, then bake some more for about 2-3 minutes, depending on how thick your dough is. Transfer the parchment paper onto cooling racks, and remove the parchment paper after about 2 minutes to cool completely before transferring to a box or cookie jar.

NOTES:
(1) Baking time may be shorter or longer, depending on whether your oven actually is hotter or cooler than mine, and maybe you piped out not quite exactly right. For the first batch, wait until you get the result, cool some, and have a bite. Correct the thickness and the width of the dough and baking time accordingly on the next batch, and watch carefully until you have learned the right combination of these factors. Once you got it right, proceed with better rhythm of piping the dough onto parchment paper while the other batch is baking.

(2) You can re-use the parchment paper after removing the baked lenguas. That is why 4 of them pre-cut are enough.

(3) While one pan is inside the oven, and the other pan already has dough piped on, you can place the other parchment paper on the table or countertop and pipe out some more. Once you have a hot pan out and you have removed the parchment paper and cookies, let it cool down some (at the same time you are piping dough onto PP on the table), then spray with cold water and wipe dry when you are ready to place a the next batch into the oven. (magulo ba?) What I am trying to say is, since I only had two aluminum pans, one is still warm by the time I am ready to take out the other, so to be able to place the next batch right away, my PP is ready with the dough on the table, and I just have to cool down the pan using cold tap water. With this setup, I had two PP ready on the table, just waiting for the cookies to bake while cooling down the other pan.

(4) If I try to make the piped dough higher (thicker) or so much wider, the middle part tends to get chewy instead of crispy, which I do not like.

(5) If I bake and do NOT wait for the sides to get golden brown (so that they appear light brown all over), I end up with chewy cookies even if they are flat. I don't like that.

(6) This recipe will be enough to fill half of a typical cookie jar (hard to keep track of the number, as it will vary depending on how much you pipe out per piece, and you will tend to munch some of those done while you bake the rest. It is that addicting!)

UPDATE 1/7/10:
This is a feedback by Chef Vanessa (an fb friend):
"I made the recipe you shared for Leguas De Gato and my kids absolutley loved it and it didn't even hit 48 hours in the jar hahahhaa..The first recipe I made was from a site but it did not turned out right..It was too leathery and tasted like flour.Thanks for sharing that recipe!!!"

Thanks for your feedback, Chef!

Tuesday, June 30, 2009

Cocoa Crinkle Cookies


I did not make this. My MIL did. She makes this about once a year and gives us a big bag of them freshly made. So, even though I have the recipe, I thought I'd let myself look forward to having this at least once a year from her, just as I like looking forward to having paris brest made by my SIL every Christmas or Thanksgiving, whenever it was her turn to host a major holiday. Moreover, I am still trying to learn how to bake full-bodied cookies (instead of flat ones) using the Tollhouse recipe.

Everyone in our family loves them, including my husband who always look forward to getting treats from his mom (and he loves traditions, so this is one traditional food for him).

Recipe is from Hershey's Classic Recipes book; also in their website.

For more photos of actual making of these delights, please refer to the chef's wife's post here.

Cocoa Crinkle Cookies

Ingredients:
2 cups granulated sugar
3/4 cup vegetable oil
3/4 cup HERSHEY'S Cocoa or HERSHEY'S SPECIAL DARK Cocoa
4 eggs
2 teaspoons vanilla extract
2-1/3 cups all-purpose flour
2 teaspoons baking powder
1/2 teaspoon salt
Powdered sugar

Directions:
1. Combine granulated sugar and oil in large bowl; add cocoa, beating until well blended. Beat in eggs and vanilla. Stir together flour, baking powder and salt; gradually add to cocoa mixture, beating well.

2. Cover; refrigerate until dough is firm enough to handle, at least 6 hours.

3. Heat oven to 350°F. Grease cookie sheet. Shape dough into 1-inch balls; roll in powdered sugar to coat. Place about 2 inches apart on prepared cookie sheet.

4. Bake 11 to 13 minutes or until almost no indentation remains when touched lightly and tops are crackled. Cool slightly. Remove from cookie sheet to wire rack. Cool completely. About 4 dozen cookies.

Monday, March 16, 2009

Almond Sans Rival Part I - Meringue layers


This is the first in the sans rival series.
I got into this obsessive desire to try making sans rival after my correspondence with retired pastry chef, EQ, who loved my supersoft ensaymada. I asked for his recipe for sans rival, but he could not find it, so he pointed me instead to two sites that will help me create them.

Sans rival ("no rival") is a very sinfully delicious dessert that I encountered first, I believe, in a bakeshop within UP campus during my college days. I cannot remember the name of the building (not an academic building but one of the administrative type of buildings, I think). In any case, since introduction to it, I had been enjoying it whenever and wherever I saw it (together with another favorite dessert, Sambo). I can't buy them where I am now.

The most common flavor then was cashew. Nowadays, browsing through the net, there are also other flavors such as pistachio and other nuts, and pandan. I made almond, based on the recipe pointed out to me. I am not too keen anymore on the pandan...somehow, the essence/extract/flavoring tastes too artificial to me. Nothing like the real leaves boiled in water.

As I said in the previous post, I will post this in a series (like my hopia series). If you have plenty of egg whites (maybe you make your leche flan only with yolks, or you are making runny ensaymada dough using 20 egg yolks), you might want to make sans rival. Both meringue and buttercream recipes I used as reference make use of egg whites.

Now, I don't know what the origin of the term is, but this particular wafer has its own name (which it deserves to have, in my opinion): Dacquoise. I don't have the least idea how to pronounce that. This is what makes the meringue layers of sans rival. Plain or used in sans rival, these have become a big hit in my family, including my hubby.

The way I prepared the meringue layer was as individual servings of round flat "cookies" or wafers which everyone in my family also loves plain. I have experimented in the past by baking one whole flat sheet then using a biscuit cutter, but I ended up with crumbs and broken pieces. The site I referred to here gave me the idea about using patterns, although it did not elaborate much on how to easily peel off the meringue from the parchment paper. Some sites say to use greased and floured baking pans. I remember when I made the frozen brazo de mercedes, I greased the wax paper. At the edges where I missed some spots, the meringue stuck. So I experimented doing these two things: greased only, and greased and floured.

Ingredients:
2/3 cup egg white, in room temp for 30 minutes
2/3 cup almond meal (I had sliced almonds chopped finely in food processor)
1/4 cup sugar, mixed with almond meal
2 tbsp sugar, mixed with egg whites during foaming
2/3 cup sugar, mixed with egg whites during soft peaks

Instructions:


EDITED 3/19/09: Take out your eggs from the fridge and separate the whites if you don't have them ready yet (easier to separate them while cold). Use a small bowl/cup to catch the egg white. Once you are sure you are not gonna break the yolk, transfer the white to the mixing bowl, preferably glass or metal, not plastic. If you break the yolk, reserve that whole egg for another recipe and use another egg to avoid contamination of the whites). Let the egg whites sit out at room temp (better for whipping) while you prepare the pans.

A. Prepare the pan . Follow these steps carefully or you will end up breaking all your dacquoise trying to remove from the pan, then you will end up with crumbs.

1. Make patterns of circles on one side (the side that will touch the pan later) of wax or parchment paper. (I used sharpie and a plastic cup.)

2. Apply a thin layer of shortening onto baking sheet. (I dip paper towel into a bucket of Crisco to get about a tbsp of shortening. I then wipe this onto the baking sheet.)

3. Place the patterned wax/parchment paper onto the greased sheet.

4. Grease the paper also (like in step 2).

Note: I attempted to try sprinkling with flour one of them greased paper. I compared the two after baking. The floured ones stuck more. So just be satisfied with greasing the paper. I don't think that greasing the pan under the paper will also help, but I do it anyway so my paper sticks to the pan and not slide.)

B. Prepare the batter and bake. Pre-heat the oven to 225 deg F. (Recipe courtesy of Zoe).

1. Mix the almond meal with 1/4 cup sugar.
2. Start whipping the egg white under medium speed.
3. When whites start to foam, add the 2 tbsp sugar. Continue whipping.
4. When soft peaks form, gradually add 2/3 cup sugar while continuing to whip the whites. Stop when stiff peaks form. [Note that in the slideshow I changed from glass bowl to the metal bowl. I did this because my hand mixer did not seem to have enough power to beat once the sugar made the mixture sticky. The motor was running but the beaters were not. So I immediately transferred to my clean metal bowl and continued whipping there. It is important that there is no trace of water, oil or even egg yolks when whipping egg whites.]
5. Add half of the sugar+almond mixture by folding* this into whipped egg whites. Repeat with the remaining half.
6. Place in ziploc bag. Cut a corner and pipe out thin layers onto prepared pan, following the patterns.
7. Bake for 1 hr. Peel off paper and let dry out some more on cooling racks while making the buttercream. [Note: Maybe a shorter time will do, since this is very thin, maybe 20 minutes? maybe increasing the temp will help also? Then just let dry out some more on wire racks, if your air is as dry as mine here. If not (like in the Philippines, where it is always humid), maybe stick to the temp as above, bake for 20 mins, turn off heat and let residual heat dry out the cookies/wafers some more.)

*If any of my readers would be interested to make this (and other recipes with "folding" step) but do not really know exactly what folding is (if you are a newbie in baking), I will try my best to upload a video as an example, if requested. I may not be an officially trained baker, but I do know what "folding" means in baking terms. It was demonstrated to me by my ex-MIL, who is a home economics graduate. One thing to remember: YOU DO NOT USE A WIRE WHISK TO GENTLY FOLD something into the batter; rather, you use a spatula or spoon. The folding is a means to incorporate ingredients into an airy/bubbly batter without breaking up all the air bubbles, because you want to maintain the airy-ness and fluffiness of the batter for "volume" and sponginess upon baking.

UPDATE as of 3-27-09:
I made this again today, but basing on other recipes, i tried to do short cut by baking at 350 deg F for 20 minutes. Well guess what...after about 10 minutes, I sniffed the burnt smell! It was too late! I already ruined this batch...I will have to wait again for egg whites...

Sunday, November 02, 2008

Sugar Cookies for decorating Graveyard Halloween Cake

This post should have been earlier uploaded,.
From Sugar cookies for Halloween
but I had been working every night since Halloween, and I blog during the slow time of my shift, if any.

I was not able to take a photo of the cake that I made for Halloween. I got the idea of "graveyard" look by browsing kraftfood.com. I brought it to work with only the chocolate glaze on it, planning to top it with crushed Oreos then decorate once I got to work, but I forgot to bring my camera! Anyway, while I found it quite too sweet for my teeth, my coworkers said it was excellent!

The recipe I used for the sugar cookies was courtesy of Liz. My husband hogged the sugar cookies as soon as the first batches were out of the oven. He loved them especially with the sugars. I got different sprinkles and icing colors from Walmart. (Hubby had been hinting to me for years that he likes sugar cookies. I just got discouraged with the flat cookies I have been making using Nestle Toll House choco chip cookies recipe that I did not try sugar cookies too soon.) My sons had some fun trying to shape them cookies and decorating, but I myself had a hard time achieving the effect I wanted (as you can see in the photo). I probably will try to recreate that graveyard cake just so I can take a photo. I still have some sugar cookies in the freezer (we got tired of shaping them).

I will post about the cake recipe itself once I had the gumption to make it again and take a photo of it complete with "graveyard" decors.

Monday, January 24, 2005

Mix-In-A-Jar by my Boys

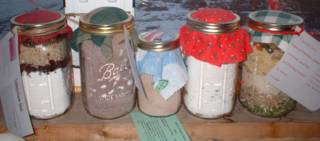
I registered my boys in the After-School Program, which runs in seasons (different line up of types of activities for each season). During the Holidays last year, I enrolled them in the "Mixes In A Jar Crafts". Here's a photo of their products. Since both of them are enrolled, we got to try one and preserve the other at least until the collection was completed.


These are, from left to right, all the mixes that they have prepared:


Cranberry Raisin Bread

Hot Cocoa

small Hot Cocoa (different recipe)

M&M Cookies

Friendship Soup


So far, we have tried the hot cocoa, the Friendship Soup and the M&M Cookies.


M&M Cookies


Since these were meant for the Holidays, the M&M chocolate candies were coated in red and green colors.

Ingredients:


For the quart jar:

1 1/4 cups sugar

1 1/4 cups M&M chocolate candies

2 cups flour

1/2 tsp baking soda

1/2 tsp baking powder


For the preparation, to be written on the gift tag, available here):

1/2 cup butter or margarine, softened

1 beaten egg

1 tsp vanilla


Instructions:


For the jar:


Mix together flour, soda, and baking powder. Layer sugar, M&M candies and flour mix in 1 quart canning jars. Be sure to pack firmly.


Add fabric, ribbon and gift tag to jar.


For the preparation:

Empty jar of cookie mix into mixing bowl, blend thoroughly.

Add 1/2 cup butter or margarin, softened, 1 beaten egg and 1 teaspoon vanilla. Mix until completely blended.

Roll into 1-inch balls and place 2 inches apart on ungreased cookie sheet. Nake at 375 degrees until edges are lightly browned, about 12 to 14 minutes.


Right after baking these cookies (as in piping hot and very soft), my husband was so eager to have one. Despite almost burning his fingers and tongue, he could not wait for the cookies to cool down first.


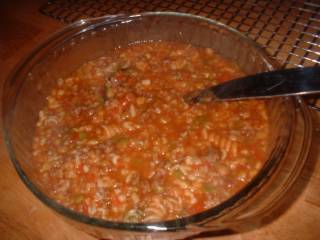
Friendship Soup


This is like a combination of stew and rice porridge, with the addition of beans. Hearty and healthy, this is a novelty for both me and my husband, and I can't believe it is an American recipe! I have been making dishes converting leftover mac & cheese into revised version of the Filipino sopas, which my husband has jokingly commented looked like a dish for swine (sarap batukan). This looked worse, and I admit, it does seem like "kanin-baboy." But I am open for new things, so I cooked it. It has a taste characteristically Italian, and it went very well with biscuits.


Ingredients:


For the jar:


1/2 cup dry split peas

1/3 cup beef bouillon granules

1/4 cup pearl barley

1/3 cup dry lentils

1/4 cup dried minced onion

2 tsp Italian Seasoning

1/2 cup uncooked long grain rice

1/2 cup tri-colored pasta

1/2 cup alphabet macaroni


Layer ingredients in jar and put lid and cover on.


Additional ingredients for preparation:


1 lb hamburg

1 can tomato sauce (4-0z)

1 can diced tomatoes (28-oz)

4 qt (8 cups) water


Instructions:


In a large saucepan, brown hamburg and drain.

Carefully remove macaroni from top of jar and set aside. Add water, tomatoes, tomato sauce and soup mix. Bring to boil. Reduce heat, cover and simmer for 45 minutes.

Add the macaroni. Cover and simmer for 15 to 20 minutes or until beans are tender.


Yields 4 to 5 quarts, so I prepared this for a weekend lunch when we had my nephew and niece with us.


Hot Cocoa Mix


We have been enjoying these jars of hot cocoa. It goes well with the cold season.


Ingredients:


2 cups powdered milk

1 cup sugar

1/2 cup cocoa

1/2 cup powdered non-dairy creamer

1/4 tsp salt

miniature marshmallows, optional


Instructions:


Combine all ingredients and layer with marshmallows in quart jar. Makes about 4 cups osf hot cocoa mix.


For preparation:


Add 2-3 tbsps to a mug of hot water.


*****


I am documenting these for future reference. Those that we deem really good we might try to prepare next holiday season. It is a creative, enjoyable and frugal way for the children to prepare their gifts for relatives. Other ideas can be found at this website and some more here. (I found it when I was looking for the Preparation instructions for the M&M cookies because both boys forgot to attach a gift tag. I am sure my MIL and SILs will appreciate these.

Monday, January 17, 2005

Choc-Oat Chip Cookies

I know, I know...I previously said quite with a final tone that I might not try another cookie recipe, but I could not help trying this other recipe at the label of Nestle Toll House chocolate morsels, because I had a bag of old-fashioned rolled oats which had been sitting in the pantry for eons.


Basing on my observations in the past, my kids and husband did not like whole oats in breads. I presumed that they would not like this either. I sighed deeply and got on with it.


So it was a pleasant surprise to see those cookies gone in a matter of hours that night. I said to hubby,"I thought you did not like oats?"


"Are you kidding? I LOVE OATMEAL."


Now I have run out of rolled oats.


Recipe can be found here and at the back of the packaging of Nestle Toll House Semi-Sweet Chocolate Morsels (for a video of how-to and step-by-step photos, get the idea from the Original Chocolate Chip Cookie recipe here). So, for you newbies in cookie-baking like me, go ahead and get a big pack of those morsels and share with your family these sweet delights.Posted by Hello


Saturday, November 20, 2004

Original Nestle Toll House Chocolate Chip Cookies

I remember the first time I tried to bake, it was Herbed Rolls, a kind of yeast rolls, which was in no way considered to be a good starting point for newbies. From my readings about baking, cookies are usually the first attempts at baking, as the process is "simpler."


So I searched for a recipe for making cookies. My attention was caught by the recipe title "Out-Of-This-World Oatmeal Cookie," plus it had the promise of being healthy by virtue of the oatmeal content. I followed the instructions, down to "drop by teaspoonfuls onto an ungreased cookie sheet." I ended up with tiny hard and tough crunchy cookies that everyone in the family tried and never got a second helping of. Including me. I kept the 4 dozens of cookies in jars and cans, not wanting to throw them away...until the cans and jars were all covered with dust, then I tried them again in the hope of liking them this time...but no.


I finally had the will to throw them into the trash can. And now, after probably a year after that first try with cookies, I have again gathered enough courage to try, this time, the Nestle Toll House Chocolate Chip Cookies. At first I tried making half a batch (half the recipe), so that in the event that the turn out was not that good, I would not have dozens to throw away.


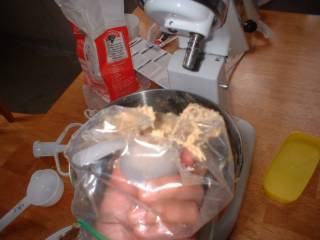
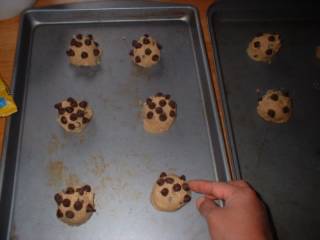
The first photos here show the ingredients for half the recipe. The photos starting from the scooping of the cookie batter to the baked finished product show my second batch of the same recipe. The first half I made were good enough but not quite good to me: they were not too small, but flat and looked so plain (no choco chips showing on top). Soft yet crunchy nonetheless. With the second batch I made some experiments in the process (I also encouraged the kids to take part), and the results were what I yearned for.


Ingredients (whole recipe, found at the back of the package of choco chip morsels):


2 1/4 cups all-purpose flour

1 tsp baking soda

1 tsp salt

1 cup (2 sticks) butter, softened (microwave for 10 seconds)

3/4 cup granulated sugar

3/4 cup packed brown sugar

1 tsp vanilla extract

2 large eggs

2 cups (12-oz pkg) Nestle Toll House Semi-Sweet Chocolate Morsels

1 cup chopped nuts (optional; I made some with nuts for myself; kids and hubby don't like nuts)


Instructions:


Preheat oven to 375 deg F.


Combine flour, baking soda and salt in small bowl.

Beat butter, granulated sugar, brown sugar and vanilla extract in large mixer bowl until creamy.


Add eggs one at a time, beating well after each addition.


Gradually beat in flour mixture, stopping from time to time to scrape the sides and bottom to ensure uniform mixing.


Stir in morsels and nuts, reserving about 1/2 cup of the chocolate morsels.


Where the recipe called for "dropping by rounded tablespoon, I used a plastic measuring cup lined with sandwich bag to scoop out and shape the cookie dough. If you have a cookie scoop, that will be easier to use. (Sorry na lang ako, wala pa ako nun. And it's not something I would buy when I can improvise.)


Drop the cookie batter to form a mound like so (it was a mound only a bit smaller than that of ice cream scoop, with diameter the same size as the circle made with your thumb and middle finger apposed together. And though here I used an ungreased baking pan, later I experimented using wax paper to line the pan. The advantages of wax paper will be apparent in the subsequent steps. Imagine the mounds to flatten and approximate the space it would need for the expansion. Avoid crowding the cookies on a pan.


Place the remaining chips on top of the cookie mounds as shown above. This step would result in more appealing cookies when baked.


Bake for 10-12 minutes.


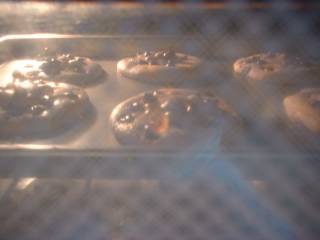
As you can see, as the mounds heat up, the butter melts and the mounds become flatter. The chips on top also become distributed.


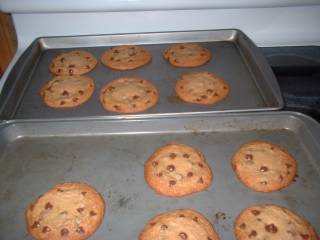
Before the end of baking, the cookie is already flat as shown below. This results to big cookie(make a circle with your two thumbs and two middle fingers, that's the size of these cookies), which is crunchy on the underside and at the periphery while chewy at the centertop -- just the way we like it. Even my husband could not give up his last cookie for his daughter who wanted more. (Hence, the very next day I baked again, and this time making a whole batch, resulting to 22 big cookies. This is also one way that I try to establish good memories for my stepdaughter during her infrequent visits with us.)


When done, allow to cook in the pan on a wire rack for 2 minutes.


Then transfer the cookies to cook completely on the wire rack for about 10 minutes.(I did this then using a spatula when I had no wax paper lining. The cookies were very pliable and a bit sticky. Hence I thought of using wax paper on my subsequent tries. Not only did it solve the sticking problem, but also transferring all the cookies at once was a breeze! No hassle in cleaning the baking sheets either and no danger of scratching the finish, since I only had to clean the oil off with hot soapy water. Maybe aluminum foil will be better.) Here I held one cookie to give you an idea of how big the cookies were. One cookie is equivalent to 4 small cookies. One piece was enough for snack with a glass of milk (I can actually eat only half of it for snacks.) The kids loved it. My hubby's crazy about it. So this is now among the favorites. I am not sure if I will try other cookie recipes. We tend to stick with what we find really good.


Now because of this post I got curious to visit the Nestle Toll House website and found a webpage with step-by-step photos and a video explaining how to make it! Now is this post a complete waste of time and effort???


I Love Chocolate Chip Cookies! Surely this will be a year-round tradition to make good memories with the kids.


Custom Search