Showing posts with label yeast breads. Show all posts

Sunday, September 27, 2009

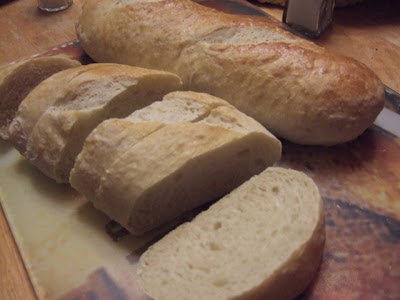
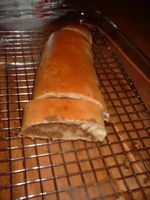
Pan de Pula/Pan de Regla/Kalihim/Kabukiran


For a good story on how this tinapay's name evolved through time, read here.

Maybe, for me, the most apt name would be kalihim, in reference to bucaio's theory that it got that name from the sweet secret of using old rolls.

In my father's bakery (now gone), we did use stale breads to make this tinapay (which we simply referred to as "pula'). I have to confess that I never liked this tinapay, and it was not because of this secret (because we had another tinapay, "pudding," that used old breads also and was brown and chewy but I loved it very much).

However, in my compulsion to add to my list of Filipino rolls and breads in my kusina, I tried to come up with my own version. And while my own version did not taste at all like the pan de pula my father's bakery used to make, I actually ended up liking this version, and made me wonder whether other bakeries made theirs like this, because if they did, then there is no wonder anymore why lots of Filipinos love "kalihim" or "pan de regla." Even my kids loved them (this batch was gone within 24 hours). Having said this, please do not treat/expect this recipe as an authentic pan de pula or pan de regla or kalihim or kabukiran recipe. I will leave it up to you if you want to try this. My method is how I imagined it was probably done by my father's bakers back then. I did not know exactly how they prepared the filling, but I knew they wrapped it in dough, and proceeded pretty much like how I did. I also did not know their recipe for the dough, but one time I was talking to my mother about it, she said to have a dough that had a small amount of yeast so that it would not be thick. I got the dough recipe from breadworld.com, as usual, and liked it. As for the filling, I made a pudding recipe based on the usual ingredients: stale bread, milk, eggs, sugar and vanilla. I used red food coloring mainly because that was what I knew we used in my father's bakery.

Ingredients:
Pudding Filling --
stale bread, cut into pieces (I used white bread, and filled a loaf pan 2/3 up)
2 cups milk
3 eggs
1/3 cup sugar
1/2 tsp salt
1 tsp vanilla
red food coloring (or whatever color you prefer or none at all)

Dough --
1-1 / 2 to 2 cups all-purpose flour
1 envelope FLEISCHMANN’S RapidRise Yeast
3 / 4 teaspoon salt
2 / 3 cup very warm water (120o to 130oF)
1 tbsp oil
egg glaze (beaten 1 egg white plus 1 tbsp water)

Instructions:

Prepare the filling first. Place the cut up stale bread in a loaf pan up to 2/3 full. Mix all other ingredients in a bowl. Press the stale bread pieces then pour the mixture and let soak. Press some more with fork to make sure you release gas and bread pieces absorb the mixture. You may let this sit in the fridge for several hours or overnight.

Puree the pudding in a food processor. Cook in a saucepan on medium heat, stirring frequently to avoid scorching. Stop when it is thick. Let cool down then form into a log using a cling wrap. Chill when cool enough to place in the fridge.

Prepare the dough. In a large bowl, combine 1 cup flour, undissolved yeast, and salt. Gradually add very warm water and oil to flour mixture. Beat 2 minutes at medium speed of electric mixer, scraping bowl occasionally. Stir in enough remaining flour to make a soft dough. Knead on lightly floured surface until smooth and elastic, about 8 to 10 minutes. Cover; let rest 10 minutes.

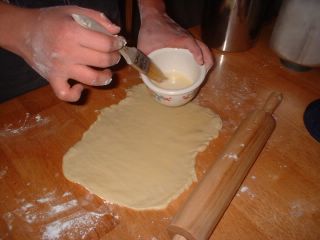
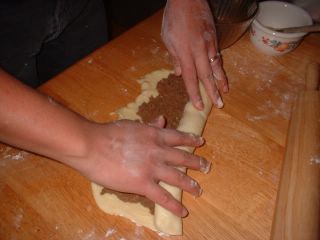
Roll dough to 12 x 10-inch rectangle. Place the pudding log onto it and wrap with the dough. Pinch seams to seal. Place on a greased baking sheet seam side down. Flatten a bit. Brush with egg glaze. Pierce with fork tines on several spots for vents. Place in warmed oven (or a draft-free moist and warm place) to rise for about 30 minutes.

Bake at 400 deg F for about 20 minutes. Let cool for about 10 minutes before slicing. Cool completely before placing in ziploc bags.

Saturday, July 18, 2009

Cream Cheese Squares


Trabahong tamad...perfect with coffee. Got it from kraftfoods magazine.

I enjoyed it plain or with blueberry sauce (made by cooking 2 pints blueberries with 1/4 cup water and as much sugar as I felt it needed, cooked until syrupy).

Store leftovers inside plastic ziploc bags refrigerated. Good even when cold. No need to reheat.

Ingredients:
2 cans (8 oz. each) refrigerated crescent dinner rolls, divided
2 pkg. (8 oz. each) PHILADELPHIA Cream Cheese, softened
1 tsp. vanilla
1 egg, slightly beaten
3/4 cup sugar, divided
2 Tbsp. ground cinnamon

Instructions:

PREHEAT oven to 350°F. Unroll 1 of the cans of crescent dough. Press onto bottom of greased 13x9-inch baking pan to form crust, firmly pressing seams together to seal.

BEAT cream cheese, vanilla, egg and 1/2 cup of the sugar with electric mixer on medium speed until well blended. Spread onto crust.

UNROLL remaining can of crescent dough onto large sheet of wax paper. Pat out dough to form 13x9-inch rectangle, pressing seams together to seal. Invert over cream cheese mixture to form top crust; discard wax paper.

BAKE 30 to 35 min. or until golden brown. Combine remaining 1/4 cup sugar and cinnamon in small bowl; sprinkle over squares before cutting.

Thursday, May 21, 2009

White Bread


I once asked my hubby (knowing how he loves having "traditions" in the family) that if he would have to choose what bread to have for a meal, what would it be. "Give me either whole wheat bread or white bread and I'll be happy."

Well, I have not really made white bread (thinking it was too boring and basic), and I personally preferred basic egg bread and buttery sweet bread over white bread. White bread would be the equivalent of pan de americana (or what we referred to as "Tasty" bread in the Philippines) so I have somehow subconsciously equated it to the commercial white bread that I never considered making it at home...until that conversation with hubby. We all liked it, and despite it being baked in the bread machine itself, it had a nice crunchy yet soft crust.

Ingredients: from breadworld.com

1-POUND LOAFINGREDIENTS1-1/2-POUND LOAF
2/3 cup
4 tsp
3/4 tsp
2 cups
3 tbsp
1 tbsp
1-1/2 tsp
water
butter or margarine
salt
bread flour
nonfat dry milk powder
sugar
bread machine yeast
3/4 cup + 2 tbsp
2 tbsp
1 tsp
3 cups
1/4 cup
4 tsp
2 tsp


Instructions:

Add ingredients to bread machine pan in the order suggested by manufacturer.

Recommended cycle: Basic/white bread cycle; medium/normal color setting. Timed-bake feature can be used.


Nutritional Information:
Per Serving:
Serving size: 1 slice (1 / 12 of recipe)
Serving weight: 2 ounces (58 grams0
Calories 150; Total fat 2.5 g; Saturated fat 1.5 g; Cholesterol 5 mg; Sodium 220 mg; Carbohydrates 27 g; Dietary fiber less than 1 g; Sugars 3 g; Protein 5 g


Share

Tuesday, May 05, 2009

Bread Bowls


I felt like playing with bread and making a somewhat fancy yet simple and satisfying dinner, so I made bread bowls to serve Chicken a la King in.

Ingredients:
6 cups bread flour
2 envelope Fleischmann’s RapidRise Yeast
1-1/2 teaspoon salt
2 tablespoon sugar
1-1/2 cup + 1 tablespoon water
1 cup milk
2 tablespoon butter

Instructions:


Combine flour, yeast, salt and sugar in a mixing bowl; make a well at the center. Heat water, milk and butter to between 120º to 130ºF. Pour into the well and gradually stir into flour mixture. Beat 2 minutes at medium speed of electric mixer, scraping bowl occasionally, until a soft dough is formed.

Turn dough out on a lightly floured surface; knead 6 to 8 minutes until smooth and elastic. Cover dough and let rest 10 minutes.

Divide dough into 4 (or 5, in my case, about 10 oz each) equal portions; shape each into smooth ball. Place on greased baking sheet. Cover; let rise in warm, draft-free place until doubled in size, about 1 hour.

With sharp knife (I use a new blade for cutter, greased with shortening), make 4 (1/4-inch deep) slashes (swiftly!) in crisscross fashion on top of loaves. Bake at 375ºF for 20 to 25 minutes or until done. Remove from baking sheet; cool on wire rack.

Cut off 1/3 of loaf; hollow out loaf to form 1/4-inch thick bowl. Fill bowl with soup.[Actually, I cooked chicken a la king for this. Recipe up next.]

All the boys said, "Kewl!"

Saturday, April 11, 2009

Maple Oatmeal Bread


This is one of the recipes that I sought to make because of available ingredients. My in-laws just made another batch of maple syrup for this year (they do around March) and gave us some. I still had some from last year's, so I thought I'd look for a recipe to use up the opened jar sitting int he fridge. I found one at KAF, but I modified the recipe. Reading their blog about this recipe, I learned that they originally made use of 1/2 cup maple syrup. and while they made use of water, maple syrup and maple flavoring to brush the top to save on the expensive ingredient, I did not have to do that.

I had about 1/2 cup from a pint jar of maple syrup, and after pouring that off into a measuring cup, I had maple sugar sediment at the bottom, which I crushed with fork. This was what I used to brush the top of the loaf prior to baking. The blog author was right, the maple flavor was like creeping on you slowly...and toasting it (I do for 5 minutes) brings out the full flavor. Perfect for breakfast with my coffee, even plain or with jam.

And since I was using my bread machine, I changes the flours to bread flour and traditional whole wheat, both KAF brands, and the yeast to BM yeast. Of course, once these ingredients are changed, the method changes as well.

Ingredients:
* 3/4 cup warm water (80-100 deg F)
* 1/2 cup old-fashioned rolled oats
* 1/2 cup real maple syrup
* 1/4 cup butter
* 1 1/4 teaspoons salt
* 1/2 teaspoon cinnamon
* 3/4 cup King Arthur 100% Traditional Whole Wheat Flour
* 2 cups King Arthur Unbleached All-Purpose Flour
* 2 1/4 teaspoons instant yeast


Instructions:


Combine all wet ingredients and warm up to 80 to 100 deg F. Place in BM pan. (Don't forget the paddle!)

Combine all dry ingredients and place on top of dry. Start the dough cycle. Run a timer for 30 minutes (this will be the total time of kneading by the machine before it rests to rise for one hour), after which, transfer the dough to a lightly floured surface and flatten with your floured palm to a disk. Generously grease your loaf pan.

Roll the dough to a log and place seam side down in an 8.5 x 4.5 x 2.5 loaf pan (if you use a bigger one, your loaf will not have an overhang and will seem to small for the pan). Cover with cling wrap smeared with shortening on the side that will eventually touch the dough so that dough will not stick when you remove the plastic later. Let rise for 1-1/2 to 2 hours in a warm, draft-free, moist place or until the dough has doubled in size and has about 1 inch overhang.

Heat the oven to 350 deg F. Place rack at the middle.

Remove plastic and brush the top with maple sugar-syrup all over. (I placed the loaf pan on another shallow pan to catch syrup drippings.). Bake for 35-40 minutes or until it sounds hollow when top is tapped with finger.

Let cool down for about 5 minutes before turning onto a cooling wire rack. KAF advises to let it cool fully before slicing. I don't. I think the reason they advise that is that it is easy to compress and deform the loaf with the pressure of slicer. I have, in the past, even as a child, learned to angle the loaf in such a way that my slicer hits the bottom corner first. When done this way, versus hitting the loaf from the top or flat sides, the bread maintains its shape, especially if you are not hastening the slicing.

Now this is very artisanal, all-natural, and heart-healthy. I loved the flavor and my kids did as well. Too bad, I did not expect it to take a long time to rise to a level I wanted it to, so that we ate supper first before I baked this, so hubby did not have a taste of it as soon as it was baked (he prefers his breads and rolls eaten at meal times). When freshhly baked, it had a wonderful crunchy crust with that maple sugar on top. This top would not be there after placing in ziploc bag, even upon reheating in a toaster. However, like I said above, toasting it brings out the maple flavor of the bread itself.

This would be a wonderful holiday bread to share with relatives.

Tuesday, March 17, 2009

Sweet Potato Cream Cheese Wheat Bread


This is another entry for the NC Sweet Potato contest that I referred to earlier when I made the sweet potato pandesal and pandelimon. I would like to thank sweetbytes for this contest and giving us a boost to explore the possibilities of sweet potatoes.

This bread is inspired by the common Filipino bakery item "pan de pula" with the bread enveloping a red filling. Although the original recipe for pan de pula makes use of stale bread for the filling that is made like a pudding, to which a few drops of red coloring is added for interesting contrast against the bread that wraps around it, I used cream cheese for this recipe to make it special. I also made use of some whole wheat flour for the bread. The sweet potatoes help create a very tender wheat bread. Upon baking, this bread is then sliced into individual servings. The leftover is kept in the fridge. Reheating takes about 15 seconds for each slice. I love it as snack or to accompany my evening/morning coffee. My husband said it was quite good. My sons liked it as well, especially upon coming home from school.

I experimented with two types of "presentation" of the bread, one with slashes and one with fork tine piercings for vent. I like the slashed one better as far as appearance goes.

FILLING:
Ingredients:
8-oz cream cheese, softened
1 stick butter, softened
1-2 cups confectioner's sugar
1/2 cup sweet potato
1 egg

Instructions:
Beat together all ingredients until well-blended. Refrigerate until ready to use.

DOUGH:
Ingredients:

Makes 2 loaves

3 to 3-1 / 2 cups all-purpose flour
1 cup whole wheat flour
1 / 4 cup sugar
2 envelopes FLEISCHMANN’S RapidRise Yeast
2 teaspoons salt
1-1 / 2 cups water
3 tablespoons butter or margarine
3 / 4 cup mashed boiled sweet potato

egg wash made of 1 egg and 1 tbsp milk

Instructions:


In a large bowl, combine 1 cup all-purpose flour, whole wheat flour, sugar, undissolved yeast, and salt. Heat water, butter and mashed potato until very warm (120o to 130oF). Gradually add to flour mixture. Beat 2 minutes at medium speed of electric mixer, scraping bowl occasionally. Stir in enough remaining flour to make a soft dough. Knead on lightly floured surface until smooth and elastic, about 8 to 10 minutes. Cover; let rest 10 minutes.

Divide dough in half. Roll each half to 8 x 12-inch oval. Divide filling into two and spread on the dough, either in the form of a log or spread flat, sparing the edges for the dough to seal (filling is quite runny, so do not put too much and allow about 3-4 inches for dough edge sealing. Turn seam side down onto greased baking sheet and let rise for about 40 minutes to an hour in a warm, draft-free place. Using a sharp blade, make slashes (or use fork tines) to create vents. Let rise for another 10 minutes. Meanwhile, heat up the oven to 400 deg F. Brush dough with eggwash. Bake 15-20 minutes or until done. Remove from sheet. Cool on wire rack.

Wednesday, March 11, 2009

Honey Whole Wheat Loaf

My husband loves wheat loaves. He loves the texture and the chewiness. It also happens that my BIL/SIL have honeybees, so every year we get a good supply of homemade honey. One of the few loaves that hubby loves so much is honey whole wheawt loaf, which I found in breadworld.com in my search for loaves with honey and wheat. Everyone in the family loves this. If I can't get my stepdaughter to eat supper, she will gobble up any rolls or loaves I put on the table that are tender and warm.

Recipe courtesy of breadworld.
Ingredients:

Makes 1 Loaf

1-1/2 to 2 cups all-purpose flour
1-1/2 cups whole wheat flour
1 envelope FLEISCHMANN'S RapidRise Yeast
1 teaspoon salt
1/2 cup milk
1/4 cup water
3 tablespoons honey
2 tablespoons butter or margarine
1 large egg
1 egg (beaten with 1 tablespoon of water)

Directions:

In a large bowl, combine 1/2 cup all-purpose flour, whole wheat flour, undissolved yeast, and salt. Heat milk, water, honey, and butter until very warm (120o to 130oF). Gradually add to flour mixture. Beat 2 minutes at medium speed of electric mixer, scraping bowl occasionally. Add egg and 1/2 cup all-purpose flour; beat 2 minutes at high speed. Stir in enough remaining flour to make a soft dough. Knead on lightly oiled surface until smooth and elastic, about 8 to 10 minutes. Cover; let rest 10 minutes.

Divide dough into 3 equal pieces; form each into a smooth ball. Place, side by side, in greased 8-1/2 x 4-1/2-inch loaf pan. Cover; let rise in warm, draft-free place until doubled in size, about 1 hour.

Brush top with beaten egg and water. Bake at 375oF for 35 to 40 minutes or until done. Remove from pan; cool wire rack.

Nutritional Information:
Per Serving :
Serving Size: 1 slice (1/12 of recipe)
Serving Weight: 2.2 ounces (62 g)
Calories 160; Total fat 3 g; Saturated fat 1.5 g;
Cholesterol 25 mg; Sodium 230 mg; Carbohydrates 30 g;
Dietary fiber 2 g (0.9 g / oz); Sugars 5 g; Protein 5 g

Tuesday, November 25, 2008

Coconut-Cinnamon Rolls & Pan de Coco-Cinni

This post is especially dedicated to Susan of Guam, who sent me an email yesterday about MY pan de coco recipe...She is one of those who give me inspiration.

Okay, here's the recipe for my Coconut-Cinnamon Rolls
From Coconut-cinnamon rolls
that made my husband close his eyes savoring his bite as he taste-tested this the night I baked them. I guarantee you this is gonna be a hit to any cinnamon and coconut lover.

Ingredients:

Prepared dough (I used half of my buttery ensaymada dough for two logs)

Mix and put in the fridge overnight -
8-oz grated coconut (that's about 1 cup packed?)
1 cup white sugar
1 cup packed brown sugar

Add to the above mixture the following prior to filling the dough:
2 tbsp ground cinnamon (you may add up to 4 tbsp depending on how cinn-y you want it)
5 tbsp flour

2 tbsp milk to brush on dough prior to filling

Directions (the slideshow is pretty much self-explanatory:

Prepare filling.
Roll dough to about 8x 13 in; make sure you sprinkle flour on the countertop and on your rolling pin. The dough gets stickier as it stays in room temp.
Brush milk onto the dough. Spread the filling thinly. Spare the edges that should make the seam.
Roll tightly into a log. You may have to use the dough cutter (dipped occasionally into a mound of flour) to lift up the dough as you roll.
Cut at 1-inch intervals using dough cutter (wipe the blade before every slice). Fix the roundness of the cut piece with your fingers before you place onto a greased pan.
Let rise for one hour inside the oven warmed by "baking" for 1 minute then turned off.
Take out of the oven; start heating up the oven for real baking at 350 deg F.
bake for 15-20 mins or until the middle dough is browned.
Loosen edges from the pan and invert onto a plate to remove.
Place on a cooling wire rack. If not eating right away, cool completely and wrap in plastic. May store at room temp for up to 3 days. (I guarantee you this is better than store-bought canned cinnamon rolls!).

Basically the same recipe for Pan de Coco-Cinni --

Ingredients:

Prepared dough (I used 1/4 of my buttery ensaymada dough)
Remaining filling (not sure how much was there; probably a cup)
Egg white for glaze

Instructions:
Cut dough into pieces (I cut them just so I could barely close my hand around each piece- yields pieces that are quite big one can fill you up quickly)
Flatten to disks.
Put about 1 tbsp filling at the center. Fold over the edges to seal.
Flatten the pieces. Place on greased baking sheet.
Bake at 350 deg F for 20 minutes or until browned to your liking (I should have baked this at 400 to bake at 12 minutes but since I baked this along with the coco-cinnamon roll, I used 350. End product seems too light (and uncooked) to my eyes, but actually they are done. My older son can eat two of these at a time.

I think I am gonna submit my coconut-cinnamon roll recipe to a baking contest...huwag nyo ako unahan/agawan...:)

Monday, November 24, 2008

Buttery Ensaymada

I should call this buttery eggyolk-y ensaymada.
I am getting so ensaymada'ed out already I could puke (excuse me!), but I just gotta be able to compare the two recipes which vary only in the fat content (shortening versus butter) and the eggyolks.

Honestly, I cannot really choose between the two recipes (Supersoft using shortening and just whole eggs versus Buttery using butter, of course, and 5 eggyolks in addition to 1 whole egg).

Supersoft has the familiar taste of the ensaymada I used to get from bigger bakeries in PI. By itself (without topping), it is okay, but since it is not sweet, the flavor is greatly enhanced once the topping is there, and a bite becomes heavenly. Lasts 2 days or even 3 without getting tough as long as it is kept in plastic at room temp.

Buttery is strikingly special flavored by itself mainly by its very nature...buttery and yolky. Once with the usual topping, it is as heavenly as supersoft, although it is not the taste I was familiar with when it comes to ensaymada bought from the likes of goldilocks. I have yet to observe how long it lasts. It is still soft after a day even when cold.

Now, since i have made lots of ensaymada dough, I thought I'd use some of it for something else special I can create for the Holidays. I came up with pan de coco-cinni (or Coconut-cinnamon rolls) because I accidentally left a pack of grated coconut on the warm floor when I was rearranging my meats in the freezer). I am not assigned to any of the winter holidays, so I will just bring to the gathering some desserts like this or leche flan or egg pie. I will next post the coconut-cinnamon roll and pan de coco-cinni, which my poor husband had to taste-test last night, and he bit with that familiar closing-of-the-eyes expression for something sooo good.
Ingredients:

3+1 +1 + 1 cups bread flour (total 6)
1/2 cup sugar
2 envelopes RapidRise Yeast
1 tablespoon salt
1 cup milk
1/2 cup water
1/2 cup butter + 1/2 cup softened butter (total 1)
1 cup mashed potato
1 egg
2 + 3 eggyolks (total 5 yolks)
Melted butter (about 1/4 cup) for brushing

Directions

Combine 1 cup flour, sugar, undissolved yeast and salt. Heat milk, water and butter until very warm (120º to130ºF). Gradually add to dry ingredients. Beat 2 minutes at medium speed of electric mixer, scraping bowl occasionally. Stir in mashed potato, 1 egg and 2 egg yolks and 1 cup flour; beat 2 minutes at high speed, scraping bowl occasionally. Gradually stir in 3 cups flour to make a stiff batter. Detach dough hook from mixer. Cover dough with the hook loosely with plastic wrap; refrigerate 1 hour. Meanwhile, soften 1/2 cup butter by leaving it out at room temp.

Remove dough from fridge and attach dough hook to mixer. Stir in 3 egg yolks and 1/2 cup softened butter (cut into bits), gradually add 1 cup flour and blend well. Place in greased bowl and cover loosely with plastic and refrigerate for additional 2-24 hours prior to baking (put simply, shape and bake the next day).

Use a GENEROUS amount of flour on the countertop, your hands, and your rolling pin when you start working to shape this dough because it is so STICKY. Shape accordingly (coiled or rolled method -- please see previous post). Brush with (or dip in) melted butter. Let rise for about an hour in a draft-free, warm and preferably moist environment (oven works best - place pans of ensaymada inside, along with a bowl of hot water, turn oven on for one minute then turn off and let the trapped heat hasten the rising. Don't forget to remove from oven once you are ready to bake and you are heating up the oven to the right baking temp.) (This whole batch will probably give you 32-40 pieces depending on the size you want. I suggest you think of ways to use this as master dough for other special desserts/pastries, like pan de coco-cinni up on my next post, or use ube haleya as filling, or make monggo bread which I plan to experiment on sometime later).

Bake at 350 deg F for 12-15 minutes (rotate pans after the first 10 minutes to even out browning) until done and browned to your preference. Take out from oven and brush again with melted butter (helps keep them moist). Enjoy with preferred topping.
If not consuming right away, let cool on wire rack completely then place in ziploc bags without the toppings. For individual servings, zap in microwave for 15 secs, add softened butter, sugar, and cheese. For family servings, cover loosely with foil and bake at 350 deg for 10 minutes.


Posted by Picasa


UPDATE: 9-07-09
Ritchie made and blogged about these ensaymada buns, saying,
Thank God for Kusina ni Manang she has the recipe for ensaymada (brioche) without too much work. Not that I want to eat ensaymada a lot, but because of the challenge in making it and getting the desired result, it became a monkey on my back, until now. You are da bomb manang.

I left a comment there thinking it was the supersoft, and she emailed me back:
Hi Ritchie,
Thanks for trying my recipe and actually liking it. :)
I presumed it was the supersoft ensaymada that you made?...I edited my post on it to include a link to this post.

Actually, it is the buttery one. OMG, it is the best I have ever made in my life. I gave some to my friends today and they said this is the best they have eaten too...hahaActually, it is the buttery one. OMG, it is the best I have ever made in my life. I gave some to my friends today and they said this is the best they have eaten too...haha

Thanks, Ritchie!


Monday, November 17, 2008

Roast Chicken with Baked Potatoes

Last night's supper menu:

Roast Chicken with homemade gravy
Baked Potatoes
French Bread

(No dessert! We usually do not have space in our tummy for dessert after a heavy hearty meal like this). I meant to serve steamed broccoli as well but I totally forgot to prepare it towards the last 30 minutes of baking the chicken, potatoes, and bread.

In preparing these, I started about 3-1/2 hrs prior to my targeted time for meal. The photos in my slideshow below are from my first year of roasting chicken, as I blogged about in my old kusina. I have prepared this numerous times now and I have developed my method to come up with menus that would maximize the use of oven and time.

I used one of our very own homegrown chickens. For the potatoes, I used big Russet potatoes, which might have been 1-pounder each. This is my second attempt at baking potatoes. The first was a disaster in that it was not fully cooked. This time I made sure the potatoes were cooked by baking them for two hours.

I was not quite organized with my how-to's below, because I proceeded as I would with actual preparation.

Roast Chicken:

1 whole garlic, cloves separated
1 tbsp rosemary
1 whole chicken (3-4 lbs)
1 bunch lemongrass
1 whole onion
(optional) 1 lemon rind (use the juice in something else)
coarse kosher salt, sprinkled onto wet chicken skin
garlic salt, sprinkle onto chicken
1 onion, cut into chunks
3 carrots, cut into chunks
1 cup celery stalks cut into chunks
2 bay leaves
10 or so peppercorns
1-1/4 cup water (or enough to cover the veggies)

Roast the garlic cloves (I now use a whole garlic to prepare the paste) for about 7 minutes in the oven toaster (broil setting) or until skin cracks open and you smell the aroma. Make a paste by mashing (I now use the garlic press for that purpose) and add rosemary.

Pre-heat oven to 350 deg F. Separate skin from underlying meat using blunt instruments. Insert some paste underneath and massage over the skin to distribute. Wipe cavity with paper towel and apply garlic paste as well.

Insert lemongrass (tanglad), lemon rind, and whole onion into the cavity. Sprinkle kosher salt all over chicken.

In a baking dish, place the chunks of onion, carrots, and celery. Add the water.

Preferably using a wire rack, place the chicken above the veggies. Cover with foil. Bake at lower 3rd rack of oven for 30 minutes.

Meanwhile, prepare the french bread in the bread machine.

Once BM has started, start preparing the potatoes.

After 30 minutes has passed since baking chicken, remove foil. If skin is relatively dry now, spray with olive oil and sprinkle garlic salt. Continue baking uncovered for browning.

Baked Potatoes
From baked potatoes

4-5 big Russet potatoes (mine was about almost a pound each)
olive oil, sprayed (can be bought from grocery store)
kosher salt

Wash the potatoes gently with a brush. Pat dry with paper towels. Pierce with fork at 1.5 inch intervals for the steam to escape while baking. Spray with olive oil. Sprinkle all over with kosher salt. Place on a wire rack (cookie cooling rack) then onto a cookie sheet.

When the chicken has been cooking for an hour, reposition to make space and place the potatoes beside the chicken. Set your timer for 1-1/2 hrs to announce baking the french bread.

Once dough cycle of bread machine is over, shape the dough and let rise for about 30 minutes, covered with plastic, in a warm and draft-free place (I just place the pan on the stovetop where steam from chicken being baked keeps the area moist and warm).

For the last 30 minutes of baking (after the 1-1/2 hr alarm), remove chicken from oven, get the liver, and transfer the chicken (using the rack) onto a shallow baking pan to catch drippings while you continue baking. Place chicken back into the oven, then place your french bread on upper third rack of oven and bake for about 20-25 minutes or until brown.

Meanwhile, if you do remember and if you plan to offer steamed broccoli, do so now using a steamer or your cooktop.

Homemade Gravy
Chicken/veggie juice
Chicken drippings
1/4 cup white wine

Prepare your gravy. Remove veggies from pan and transfer to a bowl and keep warm. Place juice, liver and some onions into a small saucepan and let boil. Adjust taste by adding salt and pepper. Thicken with flour-water mixture. Set aside.

Once everything is done and removed from oven, place the chicken back to the original baking pan and surround with the veggies. (Ask your husband and/or children to set the table and slice the bread.)

Pour the white wine onto the 2nd baking pan that caught the chicken drippings (this has the flavor of roasted chicken if the drippings have browned but not burnt). Add this to the prepared gravy and mix well. Transfer to gravy boat.

Going back to the baked potatoes, cut longitudinal slits onto top. Using silicone mitts, press at both ends to crack open at the middle. Put slices of butter on top. You may want to enjoy this with gravy as well.

Have gourmet pepper (using pepper mill) and butter sticks ready on the table.

Enjoy your meal!


Saturday, October 25, 2008

Rustic Italian Bread

I saw this on the packaging of Pillsbury Bread Flour

Type
Ingredients:
1 cup water heated to 100 F to 110 F
2 tbsp oilive oil
3 cups bread flour
2 tsp sugar
1/2 tsp salt
1 (1/4 oz) pkg active dry yeast
cornmeal
1 egg white, beaten

Directions:
Place all ingredients except cornmeal and egg white in bread machine pan according to manufacturer's direction. Process on dough setting.

Sprinkle ungreased cookie sheet with cornmeal. At end of dough cycle, remove dough from machine; place on lightly floured surface. Punch dough down (if dough is sticky, knead in additional flour before shaping.) Cover dough with clean cloth; let rest for 15 minutes. Shape dough into baguette-shaped loaf about 12 inches long. Place loaf on cornmeal-coated cookie sheet. Cover; let rise in warm place (80-85 F/ for 20-25 minutes or until light and doubled in size.

Heat oven to 375 F. With sharp knife, make 1 deep lengthwise slash in top of loaf. Brush loaf with egg white. Bake at 375 F for 25-30 minutes or until loaf sounds hollow when ligtly tapped.

Monday, October 13, 2008

BM French Bread

Taken from Taste Of Home's website, this was recommended to me by a co-worker. I just changed the yeast from active dry yeast to bread machine yeast. Husband raved about it! We all loved it!

From french bread (BM)


Ingredients:

1-1/4 cups water (70° to 80°)
2 teaspoons sugar
1 teaspoon salt
3-1/2 cups bread flour
1-1/2 teaspoons bread machine yeast
1 tablespoon cornmeal

GLAZE:
1 eggwhite (I had leftover eggwhites, which I used instead of whole egg in the orig recipe)
1 tablespoon water


Directions:
In bread machine pan, place the first five ingredients in the order suggested by the manufacturer. Select dough setting (check dough after 5 minutes of mixing; add 1 to 2 tablespoons of water or flour if needed).
When cycle is completed, turn dough onto a lightly floured surface. Divide in half. Roll each portion into a 10-in. x 8-in. rectangle. Roll up jelly-roll style, starting with a long side; pinch seams to seal.
Sprinkle a greased baking sheet with cornmeal; place loaves seam side down on prepared pan. Cover and let rise in a warm place until doubled, about 20 minutes.
Whisk eggwhite and water; brush over loaves. With a sharp knife, make four shallow slashes across the top of each loaf. Sprinkle with sesame seeds if desired. Bake at 375° for 20-25 minutes or until golden brown. Cool on wire racks. Yield: 2 loaves (16 slices each).

Thursday, January 31, 2008

Potato Peasant Bread

My husband is so fond of whole wheat type of breads. This one combines whole wheat with mashed potatoes, and is very soft and tender, like my pandelimon de patatas (which my husband also loves because they are so soft even on reheating), only healthier. Any leftover is good for garlic bread. So if you are like me who end up wondering what to do with leftover mashed potatoes, this is another wonderful way to use it. Of course I got the recipe from my favorite baking site, breadworld.com .

Makes 2 loaves

3 to 3-1 / 2 cups all-purpose flour

1 cup whole wheat flour

1 / 4 cup sugar

2 envelopes FLEISCHMANN’S RapidRise Yeast

2 teaspoons salt

1-1 / 2 cups potato water or tap water

3 tablespoons butter or margarine

3 / 4 cup mashed boiled potato*

1 tablespoon all-purpose flour


Directions
In a large bowl, combine 1 cup all-purpose flour, whole wheat flour, sugar, undissolved yeast, and salt. Heat water, butter and mashed potato until very warm (120o to 130oF). Gradually add to flour mixture. Beat 2 minutes at medium speed of electric mixer, scraping bowl occasionally. Stir in enough remaining flour to make a soft dough. Knead on lightly floured surface until smooth and elastic, about 8 to 10 minutes. Cover; let rest 10 minutes.

Divide dough in half. Roll each half to 8 x 12-inch oval. Beginning at short end, roll up tightly as for jelly roll. Pinch seam and ends to seal. Place on large greased baking sheet; flatten loaf slightly. Cover; let rise in warm, draft-free place until doubled in size, about 30 minutes.

With sharp knife, cut 3 diagonal slits (1 / 4-inch deep) on top of each loaf. Sprinkle with 1 tablespoon flour. Bake at 400oF for 15 to 20 minutes or until done. Remove from sheet; cool on wire rack.

Thursday, June 02, 2005

Beef Asado Roll (Baked Siopao)


UPDATE as of 3-6-2010:


This beef asado roll is actually a baked version of my ( steamed) beef asado siopao. Instead of making individual buns, I made a long log.

tin ni Roland,

Pasensya na sa tagal nitong post...

Eleanor, sana maihabol ko ito sa beef pares mo. How did it turn out?

To all who gave tips (anonymous) and recipe (Santos) on the previous post, thanks a lot!

My apologies for not being able to answer in a timely manner some of your comments/emails. Subsob lang sa trabaho.

wire whisk, I was able to get rice ( a sackful of 25 lbs was $13) at a Filipno store 1-1/2 hrs away from me. There is another Asian store 2 hrs away. For some spices, there is a Spice of Life Store near me.

Inna and anonymous, welcome to my blog. Pasensya na if I don't have the time to tinker much with my template anymore like linking. Busy lang kumayod.

Tina, I'm glad your hubby liked the beef pares.

Okay, let's get to the topic:

What you need for this is a recipe for sweet bread. I recommend the bread machine recipe of Basic Egg Bread from Fleischmann.

Grind your leftover beef pares (you may add chopped raisins, or for variation, substitute any meaty dish like chicken strips with pimiento, or ham with cheese, coarsely fine enough to be rolled into bread, or you may use cooked monggo).

Prepare dough under dough setting (not bread setting).

When done, place the punched-out dough on the table sprinkled with flour.

Flatten it to a rectangle shape almost as long as the rolling pin. Brush with melted butter (melt 2 tbsp).

Place the filling on top

Starting from the long end, roll tightly.

Seal the ends and place the log on a greased baking pan with the seam under.

Place on a greased baking dish with the seams under. Prick on top with fork for vents so steam from filling can escape while baking. Let rest for 30 minutes in warm, moist and draft-free environment (best place is inside the warm oven; remove when ready to heat up the oven). Place wire rack at the middle.  Bake at 400 deg F for 15 to 20 minutes or until golden brown.

Slice with a sharp bread knife. For variation, cut the dough into pingpong ball-sizes, place a tbsp of filling at the center, pinch the edges together to seal, place on the baking sheet with the seam end under and bake for 12-15 minutes. It's like pocket lunch, pretty much like the things I used to buy in Goldilocks for baon, because it is so convenient to have such instead of a packed lunch.

Posted by HelloIf you are going to use monggo, you can cut the dough right after rolling tight into several pieces and put them side by side in a loaf pan with the sliced edges on top-bottom orientation.
Custom Search