Showing posts with label potatoes. Show all posts

Sunday, January 04, 2009

McMeatloaf


Ever gone to your workplace smelling like restaurant because you cooked steaks or stir-fries? Well, I have. I know its just stupidity the spontaneity and lack of planning, cooking supper in a spur-of-the-moment decision. You see, I work night shifts, and I leave home around 6pm. I take my showers around 3 pm to give enough time for my hair to dry (then straighten with an iron) before I leave. I start cooking supper around 4 or 4:30 for the quick-to-prep suppers. (I do sometimes plan ahead and have something in the slow cooker or oven, but that is not always the case.) Well, one time I was working and could smell my restaurant scent, I thought, "hmmm...I have two more consecutive nights to work. Better think of menus that will allow me to go to work smelling clean and fresh." This meatloaf is one of those.

I really have no recipe to share here. I named this McMeatloaf because I used McCormick meatloaf mix to quick-fix this classic dish.

Ingredients:
1 pkg. McCormick® Meat Loaf Seasoning Mix
2 lbs. lean ground beef or turkey
2 eggs, lightly beaten
1/2 cup milk
1/4 cup dry bread crumbs OR 1 cup soft bread crumbs (2 slices bread)
1/2 cup ketchup, chili sauce or tomato sauce (optional)


MIX all ingredients except ketchup, in large bowl until well blended.


SHAPE meat mixture into a loaf. Place in foil-lined baking pan or 9x5-inch loaf pan. Top with ketchup, if desired.


BAKE in 375° F oven 1 hour or until cooked through.
We ate this with potatoes cooked in microwave using another McCormick product, Italian Herb Potato Steamer, and pre-cut salad greens.

I should get paid by McCormick for promoting their products...

Monday, November 24, 2008

Buttery Ensaymada

I should call this buttery eggyolk-y ensaymada.
I am getting so ensaymada'ed out already I could puke (excuse me!), but I just gotta be able to compare the two recipes which vary only in the fat content (shortening versus butter) and the eggyolks.

Honestly, I cannot really choose between the two recipes (Supersoft using shortening and just whole eggs versus Buttery using butter, of course, and 5 eggyolks in addition to 1 whole egg).

Supersoft has the familiar taste of the ensaymada I used to get from bigger bakeries in PI. By itself (without topping), it is okay, but since it is not sweet, the flavor is greatly enhanced once the topping is there, and a bite becomes heavenly. Lasts 2 days or even 3 without getting tough as long as it is kept in plastic at room temp.

Buttery is strikingly special flavored by itself mainly by its very nature...buttery and yolky. Once with the usual topping, it is as heavenly as supersoft, although it is not the taste I was familiar with when it comes to ensaymada bought from the likes of goldilocks. I have yet to observe how long it lasts. It is still soft after a day even when cold.

Now, since i have made lots of ensaymada dough, I thought I'd use some of it for something else special I can create for the Holidays. I came up with pan de coco-cinni (or Coconut-cinnamon rolls) because I accidentally left a pack of grated coconut on the warm floor when I was rearranging my meats in the freezer). I am not assigned to any of the winter holidays, so I will just bring to the gathering some desserts like this or leche flan or egg pie. I will next post the coconut-cinnamon roll and pan de coco-cinni, which my poor husband had to taste-test last night, and he bit with that familiar closing-of-the-eyes expression for something sooo good.
Ingredients:

3+1 +1 + 1 cups bread flour (total 6)
1/2 cup sugar
2 envelopes RapidRise Yeast
1 tablespoon salt
1 cup milk
1/2 cup water
1/2 cup butter + 1/2 cup softened butter (total 1)
1 cup mashed potato
1 egg
2 + 3 eggyolks (total 5 yolks)
Melted butter (about 1/4 cup) for brushing

Directions

Combine 1 cup flour, sugar, undissolved yeast and salt. Heat milk, water and butter until very warm (120º to130ºF). Gradually add to dry ingredients. Beat 2 minutes at medium speed of electric mixer, scraping bowl occasionally. Stir in mashed potato, 1 egg and 2 egg yolks and 1 cup flour; beat 2 minutes at high speed, scraping bowl occasionally. Gradually stir in 3 cups flour to make a stiff batter. Detach dough hook from mixer. Cover dough with the hook loosely with plastic wrap; refrigerate 1 hour. Meanwhile, soften 1/2 cup butter by leaving it out at room temp.

Remove dough from fridge and attach dough hook to mixer. Stir in 3 egg yolks and 1/2 cup softened butter (cut into bits), gradually add 1 cup flour and blend well. Place in greased bowl and cover loosely with plastic and refrigerate for additional 2-24 hours prior to baking (put simply, shape and bake the next day).

Use a GENEROUS amount of flour on the countertop, your hands, and your rolling pin when you start working to shape this dough because it is so STICKY. Shape accordingly (coiled or rolled method -- please see previous post). Brush with (or dip in) melted butter. Let rise for about an hour in a draft-free, warm and preferably moist environment (oven works best - place pans of ensaymada inside, along with a bowl of hot water, turn oven on for one minute then turn off and let the trapped heat hasten the rising. Don't forget to remove from oven once you are ready to bake and you are heating up the oven to the right baking temp.) (This whole batch will probably give you 32-40 pieces depending on the size you want. I suggest you think of ways to use this as master dough for other special desserts/pastries, like pan de coco-cinni up on my next post, or use ube haleya as filling, or make monggo bread which I plan to experiment on sometime later).

Bake at 350 deg F for 12-15 minutes (rotate pans after the first 10 minutes to even out browning) until done and browned to your preference. Take out from oven and brush again with melted butter (helps keep them moist). Enjoy with preferred topping.
If not consuming right away, let cool on wire rack completely then place in ziploc bags without the toppings. For individual servings, zap in microwave for 15 secs, add softened butter, sugar, and cheese. For family servings, cover loosely with foil and bake at 350 deg for 10 minutes.


Posted by Picasa


UPDATE: 9-07-09
Ritchie made and blogged about these ensaymada buns, saying,
Thank God for Kusina ni Manang she has the recipe for ensaymada (brioche) without too much work. Not that I want to eat ensaymada a lot, but because of the challenge in making it and getting the desired result, it became a monkey on my back, until now. You are da bomb manang.

I left a comment there thinking it was the supersoft, and she emailed me back:
Hi Ritchie,
Thanks for trying my recipe and actually liking it. :)
I presumed it was the supersoft ensaymada that you made?...I edited my post on it to include a link to this post.

Actually, it is the buttery one. OMG, it is the best I have ever made in my life. I gave some to my friends today and they said this is the best they have eaten too...hahaActually, it is the buttery one. OMG, it is the best I have ever made in my life. I gave some to my friends today and they said this is the best they have eaten too...haha

Thanks, Ritchie!


Sunday, November 23, 2008

Supersoft Ensaymada

NOTE as of 2/23/09:
This has become a favorite of many of my readers, as well as mine. Easy to make, super moist and supersoft. Satisfaction guaranteed. :)

UPDATE: Sorry I was not able to come back yesterday to posting.
From supersoft ensaymada
I got busy cooking, (and experimenting yet again with my ensaymada recipe below. I am quite satisfied with the outcome I got with the recipe I am posting here, but I am currently waiting for the newest experiment to rise prior to baking. Once I get the results, I will post later today about comparison...)

This is dedicated to all homemakers like me, who have a life outside of the kitchen...I have tried to make my recipes easy to make and follow, with ingredients easy to find and not gourmet types which you will find in God-only-knows-what-specialty-store (and therefore they are very affordable) and which would not demand your whole day to make (unless you make several batches), yet will give you fulfillment and definitely will wow your friends, brown- or white-skinned. As one of my white co-workers told me after I made her taste a pinch of this roll minus the sugar and butter, "Hmmm, how come your rolls are always moist and pillow soft???".

But of course, if you have easy access to specialty items (like special cheeses) and you have the financial means, go ahead and do your own experiment in trying different ingredients.

Just kindly do me favor, my dearest readers/followers, if you know of people with whom you might like to share the recipes I have here, please point them to my website instead of giving them a copy of the recipe. I appreciate increased traffic to my website.

11-22-08
An absolute welcome give-away in any Filipino Christmas Party supersoft ensaymada that melts in your mouth(soft even without heating up in the microwave, even after two days. Yeah, we finished them after two days because I made a big batch trying to experiment with other ways to use the dough.)

The secrets:
(1) Potatoes
(2) Lots of butter
(3) No kneading!!! (You read that right!)

I have been telling some of those who have been emailing me that I have been experimenting with this ensaymada. I am posting this right before the Holidays, in time for preparing giveaways made with love. The recipe to be posted later...Gotta go grocery shopping first.

(I can hear you say..."Bummer! Whatta teaser!")
Ingredients:
5 cups bread flour (separate 1 + 1 + 3)
1/2 cup sugar
2 envelopes Fleischmann’s RapidRise Yeast (1 envelope is 0.25 oz = 2-1/4 tsp)
1 tablespoon salt
1 cup milk
1/2 cup water
2/3 cup shortening (also known as lard, purico in Philippines, strutto in Italy)
1 cup mashed potato
2 eggs
3 egg yolks
2-oz grated sharp cheddar cheese, added to the 3-cup flour above(I used Helluva Good brand, because it comes closest to the kind of cheese paired with ensaymada that I grew up with. It's up to you to experiment with other cheeses.)- [UPDATE 12-23-08: I tried 2-oz crumbled feta cheese and it was wonderful! I loved the cheesy effect on the dough. Save your cheddar cheese for topping instead.]
melted butter (approximately 1 stick)
softened butter (approximately 1 stick to 1-1/2)(for rolled method)
(Note: Before you turn your nose up with the shortening here, wait for my next post comparing the two).

Directions
Combine 1 cup flour, sugar, undissolved yeast and salt. Heat milk, water and shortening until very warm (120º to130ºF). Gradually add to dry ingredients. Beat 2 minutes at medium speed of electric mixer, scraping bowl occasionally. Stir in mashed potato, eggs and 1 cup flour; beat 2 minutes at high speed, scraping bowl occasionally. Stir in remaining flour to make a stiff batter. Detach dough hook and cover dough plus hook loosely with plastic wrap; refrigerate 2 hours. Remove from fridge and add the 3 egg yolks, stir setting on the mixer. Remove hook from the dough this time and cover loosely again with plastic then refrigerate for another 1-22 hours.

The next stage will make use of a method depending on how hardworking you are or how time pressed you are.

Coiled: If you got lots of time, do the old-fashioned way of coiling like katol by pinching off pieces from the chilled dough about the size of a small pandesal. Get only a few at a time and chill the rest of the dough again because it becomes harder to handle when warmer; it becomes too sticky. Sprinkling flour on work surface helps lessen the stickiness. Shape the dough into a long rope about a foot long and coil as previously illustrated in older posts. Place on greased baking pan and brush with melted butter. See this post for step-by-step slideshow on how to shape into coils.

Rolled (para sa tinatamad): Get a chunk of dough about the same as one that you have for 2-lb recipes of bread (or about the size of a grapefruit or suha). Flatten to disk, fold over the four edges like that of an envelope, and roll to make a rectangle about 8 x 10 inches. Place a generous layer of softened butter except near the edges. Roll tightly from the long end. Cut in 1 to 1-1/2 inch intervals. Dip one end of cut side in melted butter then place on baking pan. Brush the rest of the surfaces with melted butter. [UPDATE 12-23-08: This whole batch can be divided into 3. When shaped into logs after you place your filling, wrap tightly in cling wrap and freeze. After freezing, let stand in room temp for about 15-20 minutes and cut with a knife to end up with 8-9 pieces minus the ends. Place in baking pan, preferably where they will crowd together to compress so they rise upward; ex., in 8x8 or 9x9 or round pans. Brush with butter. Let rise in warmed oven for about 45 mins to 1 hr, or until doubled in size. Bake as directed below. Cool down some or completely before applying topping of choice.]

Let rise in warm, draft-free place until doubled in size, about 1 hour. (My favorite thing to do is place them in the oven and "start" baking then turn off after one minute then let rise for 30 mins to 1 hr. Once puffy enough, remove from oven and start heating up the oven).

Bake at 350ºF for 12-15 minutes or until done. Remove from pans; cool on wire rack for about 30 minutes or until completely cool if not consuming immediately, and store in ziploc bag.

To enjoy ensaymada the traditional Filipino way:
Brush softened butter to warm ensaymadas (not too hot that it melts the butter), dunk in a bowl of sugar (or sprinkle the sugar on top), and top with finely grated cheese (the finer grater gives you soft looking curls of the cheese like in the photo above).


TAGALOG VERSION:

Sangkap:
5 tasang "bread flour" (paghiwa-hiwalayin 1 + 1 + 3) = hula ko, eto yung primera sa Pilipinas
1/2 tasang asukal
2 pakete Fleischmann’s RapidRise Yeast (instant yeast din to)
1 kutsarang asin
1 tasang gatas
1/2 tasang tubig
2/3 tasang purico
1 tasang "mashed potato" (maaaring gumamit ng purong nilagang patatas, o yung tirang mashed potato)
2 itlog
3 pula ng itlog
2-oz ginadgad na sharp cheddar cheese o kaya ay gumamit ng "crumbled feta cheese" at ihalo ito dun sa nakahiwalay na tatlong tasa ng harina (pwedeng gamitin ang food processor para mabiyak nang husto ang feta cheese at mahalong maige sa harina)
tinunaw na "butter" (mga 1 stick, pampahid bago i-bake)
pinalambot butter (mga 1 stick to 1-1/2)(para sa nirolyong dough)

Paraan:
Paghaluin ang 1 tasang harina, asukal, yeast (lebadura) at asin (eto ang tuyong sangkap). Pagsamahin at initin ang gatas, tubig, at purico hanggang 120º to130ºF. Unti-unting ihalo ang mga likidong sangkap sa tuyong sangkap. Paandarin ang electric mixer sa medium speed ng 2 minuto (paminsan minsan ay kaskasin sa gilid ang bowl para mahalong maigi). Idagdag ang mashed potato, itlog, at 1 tasang harina at i-beat uli ng 2 minuto sa high speed (pinakamabilis); kaskasin uli para mahalo maige.Unti-unting ibuhos ang natitirang harin (na me halong keso) habang umaandar ang mixer. Sa puntong ito, kung hindi kaya ng mixer maghalo ng makapal na dough, pwedeng gamitin ang wooden spoon o kamayin hanggang maging malambot na dough. Takpan ng plastic (cling wrap) at ilagay sa ref nang 2 oras.

Ihalo ang 3 pula ng itlog. takpan uli at ilagay sa ref. Maghintay ng 2 oras o kahit abutin ng 22 oras pa bago ihulma.

Sa paghulma, pwedeng hugis katol o nirolyo. Kung tinatamad ka, irolyo mo. Kung matyaga ka, gawing parang katol.

Wisikan ang countertop/lamesa ng maraming harina. Ilagay ang dough. Budburan ang ibabaw ng maraming harina. Gamit ang rolling pin, i-flat ang dough (Budburan lang na harina sa madikit na parte.). (Mas mabilis ito kesa paisa-isang piraso na pinahaba ng kamay).

(1) Katol: Gamit ang "dough cutter", maghiwa nang pahaba para makagawa ng "lubid" na kasingtaba ng hinlalaki na 1 ft ang haba.. Eto ang gawing parang katol. Ilagay sa baking sheet na pinahiran ng manipis ng purico. Yung dulo ng katol ay dapat nasa ilalim, para hindi hihiwalay habang umaalsa. Maglaan ng 2 inches na pagitan bawat piraso. (Pwedeng i-freeze sa puntong ito: ilagay sa freezer ng 3 oras, ilabas at ilagay sa makapal ng plastic bag/ziploc. Alisin ang hangin hanggang kaya. Pag handa na paalsahin, ilabas sa freezer, ilagay sa mold na me pahid ng purico, at paalsahin ng mga 4 na oras sa countertop/room temp, o ilagay sa pinainit (1 minuto) na oven para mas mabilis umalsa.)

(2) Nirolyo:
Itupi ang apat na gilid para makagawa ng parihaba (8x10 inches). Pahiran ng pinalambot na butter maliban sa pinakagilid para magselyo pag nirolyo. Irolyo nang mahigpit mula sa mahabang gilid. (Pwede i-freeze sa puntong ito: Balutin nang cling wrap nang mahigpit. Pag handa na paalsahin, ilabas sa freezer, palipasin ang 15 minuto bago hiwain.) Hiwain na mga 1 inch hanggang 1-1/2 inches ang kapal. Ilagay sa ensaymada mold na pinahiran ng purico/pinalambot na butter.

Pahiran ng tinunaw na butter. Hayaang umalsa sa lugar na mainit-init at kelangan, walang malakas na hangin (draft); takpan ng plastic na pinahiran ng purico. Pwedeng ilagay sa oven. Ganito: Painitin ang oven ng isang minuto, saka ilagay ang baking sheet (hindi na kelangan takpan ng plastic). Hayaang umalsa hanggan dumoble ang laki. Pahiran uli ng tinuna na butter. Ihorno (bake) sa 350 F ng 12-15 minuto or hanggang maging golden brown ang ibabaw. Pagka-alis sa oven, ilagay agad sa wire rack para lumamig nang mga 30 minuto. Kung hindi kakainin agad, ilagay sa ziploc.

Kung kakainin agad, pahiran ng pinalambot na butter ang ibabaw (ang iba ay gustong gawin to habang mainit pa ang ensaymada, kaya natutunaw ang butter. Ako, ang gusto ko ay makapal yung malabot na butter, hindi tunaw.) Maglagay ng asukal sa mangkok (bowl) at idukdok ang ensaymada na may butter. (Maaaring paghaluin ang malabot na butter at asukal, tapos eto ang ipahid sa ensaymada. Mas kakapit ang keso pag ganito.)

Kung gusto mo na me keso, maggadgad ng cheddar cheese sa ibabaw.


Variations for topping:

A. glaze/frosting
1 cup confectioners' or glazing sugar
2 tablespoons melted butter
1 tablespoon milk

better recipe from Spice Islands (good for 24 rolls)
# 6 1/2 cups powdered sugar
# 6 tablespoons butter, softened
# 6 tablespoons milk
# 1 teaspoon Spice Islands® Pure Vanilla Extract
# 1 teaspoon Almond Extract

B. cinnamon-flavored frosting
1/2 cup (1 stick) butter, room temperature
2 cups confectioners' sugar
1/2 teaspoon ground cinnamon
3/4 teaspoon salt
grated zest and juice of 1/2 orange
1 to 1 1/2 tablespoons hazelnut liqueur, such as Frangelico, or almond liqueur, such as Amaretto)

Why do I like this recipe aside from it giving me those tender, light-colored ensaymadas that very much reminds me of red ribbon or goldilocks (my previous recipes were only a bit more special than the ensaymada I grew up with, made by my Tatay or Manong)? Well, aside from those reasons mentioned above, this recipe also is pretty much like a slow cooker. Prepare then forget for a while until you are ready to cook. This recipe gives you a whole 24 hours to finally get going with the baking stage. Prepare today, put in the fridge, shape, rise and bake tomorrow. Or you can prepare today, shape hours later and refrigerate, bake the next day. Your choice. Just don't let 24 hours pass before you bake.

TIPS: For those who have a cellar with temps almost like that of a fridge, and you would like to bake several batches of this, I suggest you get a shelf (maybe 5-tier aluminum) and a damp sheet to wrap around the shelves once you have pans with the buns shaped already to keep them moist. You might want to experiment with just one or two pans and see how it turns out.

To those planning to give these away for Christmas (or maybe making a business out of it?), may I suggest baking them in Christmas baking boxes like those by KAF (star or tree).

UPDATE (12/11/08)
I tried to freeze some of the dough after rolling like a log, then tried to cut with a knife after about 20 minutes out of the freezer, as shown in the additional photos in the slideshow. I let it rise in room temp after brushing some more with melted butter, which maybe took one hour before I baked them. Taste-wise, they turned out perfect still, if not for the fact that placing them on baking sheet made them expand laterally so they looked flat. They probably would look better if placed in 8x8 or a tree-shaped pan, where they would be compressed and forced to rise upward.
Happy Holidays!

UPDATE as of 12-21-08:
From Holiday tree baking pan

I baked them in tree-shaped pan after freezing, and they rose after about 1-1/2 hour (would have been faster if I let them rise inside a warm oven, but I was baking something else that time). So this is how they looked like after baking. Beautiful, ain't it? Just add toppings of softened butter, sugar and grated cheese just before giving to your friends/relatives.

UPDATE: 1-24-09
Does this task seem daunting to you? Don't feel intimidated. Wena has tried making this and was very pleased with the results, too. And as you will see with the comments by Crystal, she found this very satisfactory as well. So shake off you fear and JUST DO IT!


UPDATE: 1-29-09
Anonymous EQ, a pastry chef, tried this recipe and states it is better than the ensaymada of goldilocks or red ribbon. Here's a photo of what pastry chef made. Pwedeng pang-business! Click on the photo to see a larger picture. Basing on his story in the comments section below, seems like he played with the dough (like it was Play-Doh, haha!), especially that he did not have his Kitchen Aid Mixer to prep the dough. I remember when I was just learning to bake from scratch (not play with dough, as that is something I have done since I was a kid), I was soooo scared to handle the dough that I myself produced, and it took time for me to get comfortable again to handle it like it was clay.

To EQ, Thanks a lot for your comment. It means a lot to me!

UPDATE as of 3-15-09: Joy L. also made these today and was very satisfied with the results. She is going to bring them the next day to her homeschooling group.

The next day she again emailed me about how these were received by his husband. "My husband said:"WoW! It's one of your best bread ever!! I can easily eat more but I have to watch my carb." My husband is diabetic but is addicted to bread and chocolates My 6 years old boy ate 2 for merienda while my little girl ate one whole piece too!! They want me to pack ensaymada for their lunch tomorrow."

Thanks Joy L for letting me know about your outcome!

UPDATE as of 4/3/09: Mai also baked these (first time for her to bake!), and was so nervous before placing the dough inside the oven to bake. The results brought joy both to her and to her husband. Her husband said, "masarap pa to kesa Goldilocks."

Thanks, Mai, for trusting me and giving this recipe a try!
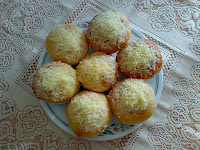
UPDATE as of 4/21/09: I was at work when I received this email of Marlene's ensaymada photos.Truly inspiring! Thanks for sharing this photo of your gorgeous ensaymadas, Marlene! Glad your family enjoyed them!


Monday, November 17, 2008

Roast Chicken with Baked Potatoes

Last night's supper menu:

Roast Chicken with homemade gravy
Baked Potatoes
French Bread

(No dessert! We usually do not have space in our tummy for dessert after a heavy hearty meal like this). I meant to serve steamed broccoli as well but I totally forgot to prepare it towards the last 30 minutes of baking the chicken, potatoes, and bread.

In preparing these, I started about 3-1/2 hrs prior to my targeted time for meal. The photos in my slideshow below are from my first year of roasting chicken, as I blogged about in my old kusina. I have prepared this numerous times now and I have developed my method to come up with menus that would maximize the use of oven and time.

I used one of our very own homegrown chickens. For the potatoes, I used big Russet potatoes, which might have been 1-pounder each. This is my second attempt at baking potatoes. The first was a disaster in that it was not fully cooked. This time I made sure the potatoes were cooked by baking them for two hours.

I was not quite organized with my how-to's below, because I proceeded as I would with actual preparation.

Roast Chicken:

1 whole garlic, cloves separated
1 tbsp rosemary
1 whole chicken (3-4 lbs)
1 bunch lemongrass
1 whole onion
(optional) 1 lemon rind (use the juice in something else)
coarse kosher salt, sprinkled onto wet chicken skin
garlic salt, sprinkle onto chicken
1 onion, cut into chunks
3 carrots, cut into chunks
1 cup celery stalks cut into chunks
2 bay leaves
10 or so peppercorns
1-1/4 cup water (or enough to cover the veggies)

Roast the garlic cloves (I now use a whole garlic to prepare the paste) for about 7 minutes in the oven toaster (broil setting) or until skin cracks open and you smell the aroma. Make a paste by mashing (I now use the garlic press for that purpose) and add rosemary.

Pre-heat oven to 350 deg F. Separate skin from underlying meat using blunt instruments. Insert some paste underneath and massage over the skin to distribute. Wipe cavity with paper towel and apply garlic paste as well.

Insert lemongrass (tanglad), lemon rind, and whole onion into the cavity. Sprinkle kosher salt all over chicken.

In a baking dish, place the chunks of onion, carrots, and celery. Add the water.

Preferably using a wire rack, place the chicken above the veggies. Cover with foil. Bake at lower 3rd rack of oven for 30 minutes.

Meanwhile, prepare the french bread in the bread machine.

Once BM has started, start preparing the potatoes.

After 30 minutes has passed since baking chicken, remove foil. If skin is relatively dry now, spray with olive oil and sprinkle garlic salt. Continue baking uncovered for browning.

Baked Potatoes
From baked potatoes

4-5 big Russet potatoes (mine was about almost a pound each)
olive oil, sprayed (can be bought from grocery store)
kosher salt

Wash the potatoes gently with a brush. Pat dry with paper towels. Pierce with fork at 1.5 inch intervals for the steam to escape while baking. Spray with olive oil. Sprinkle all over with kosher salt. Place on a wire rack (cookie cooling rack) then onto a cookie sheet.

When the chicken has been cooking for an hour, reposition to make space and place the potatoes beside the chicken. Set your timer for 1-1/2 hrs to announce baking the french bread.

Once dough cycle of bread machine is over, shape the dough and let rise for about 30 minutes, covered with plastic, in a warm and draft-free place (I just place the pan on the stovetop where steam from chicken being baked keeps the area moist and warm).

For the last 30 minutes of baking (after the 1-1/2 hr alarm), remove chicken from oven, get the liver, and transfer the chicken (using the rack) onto a shallow baking pan to catch drippings while you continue baking. Place chicken back into the oven, then place your french bread on upper third rack of oven and bake for about 20-25 minutes or until brown.

Meanwhile, if you do remember and if you plan to offer steamed broccoli, do so now using a steamer or your cooktop.

Homemade Gravy
Chicken/veggie juice
Chicken drippings
1/4 cup white wine

Prepare your gravy. Remove veggies from pan and transfer to a bowl and keep warm. Place juice, liver and some onions into a small saucepan and let boil. Adjust taste by adding salt and pepper. Thicken with flour-water mixture. Set aside.

Once everything is done and removed from oven, place the chicken back to the original baking pan and surround with the veggies. (Ask your husband and/or children to set the table and slice the bread.)

Pour the white wine onto the 2nd baking pan that caught the chicken drippings (this has the flavor of roasted chicken if the drippings have browned but not burnt). Add this to the prepared gravy and mix well. Transfer to gravy boat.

Going back to the baked potatoes, cut longitudinal slits onto top. Using silicone mitts, press at both ends to crack open at the middle. Put slices of butter on top. You may want to enjoy this with gravy as well.

Have gourmet pepper (using pepper mill) and butter sticks ready on the table.

Enjoy your meal!


Sunday, October 29, 2006

Pandelimon de Patatas

This month, the LP 15 is entitled "Recycled, Reloaded." Very appropriate for the culture who "waste not, want not." Visions of my recycled foods come into mind, both for re-cooking and for other valuable uses to lessen my contribution to the waste dump. How do I recycle foods? Let me count my ways.


First off, if I can freeze them, I do them in servings of one for quick lunch fix at times I am alone (or for my son who craves for heavy merienda). If I have leftover Korean beef and mashed potatoes or rice, or kare-kare with rice, or adobo with rice, I place them in a foil-lined small loaf pan and wrap, then freeze without the pan. I reheat these in oven toaster for 30 minutes at 350 deg prior to eating.


Second, I "remodel" some grilled or slow cooked meaty dishes to come up with new ones. Pancit, chicken empanada, chicken-veggie egg drop soup, chicken sopas and chicken mami noodles come to mind when I have leftover roasted chicken; special fried rice and ham-veggie omellet when I have leftover veggies and ham; beef siopao and asado roll when I have leftover beef pares; and fish lumpia, escabeche, sarsiado, or dinengdeng when I have leftover grilled/fried fish.


Third, I turn my old bread slices into bread pudding, french toast, biscocho or bread crumbs.


Fourth, I may not re-cook them. All biodegradable scraps (veggie peelings, seeds, or bones) and leftover I produce from my kitchen either go to chicken food bucket (goes to my MIL) or to my compost bucket (goes under the garden dirt). I do not consider them "waste" at all.


That said, I have tons of recipes in mind for this round of LP hosted by Lafang. But I do not have the luxury of time to post the recipes, or I might have posted about them in past entries, and I do not want to be redundant. Hence, I have decided to post two of them: Pandelimon de Patatas is my first entry. The next post will be Fish Lumpia.


I do not claim originality for this recipe. It so happened that in my wish to make use of leftover boiled potatoes, I looked for recipes for rolls/breads making use of them, as usual, from my fave bread machine recipe source, breadworld.com. I found Potato Dinner Rolls. After it was baked, it reminded me so much of pandelimon; hence , the name I gave it. I just omitted the egg glaze. I can't give you the link to the bread machine recipe because they seem to have deleted that and replaced with the conventional method (that is the link I used). Here is the bread machine version, edited by yours truly. The first time I made it, the dough was too sticky to form into balls. So on my second time (I baked again per husband's and son's request), I added more flour while the BM was kneading, and it solved my problem).


INGREDIENTS:


1 / 2 cup milk

1 / 4 cup potato water

1 / 2 cup boiled and mashed potato

1 / 4 cup butter or margarine

1 large egg

1-1/2 teaspoons salt

3 cups bread flour + 2-3 tbsp while kneading

1/4 cup sugar

2 tsp Fleischmann's bread machine yeast


DIRECTIONS:


Mix the milk, potato water and mashed potatoes and heat in the microwave for 30 seconds or so. Add the butter and egg, beat to mix then check temperature. It should be between 70-80 deg F (room temp). Pour into the bread machine pan. Add the dry ingredients. Set at dough cycle. after about 10 minutes, start adding flour gradually so that the dough is not too sticky (try to poke from time to time with fingers). It should appear relatively smooth and moist, not wet and flaky. The kneading ends on the 30th minute, then it rises for 1 hr.


Transfer the dough on a lightly floured surface (it will shrink). Divide dough into 15 equal portions (around 2 ounces if you are using a scale); form into smooth balls (sprinkle with some flour again as you get a new ball. Shaping this takes practice. The surface should not be too floury or you won't shape effectively, but must not have too little flour so that it becomes sticky and the surface of ball appears very rough). Arrange balls in parchment paper-lined baking pan as shown in the slide. Cover with damp flour sack in a draft-free place until doubled in size, about 1 hour.


Bake at 375oF for 15-20 minutes or until done. Remove from pan and serve hot; cool on wire rack completely then place in ziploc those you will not consume right away. Very good as chicken sandwich or toasted with cheese on top.


Announcement: Breadworld has a bread brigade movement. If you are in the US or Canada and a baking-with-yeast enthusiast like me, join for free recipes and coupons.


LP 15 entry

Tuesday, October 05, 2004

Potatoes

Potatoes are planted using "eyes". Each potato has about 5 or more eyes that will each give rise to a plant. One plant will give, in return, 5 to 10 potatoes depending on the size. The container that you see here in this photo has potatoes which I got from 5 plants. Hence, this is about the amount of potatoes you harvest from a single potato, or maybe more (if you have more than 5 eyes in one potato). And as I am holding in this photo, this is the biggest potato I have ever seen in my entire life (even my Mom-in-law said it was the biggest she has seen so far, too!). I got two of them about this size (about 7 or more inches long, 3 inches thick and 5-6 inches wide), and I got only one thing in mind to do with them:


FRENCH FRIES! (This photo shows a batch of fries that I cooked using my very small saucepan. I could not take a photo of more fries as my kids and hubby would eat each batch in seconds! )


This afternoon we dug up all my potatoes as we are expecting a temperature of 20 deg F tonight (below freezing!). We came up with a total of 4 sacks, enough to last through the winter!


Potatoes are so versatile and are a constant item in my pantry. I realized only now that here, it is more practical and cheaper to rely on potatoes for carbohydrate source rather than rice, considering the relative ease of planting and harvesting them! So I am trying to get my sons and myself used to not having rice everyday. We probably have rice once or twice a week. It's cheaper that way, without compromising nutrition.


Some potato facts can be found here for those interested or will have the need to see guidelines in planting it.


Custom Search