"Kusina" = kitchen; "Manang" (aka Ate in Tagalog)= Ilokano term for older sister.
A Filipina's adaptation in an American Kitchen
Sunday, April 26, 2009
Smoked Pork Chops
Smoked Pork Chops is the only pork I buy from the grocery store (if you have been reading my blog for quite some time now, you know that we raise our own pig). This is because my husband loves this stuff. We all do, actually. We get the Smithfield brand, which has 5 thin pieces. During those days when I am on duty and not having anything cooking in the slow cooker, smoked pork chops served with green peas and potatoes or rice is one easy meal I can prepare within 10-15 minutes, as long as I remember to tell the kids to cook rice before I come home (or I tell them to do so while on my way). I wash a potato or two (for hubby and/or stepd), sprinkle with salt, cover with wet paper towel then cling wrap and microwave (each takes about 4 minutes). I start the peas and start heating up the pan. I butter the pan and cook each side of chop for about 4 minutes or until nicely browned.
Wednesday, April 01, 2009
Wish-Bone Marinated Baked Chicken
This is one of the chicken dishes that my husband loves, and is one of our all-time favorite recipes. My stepdaught likes it as salad.
I actually posted this in my old kusina, but to make it easier to find, I am re-posting here. This photo is also a better one.
Ingredients:
Chicken cut into serving pieces
Wish-Bone Robusto Italian Dressing
Instructions:
Wash and drain the chicken pieces well. Place in ziploc bag and marinade with Robusto Italian dressing enough to cover all the pieces (probably about 1/2 cup for 1 whole chicken). Let sit in the fridge at least overnight, turning from time to time for the flavor to soak in well in all pieces.
Place iron cast griddle or grilling pan on higher rack of oven. Heat oven to 400 deg F. Drain chicken pieces. Spray griddle with oil and place chicken pieces. Let cook for about 15 minutes then baste with fresh dressing and cook further for 5 minutes. Baste again and cook for another 5 minutes. Turn over and let cook 10 minutes on the other side then baste and cook another 5 minutes. Baste and cook further for 5 minutes or until done and surface has a glazed and nicely browned appearance.
Serve with iceberg salad and Robusto dressing, and boiled potatoes or rice.
Friday, March 13, 2009
Easy Beef Stroganoff
This easy beef stroganoff is one taught by my MIL and that is loved by my whole family. I almost always have all ingredients in my pantry/freezer. Whenever I run out of ideas and want something quick, this is one of those that come to my mind. An all-time favorite in my family no matter what season, I can't imagine why it took me this long to figure out I don't have it yet in my blog!
Ingredients:
1 lb (wide) egg noodles
1 lb ground beef, sprinkled with some flour
3 cloves garlic, minced
1 medium onion, chopped
salt and pepper to taste
(optional: some drops of worcestershire sauce and 1/4 cup of sherry)
1 small can sliced mushrooms
1 can (10-3/4 oz) condensed cream of mushroom
some water (about 1/4-1/2 cup of water)
1 (8-oz) sour cream
Instructions:
Prepare noodles as directed in the package. While boiling water for this, start preparing the beef.
Brown ground beef. When it starts rendering oil, add the garlic, followed by the onions then mushrooms. Add salt and pepper to taste. Add worcestershire sauce and sherry if desired.
Add the cream of mushroom. Put some water into the can to rinse out remaining cream and add to the pan. Stir well. Add some more water as needed to make a thick sauce. DO NOT be tempted to add too much because that sauce will get thinner once you add the sour cream. Simmer for about 10 minutes for flavors to blend well, stirring occasionally.
Turn off heat (for conduction cooktop) and add sour cream. Stir to blend. (For flame stovetop, turn the heat off after stirring to blend; sour cream should be just heated through).
Wednesday, March 11, 2009
New England Clam Chowder
One item we usually order during the cold winter months in a family-friendly restaurant is clam chowder. New Englang style clam chowder uses salt pork for the fat source traditionally (or so I have read), and is rich with the use of heavy cream. Hubby loves his with lots of saltine crackers. With the exception of my stepdaughter, who is bent to believe she is allergic to all seafood, our family l loves clam chowder.
I tried to recreate it at home as this is one of the comfort foods in this area. I based this recipe on Cooking For Engineer's site, and gained approval from my picky husband.
Ingredients:
3 tbsp oil (rendered fat from salt pork)
3 cans (6.5 oz minced clams in clam juice)
1 (8-oz) clam juice
1 big (1-lb or so) russet potato, diced
1 medium onion, chopped
1 tbsp flour
1 cup heavy cream
1 cup milk
salt and pepper to taste
dash of ground basil (optional)
Instructions:
>
Drain clam juice off from cans. Set aside the juice.
Render oil from salt pork.
Sautee onion. Follow with diced potatoes and stir until potatoes are well coated with oil (this coating will help potatoes retain their shape and not easily crumble).
Sprinkle the flour and stir. Add the clam juice from draining, and the bottled one. Let boil. Season with salt and pepper (be careful as salt pork and saltine crackers are salty already).
Lower heat and simmer covered for about 20 minutes or until done, stirring occasionally to make sure potatoes don't stick to pan.
Add milk, heavy cream and clams, and heat without boiling (which will cause milk to coagulate and form clumps).
Enjoy with crumbled saltine crackers on top (or crumbled chicharon, like what my sons do).
(I served this tonight with potato peasant bread and fruit salad = combination of canned cocktail fruit, peaches, mandarin oranges, lychees, and palm seeds, topped with whipped cream.)
Monday, February 23, 2009
Eating Your Words
src="http://pagead2.googlesyndication.com/pagead/show_ads.js">
Tangled Noodle and Savor the Thyme posted this challenge to "write" or "spell" using food or drink. I thought it would be fun to join, although initially I could not think of what to "write."
src="http://pagead2.googlesyndication.com/pagead/show_ads.js">
Well, two nights ago, I was on duty, and my charge nurse warned me about the possibility of being RIF'ed after 10 PM (RIF=reduction in force, a cost-cutting measure where employees are asked not to come to work or go home if there are not enough patients). So when I came home after that duty, I resolved to sleep only 4 hours, thinking I must be able to sleep with my husband that night. However, as soon as I got to work, I learned that somebody else called out. That meant, I would have to stay and work the whole shift. Darn...
I told my charge nurse and the other nurse, "I feel sad that I can't go home....boohoo...my husband and I were planning on making whoopie tonight." And they laughed...Suddenly I knew what to "write" about.
You see, Mainers (or probably New Englanders) know the meaning of whoopie that is not the whoopie pie pictured above surrounded by the spelled whoopie.
Whoopie pies are my husband's favorite sweet snack, the reason why he gave me my Kitchen Aid stand mixer. He cannot eat the ones available in stores because "they don't make it the way Mom does." The difference being that his mom's recipe makes use of fresh egg whites for the filling; those sold in stores use fluff. His request then was for me to learn how to make whoopie pies from his mom, and I gladly obliged. Now I am making them as well, although I tweaked the recipe to make double batch, and to make use of egg yolks in the batter instead of throwing them away after making the filling.
While baking these, my husband was eagerly waiting, and as soon as I took the above photo, he was standing beside me and saw it, laughed, and asked if he could have that one in the middle (the first one assembled as whoopie pie), which of course he could. He took a bite and said, "You make the best whoopie pies." Now the letters are sandwiched and hidden...My fridge is stocked with them whoopie pies, which will probably last 2-3 days...Hubby and older son particularly like eating them with milk, I with coffee.
Whoopie pies are very popular here in Maine, but I make them only about twice a year or so because they are heavy on cholesterol and sugar...and this way, they are a real treat when I do make them.
And yes, hubby and I are making whoopies tonight. :)
Recipe can be found here.
UPDATE:
Round-up of the entries by the challengers is posted here and here.
As a reward for participating in the fun event, I got the following badge!

Thanks to Savor The Thyme and Tangled Noodles for hosting this challenge!
src="http://pagead2.googlesyndication.com/pagead/show_ads.js">
Strawberry Jam
I am at work right now...I needed something to keep me awake...coffee...still sleepy.
Blogging...sure way to keep my mind going...so here I am.
I was reviewing my old posts from my old kusina that I transferred here. Most of the posts then had recipes on geocities webpage that I tied up with my blog posts because photoblogging then was not yet "in" at the time. I (painstakingly) made separate webpages to show step-by-step photos of things I was doing then. I was quite surprised to find out I did make one for homemade strawberry jam, but which was not tied to a blog post. So I am making one for that now. Though strawberry season is quite far away...
src="http://pagead2.googlesyndication.com/pagead/show_ads.js">
I make strawberry jams whenever my MIL tells me she has had enough for her own use. My kids would pick them, we would eat some, and the rest I would make into strawberry jams. Strawberry jams and raspberry jams are our favorites. Very good on rolls, Club crackers, over cheesecake, etc. I have brought several jars of these for munchin during work, and my British and American co-workers loved my homemade jams. "Cannot compare with them commercial ones!"
Ingredients:
5 1/2 cups mashed strawberries
1 box pectin (Her preference is Sure-Jell)
7 cups sugar
8 jars for canning
Instructions:
Boil water for sterilizing jars then let simmer until ready for sterilizing jars. Wash jars and screw bands in hot, soapy water; rinse with warm water.
Prepare strawberries by removing the stems and mashing thoroughly with fork. (I think you can also use chopper batch by batch.) Put in a big saucepan and heat to boil, constantly stirring while gradually adding the pectin until fully dissolved and bring to full rolling boil (A boil that does not stop bubbling when stirred) on high heat, stirring constantly.Add 1/2 tsp butter or margarine to reduce foaming, if desired.
Stir in sugar quickly. Return to full rolling boil and boil EXACTLY 1 MINUTE, stirring constantly. Remove from heat.
Skim off any foam with metal spoon.
Pour quickly into prepared jars, filling to within 1/8 inch of tops. Wipe jar rims and threads.
Cover with two-piece lids. Screw bands TIGHTLY.Turn upside-down right away, then turn upright again after 5 minutes (This process is to ensure that minimal (unsterile) air is trapped, and that the hot jam will sterilize that space by inversion. Setting it upright after 5 minutes will ensure proper setting where the jam does not stick to the lid.)
Let stand at room temperature 24 hours. You may store unopened jams in cool, dry dark place up to 1 year. Refrigerate opened jams up to 3 weeks.
You may use strawberry jams on rolls/bread, Ritz crackers or saltine crackers.
Note: Upon setting, if you are using a larger jar, you may notice separation of layers. Above is the jam with all the bits of strawberries, and below a clear layer, which is the jelly.
Also, after the strawberry season comes the raspberry. When picking, the stems easily detach from the ripe fruits. Wash the raspberries just before the procedure, then proceed as with the strawberry jam procedure.
Tips:
Freshly picked strawberries should be washed ONLY when you are ready to consume/use it, otherwise it will spoil easily.
Pick only red and plump strawberries. When picked too soon, it won't have a sweet taste.
When in full rolling boil, you may lessen the foaming by adding 1/2 tsp butter.
Follow closely the timing of pouring boiling water into the jars and of removing the water and of closing the jars with the lids. Also minimize the air incorporated in the jar. Leaving a small space for air will result in popping in of the lid when the jam cools down, a sign of successful technique to ensure sterile procedures.
Additional info on jams and jellies available at www.surejell.com .
src="http://pagead2.googlesyndication.com/pagead/show_ads.js">
Friday, January 09, 2009
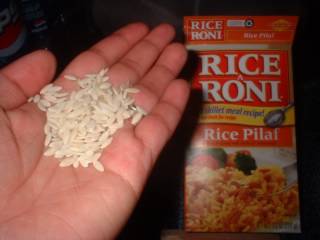
Butter-Fried Haddock, Rice-A-Roni, and Baby Spinach
| From butter fried haddock wit rice-a-roni and baby spinach |
Very easy to prepare, we have this menu almost every two weeks.
Ingredients:
2 lbs haddock fillets, cut into serving pieces (I have extra for lunch-dinners the next day)
spices: salt, pepper and paprika, sprinkled onto cut pieces
flour for dredging right before frying
1 stick butter for frying
Rice-A-Roni
(2 boxes for a family of 4-5 with boys who eat like men, and a man who eats like a boy)butter (see package for directions; I use 4 tbsp for two boxes)
water (I usually use 3&1/2 cup for two boxes RAR)
fresh baby spinach
Instructions:
Start cooking the rice first. Using the stovetop, I melt the butter, add rice and stir, add water and flavoring then stir. Then I place in rice cooker to finish (takes about 30 minutes to cook). I wait for about 15 minutes before starting cooking the fish.
Meanwhile, I prepare the fish. After cutting, I sprinkle with spices and let them
| From butter fried haddock wit rice-a-roni and baby spinach |
Monday, November 17, 2008
Roast Chicken with Baked Potatoes
Roast Chicken with homemade gravy
Baked Potatoes
French Bread
(No dessert! We usually do not have space in our tummy for dessert after a heavy hearty meal like this). I meant to serve steamed broccoli as well but I totally forgot to prepare it towards the last 30 minutes of baking the chicken, potatoes, and bread.
In preparing these, I started about 3-1/2 hrs prior to my targeted time for meal. The photos in my slideshow below are from my first year of roasting chicken, as I blogged about in my old kusina. I have prepared this numerous times now and I have developed my method to come up with menus that would maximize the use of oven and time.
I used one of our very own homegrown chickens. For the potatoes, I used big Russet potatoes, which might have been 1-pounder each. This is my second attempt at baking potatoes. The first was a disaster in that it was not fully cooked. This time I made sure the potatoes were cooked by baking them for two hours.
I was not quite organized with my how-to's below, because I proceeded as I would with actual preparation.
Roast Chicken:
1 whole garlic, cloves separated
1 tbsp rosemary
1 whole chicken (3-4 lbs)
1 bunch lemongrass
1 whole onion
(optional) 1 lemon rind (use the juice in something else)
coarse kosher salt, sprinkled onto wet chicken skin
garlic salt, sprinkle onto chicken
1 onion, cut into chunks
3 carrots, cut into chunks
1 cup celery stalks cut into chunks
2 bay leaves
10 or so peppercorns
1-1/4 cup water (or enough to cover the veggies)
Roast the garlic cloves (I now use a whole garlic to prepare the paste) for about 7 minutes in the oven toaster (broil setting) or until skin cracks open and you smell the aroma. Make a paste by mashing (I now use the garlic press for that purpose) and add rosemary.
Pre-heat oven to 350 deg F. Separate skin from underlying meat using blunt instruments. Insert some paste underneath and massage over the skin to distribute. Wipe cavity with paper towel and apply garlic paste as well.
Insert lemongrass (tanglad), lemon rind, and whole onion into the cavity. Sprinkle kosher salt all over chicken.
In a baking dish, place the chunks of onion, carrots, and celery. Add the water.
Preferably using a wire rack, place the chicken above the veggies. Cover with foil. Bake at lower 3rd rack of oven for 30 minutes.
Meanwhile, prepare the french bread in the bread machine.
Once BM has started, start preparing the potatoes.
After 30 minutes has passed since baking chicken, remove foil. If skin is relatively dry now, spray with olive oil and sprinkle garlic salt. Continue baking uncovered for browning.
Baked Potatoes
| From baked potatoes |
4-5 big Russet potatoes (mine was about almost a pound each)
olive oil, sprayed (can be bought from grocery store)
kosher salt
Wash the potatoes gently with a brush. Pat dry with paper towels. Pierce with fork at 1.5 inch intervals for the steam to escape while baking. Spray with olive oil. Sprinkle all over with kosher salt. Place on a wire rack (cookie cooling rack) then onto a cookie sheet.
When the chicken has been cooking for an hour, reposition to make space and place the potatoes beside the chicken. Set your timer for 1-1/2 hrs to announce baking the french bread.
Once dough cycle of bread machine is over, shape the dough and let rise for about 30 minutes, covered with plastic, in a warm and draft-free place (I just place the pan on the stovetop where steam from chicken being baked keeps the area moist and warm).
For the last 30 minutes of baking (after the 1-1/2 hr alarm), remove chicken from oven, get the liver, and transfer the chicken (using the rack) onto a shallow baking pan to catch drippings while you continue baking. Place chicken back into the oven, then place your french bread on upper third rack of oven and bake for about 20-25 minutes or until brown.
Meanwhile, if you do remember and if you plan to offer steamed broccoli, do so now using a steamer or your cooktop.
Homemade Gravy
Chicken/veggie juice
Chicken drippings
1/4 cup white wine
Prepare your gravy. Remove veggies from pan and transfer to a bowl and keep warm. Place juice, liver and some onions into a small saucepan and let boil. Adjust taste by adding salt and pepper. Thicken with flour-water mixture. Set aside.
Once everything is done and removed from oven, place the chicken back to the original baking pan and surround with the veggies. (Ask your husband and/or children to set the table and slice the bread.)
Pour the white wine onto the 2nd baking pan that caught the chicken drippings (this has the flavor of roasted chicken if the drippings have browned but not burnt). Add this to the prepared gravy and mix well. Transfer to gravy boat.
Going back to the baked potatoes, cut longitudinal slits onto top. Using silicone mitts, press at both ends to crack open at the middle. Put slices of butter on top. You may want to enjoy this with gravy as well.
Have gourmet pepper (using pepper mill) and butter sticks ready on the table.
Enjoy your meal!
Thursday, November 06, 2008
Chili
| From chili |
I like preparing chili when I have to go to work (night shift). I usually start thawing 2 lbs ground beef at night. Then in the morning, I prepare it as directed on the package of McCormick Chili seasoning. By suppertime, I just have to have shredded cheddar cheese (or 4-cheese mexican shredded cheese) available as topping (I add chopped onions for myself).
Ingredients:
2 pound lean ground beef
2 packages McCormick® Chili Seasoning Mix, Original or 1 package McCormick® Chili Seasoning Mix 30% Less Sodium
2 cans (15 ounces) kidney beans, drained
2 cans (14 1/2 ounces) diced tomatoes, undrained
2 cans (8 ounces) tomato sauce
Instructions::
1. Cook ground beef in large skillet on medium-high heat 5 minutes, stirring occasionally. Drain fat.
2. Place in 3-qt slow cooker. Stir in Seasoning Mix and remaining ingredients. Bring to boil. Reduce heat to low; cover and simmer 10 minutes, stirring occasionally.
3. Serve with shredded cheese, sour cream and chopped onion, if desired.
Sunday, October 19, 2008
Best-Ever Chocolate Fudge Layer Cake
Ingredients:
1 pkg. (8 squares) BAKER'S Semi-Sweet Chocolate, divided
1 pkg. (2-layer size) chocolate cake mix
1 pkg. (4-serving size) JELL-O Chocolate Instant Pudding
4 eggs
1 cup BREAKSTONE'S or KNUDSEN Sour Cream
1/2 cup oil
1/2 cup water
1 tub (8 oz.) frozen COOL WHIP Whipped Topping
2 Tbsp. PLANTERS Sliced Almonds
Procedure:
PREHEAT oven to 350°F. Grease two 9-inch round baking pans. Chop 2 of the chocolate squares; set aside. Beat cake mix, dry pudding mix, eggs, sour cream, oil and water in large bowl with electric mixer on low speed just until moistened. Beat on medium speed 2 min. Stir in chopped chocolate. Spoon into prepared pans.
BAKE 30 to 35 min. or until wooden toothpick inserted in centers comes out clean. Cool in pans on wire racks 10 min. Loosen cakes from sides of pans. Invert onto racks; gently remove pans. Cool cakes completely.
PLACE frozen whipped topping and remaining 6 chocolate squares in microwaveable bowl. Microwave on HIGH 1-1/2 min. or until chocolate is completely melted and mixture is smooth, stirring after 1 min. Let stand 15 min. to thicken. Place one cake layer on serving plate; top with one-fourth of the chocolate mixture and second cake layer. Spread top and side with remaining chocolate mixture. Garnish with almonds. Store leftovers in refrigerator.
See the kraftfoods recipe webpage here.
Monday, October 13, 2008
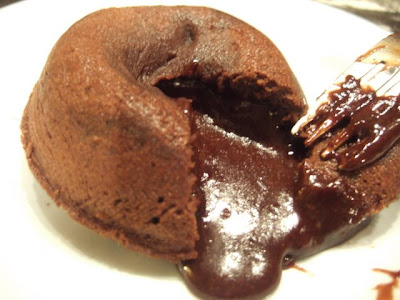
Chocolate Molten Lava Cake
| From Molten Lava Cake |
Then I saw a recipe in Kraft's Food and Family (free) magazine, and at the time I had all the ingredients on hand. I decided to give it a try and made 6...we were hooked!!! The recipe is good for 4 cups, so if you want to make more, adjust the proportions accordingly.
The recipe can be found here along with a how-to video. If you want to receive such magazines for free, just sign up in their webpage.
To make sure I will not lose this recipe, I have included the recipe here, as adjusted accordingly:
Ingredients:
6 squares BAKER'S Semi-Sweet Chocolate
3/4 cup (1-1/2 stick) butter
1-1/2 cups powdered sugar
3 eggs
3 egg yolks
9 Tbsp. flour
3/4 cup thawed COOL WHIP Whipped Topping
Procedure:
PREHEAT oven to 425°F. Butter four 3/4-cup custard cups or soufflé dishes. Place on baking sheet.
MICROWAVE chocolate and butter in large microwaveable bowl on HIGH 1 min. or until butter is melted. Stir with wire whisk until chocolate is completely melted. Stir in sugar until well blended. Blend in eggs and egg yolks with wire whisk. Stir in flour. Divide batter among prepared custard cups.
BAKE 13 to 14 min. or until sides are firm but centers are soft. Let stand 1 min. Carefully run small knife around cakes to loosen. Invert cakes onto dessert dishes. Serve immediately, topped with whipped topping.
UPDATE: This chocolate molten lava cake was tried and posted about by Zee, complete with her rave review and a beautiful photo.
Sunday, July 08, 2007
Whoopie Pies
The photos shown below were taken way back in 2004 (payat pa ako nun). One picture shows my niece when I was receiving the lesson from my MIL and we were in my SIL's house then. The rest of the photos were during my first try to bake them.
Whoopie Pies are a favorite of my in-laws, and my husband gave me a Kitchen Aid standing mixer on our first Christmas together that I may learn how to make them for him. "You can never buy them the same from any store around," he says. And I guess the reason is that we use fresh egg whites for the creamy filling. The commercial ones taste like plain lard mixed with confectioner's sugar and vanilla (yuck!).
Caution: If you do not trust the freshness of the eggs, I do not recommend that you try this recipe. If you can get fresh eggs from a neighboring farm, then by all means, make these! (that is, if you are not allergic to eggs nor is your tummy squeamish)
Ingredients:
Filling -
2 1/4 cup shortening
6 cups confectioner's sugar
6 egg whites
3 tsp vanilla
Dough -
1 cup shortening
2 cups sugar
6 egg yolks
1 whole egg
2 cups milk + 2 tbsp vinegar
8 heaping tbsp cocoa
2 tsp baking soda
2 tsp baking powder
1/2 tsp salt
4 cups flour
2 tsp vanilla
Instructions:
Filling -
1. Cream (beat together) the shortening and sugar well under moderate speed.
2. Add egg whites one at a time under slow setting, gradually increasing in speed until high.
3. When fluffy and forms soft peaks, turn speed to moderate then add vanilla and increase speed again until the right spreading consistency is achieved. Place in a ziploc bag then put inside the fridge until ready to use.
Dough -
1. Pre-heat oven to 350 deg F.
2. Cream the shortening and sugar first. Beat well.
3. Mix all dry ingredients in a separate bowl.
4. Add eggs/egg yolks one at a time to the creamed sugar and shortening and beat on low going to medium until lemony creamy.
5. Alternately add the dry ingredients and the milk-vinegar mixture under low setting into the cream. Scrape bowl with spatula from time to time.
6. Add vanilla.
7. Place in ziploc bag. Cut one corner of the bag and squeeze out about 1 tbsp of dough onto baking pan lined with aluminum foil (makes it easier to change pans if you make bigger batches), 2 inches apart.
8. Bake for 10 minutes.
9. Cool on wire rack for 10 minutes.
10. Put the filling and sandwich between two cookies.
11. Refrigerate those which you will not consume right away. (Remember, there are raw egg whites there).
Sunday, April 10, 2005
Beef Pares
This is a re-posting of beef pares from my old kusina, edited with some new ingredients as per comments given that time, and a new method.This dish is something I created in my effort to copy a favorite (and famous) item in some side-street restaurants in the Philippines. Beef Pares, a Chinese influence to Filipino cuisine, I believe, is juicy tender stewed beef in sweet brown sauce. By experimentation, I was quite successful in re-creating the dish in my now American kitchen. While the sauce is served thin in the Philippines, I have tweaked it to come up with a thick sauce, which has more appeal to the Western tongue of my in-laws and husband (who is quite picky when it comes to food). They (and I) love this dish. During a town hall meeting, my father-in-law was chatting with a friend, and he introduced me, with the phrase, “Linda [my mother-in-law] is already a good cook, but she [pointing to me] is even better!” While I felt flattered with the remark, I was embarrassed because my mother-in-law was also with us! It must be quite insulting to her to hear that, but then we have a very good relationship anyway, and even she tells me I am a good cook. I usually serve this dish during my birthday celebration, although at times I prepare it only for my family over the weekend, and I end up with some leftover. With this leftover, I can make another Chinese-influenced Filipino favorite merienda (snack) – the beef asado siopao, which are steamed buns with beef filling, also loved by my in-laws. Or make it into a heavy snack – beef asado roll, which is a baked bread with beef filling (my very own idea). I am very proud to be sharing this recipe not only with other Filipina immigrants but also with Americans as well.
INGREDIENTS:
3 lb boneless beef chuck roast
1 tbsp oil for browning
2 dried bay leaves (laurel)
2 star anise
2 cinnamon sticks
some dried orange peel (optional)
1/4 cup of red wine vinegar
1/4 cup soy sauce
1 tbsp Chinese rice wine
3 cloves of garlic, crushed then minced
5-10 peppercorns, crushed or freshly milled
1/2 cup of frozen beef broth (I have several in my freezer)
Additional ingredients for the sauce:
3 tbsp light brown sugar (or according to taste)
2-3 drops soy sauce to darken the sauce some more, if desired
salt and pepper to taste
2-3 drops of Worcestershire sauce
1 tbsp cornstarch dissolved in 1/2 cup cold water
1 tsp sesame oil
METHOD:
Brown the chuck roast on all sides using a heavy iron pan on high heat. Place the bay leaves, star anise, cinnamon sticks and orange peel in the slow cooker and then the roast on top of these.
Mix together all the other ingredients and pour onto the roast. Place the frozen beef broth on top of the roast to baste it while cooking. Cover and slow cook for 8 hours.
After 8 hours, scoop out the sauce and let pass through a strainer to remove the spices. Keep the roast in the slow cooker under warm setting. Transfer the sauce into a fat separator then pour out the sauce minus the fat into a small saucepan. Boil. Adjust the taste with the additional ingredients for the sauce. Thicken to desired consistency by adding the cornstarch-water mixture in a slow stream while stirring. Turn off the heat and stir in the sesame oil.
Transfer the roast to a serving platter and pour the sauce over. This can be topped with snips of chives for a more appetizing look. Serve with mashed potatoes or plain rice, plus steamed vegetables.
Uses for the leftover, if any:
I roughly chop the meat, then reheat it on low with the sauce, constantly stirring to avoid scorching. For every cup of chopped meat, there must be about 1/2 cup of sauce. If the sauce is too much, I just let it evaporate as I reheat. If it is not enough, I add some more water in increments of 1/8 cup plus some soy sauce, sugar, salt and pepper to taste. The mixture must not be runny and must hold together when cooled.
I use this as filling either for beef asado roll (baked version) or beef asado siopao (steamed version).
Wednesday, November 10, 2004
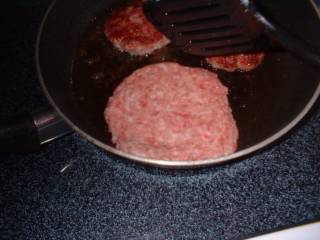
Pork Sausage
She gave me several sausages. One whole of which can make 7 patties. My family could only consume about 5 patties. I usually prepare it for breakfast with scrambled eggs and toast.At first I did not quite know how to prepare it. To me, sausages meant hotdog-shaped ground meat (like the German sausages that I loved). The first time I ordered a sausage during a breakfast at Friendly's I was surprised to see a disk. Anyway, before I proceeded with this I had to ask my hubby how it was prepared.
Pre-heat a heavy skillet on medium setting for about 5 minutes. Lightly grease with oil. (The sausage will render a lot of oil as it cooks.) Meanwhile, shape the sausage into patties. This is how I do it:
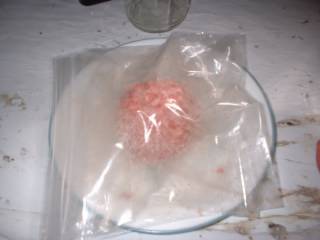
Using two sandwich bags as my gloves and for easier handling of the ground pork, I first shape it into a ball, then flatten it a bit with my hand.

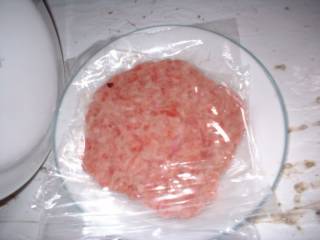
Then using a small plate I press it against another to flatten it to about 1/8 inch thickness, still sandwiched between the bags.
Then I gently peel off the plastic, transfer to a spatula,

then gently lower it onto the skillet. I cook the first side for about 7 minutes, and the other for about 5 minutes. The patties will significantly shrink in size. 
Drain on paper towels and serve with scrambled eggs (My hubby prefers eggs with just salt and pepper, no veggies. Me and my sons like it with diced tomatoes and onions, plus garlic powder.)
I usually have about 1 cup of leftover uncooked sausage. I tried to use it to make lumpia.