Ingredients:
roaster chicken (~4 lbs), pre-brined
a whole garlic
1 tsp dried rosemary
3 big onions
water
Instructions:
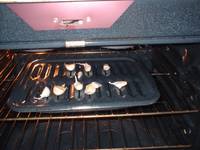
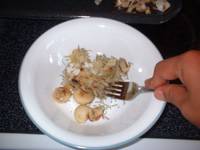
Separate and pierce with a knife the cloves of a whole garlic. Roast in the oven (broil on high for about 5 minutes or until skins crack open). Peel the garlic cloves, sprinkle with 1 tsp of dried rosemary then mash together to make a paste.


Here is now the garlic-rosemary paste, ready for rubbing under and onto the chicken skin and cavity. I use this Hannaford roaster chicken (about 4 lbs, ~$6.++), which is pre-brined.


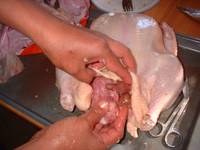
Using a blunt knife or spatula (which will not pierce the skin), separate the skin (I use my bandage scissors to cut through the connective tissues and probe to loosen the skin from the underlying muscles). Rub the paste underneath the skin on the thighs, wings, and back, then on the skin all over, and lastly in the cavity lining (I avoid rubbing under the skin over the breast, as my hubby prefers that part, and he might find the flavors too strong).


Then I bundle up several leaves of lemongrass (tanglad) tied with twine and insert it into the cavity. If I have some lemons previously used with the rind reserved and refrigerated, I chuck the rinds into the cavity as well (it gives a hint of sweetness to the juice, plus the lemon flavor). Then I insert the innards (for flavoring the gravy afterwards).


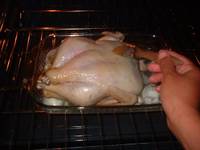
Then I set the chicken breast side up on a bed of onions cut in chunks, with water in the pan about half an inch high. I cover with foil and bake at 350 for the first 30 minutes.


After 30 minutes, I remove the foil, baste the chicken using the fluid in the pan (which already has a bit of oil by this time), then bake for 1 hour, then baste again and bake for a further 1 hour. I cover again with the foil to avoid drying up then add chunks of potatoes (pre-cooked in the microwave; my hubby likes potatoes cooked the traditional way rather than in microwave) and carrots and cook for another 30 minutes [Please see update below]. (By this time the built-in indicator of doneness has popped up).


Total cooking time: 3 hours for this 4+-pounder chicken, with the foil cover during the first and last 30 minutes. This is now the finished product. So yummy and juicy, with crispy browned skin. My hubby eats it with eyes closed, savoring every bite, and always requesting that I prepare sandwich made from leftover breast the next day for his lunchpack. I usually don't prepare gravy during this time, because the meat itself has been permeated by the flavors of the spices (lemongrass, garlic-rosemary). I usually serve this with mashed potatoes and dill pickles. (The round white button on the breast is the indicator.)

UPDATE as of 2/28/09: Now I take out the pan and replace it with a small jelly roll pan so while the chicken bakes for the last 30 minutes with the foil on, I prepare the gravy. To make the gravy, I use a fat separator to remove most of the fat, the proceed with making the gravy as described below.
Boil the pan juices in a small saucepan, (optional: mash the liver), adjust the taste accordingly (I usually add some more pepper, worcestershire sauce and salt). Mix 2 tbsp flour with 1/2 cup cold water, then gradually pour into the boiling liquid while consistently stirring until the desired consistency is reached.
Once the final 30 minutes of baking time is up, remove chicken from the oven. Place chicken on a platter covered with foil and let rest while you finalize the gravy.
Place jelly roll pan with drippings on stove top and add 1/4 cup sherry or cooking wine. Scrape the browned bits on the pan while you boil with the wine. When the juices are dark brown and all bits are scraped off, pour this into the gravy. Mix thoroughly. If the gravy turns too thin, boil some more and add flour-water mixture again. Add more salt and pepper to taste as necessary.
For leftover, we like using the breast meat for sandwiches the next day, either cold with addition of mayonnaise, salt and pepper, or hot using leftover gravy as open sandwiches.
Place into the pan cubed slices of the breast meat to heat through, and put on a toast with butter (if desired) for a light supper. (My hubby's sandwich for lunch at work is just sliced breast meat with mayonnaise on top. He said he liked it that way for cold chicken. But he liked the sandwich with gravy for heated chicken meat.) The red meat I gathered and chopped coarsely for chicken empanada using drstel's recipe.


7 comments:
Written like a doctor! I never knew baked chicken could be so scientific :) I just love your step by step photos and instructions. The end product looks delicious too!
Hi Jmom,
Haha! Lumilitaw ba? Those step-by-step instrxns w photos are quite a pain, but me and my sons have fun doing it (my older son was taking the photos here, and my younger son was the one who took photos while I made my empanadas the next day). Also, I look back during my first days here, and recall that I did not know then such things as springform pan, roasting rack, splatter screen, canner, etc., so with this, I am hoping to make it easier for the new Fil-Am (or uprooted Filipina) bride during her transition and learning process.
I changed the name to Baby Rambutan, same location. Maybe that's why nawala. I am unable to post regularly due to our schedule. Good luck in your catering business.
My own version of lechon manok indeed also uses tanglad, plus peppercorns, bay leaves, salt, onion all chucked inside the chicken's cavity. Towel dry chicken skin and massage oilive oil and salt. Drippings converted and cooked into gravy. Always a winner among those who are fed up with sutffed roast chicken!
Haven't tried rosemary though. would fresh ones injected into skin also taste good kaya?
na-mis ko tuloy ang lechon manok. maka-luto nga this weekend.
bon apettit!
--Berto
It looks delicious. Can't wait to try. Thanks for the step by step method.
hi manang! just to let you know that i tried this for our dinner last monday and it turned out great. i couldn't find any pre-brined chicken so i had it brined myself. i used the convection roast setting in my oven and placed the chicken in a roasting pan which could fit a turkey so it was kinda big for a chicken and i had to check it from time to time to make sure there is still water in the pan. the lemongrass i got from safeway wasn't the same as the one we have in the Philippines...it's more of a stalk which you have to peel by section but still smelled the same. i also used lemon rind and didn't put the rub on the breast but my husband is happy with the flavor (he didn't find it overpowering) so next time i'll include the breast. i didn't make gravy 'coz we're the type who'd dip anything into calamansi & soy sauce and sadly, i don't have any leftover for the empanada. i'm surprised! my husband and i could literally finish a 4-pounder chicken in minutes! :-)
by the way, we grow rosemary in our backyard...can i use fresh rosemary instead? thanks manang for this, i'm glad i found your site.
Hi carmel,
You probably could use rosemary, but maybe in smaller amount. Glad you liked this recipe. I am envious of your convection oven! I bet the skin was crispier!
My husband is more inclined to having just freshly milled pepper and kosher salt over the breast part, it seems. Although when I tried rubbing the rosemary-garlic paste over breast meat, he did not say it was overpowering.
Post a Comment